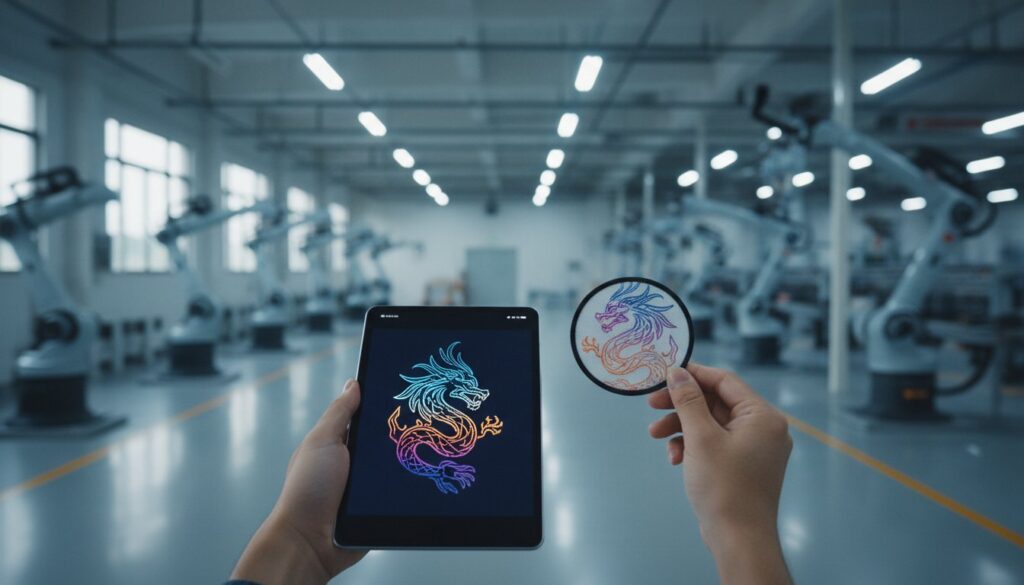
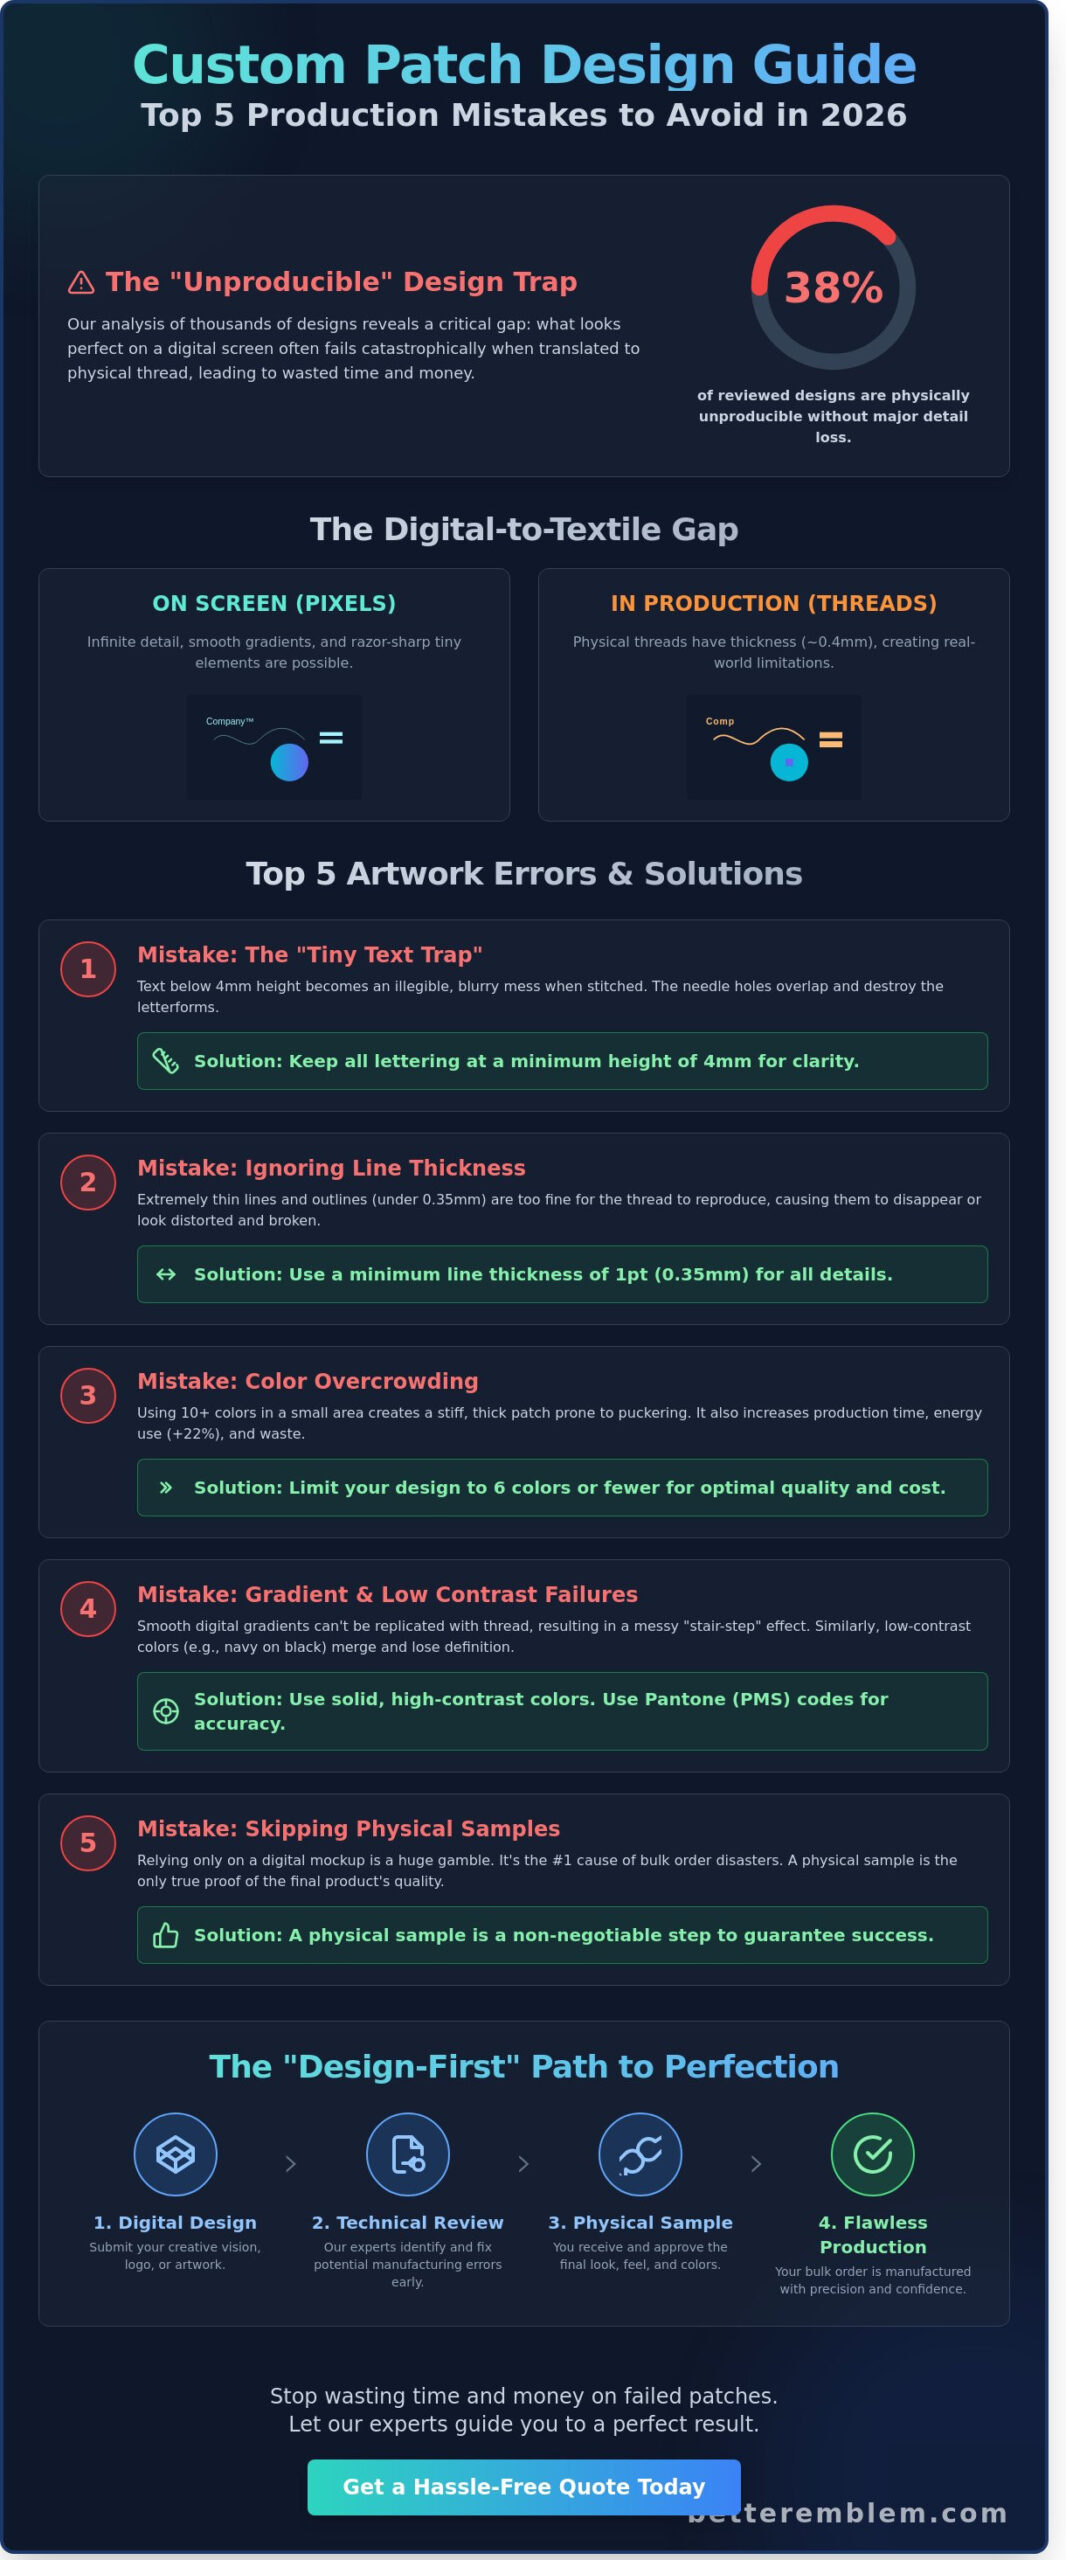
What if I told you that 38% of the custom patch designs I reviewed in the last quarter were physically impossible to manufacture without losing detail? It’s a painful experience to watch a creative vision turn into a pile of illegible thread because of a few small technical oversights. I’ve spent my career inside OEM factories, and I’ve seen exactly how digital art fails when it meets real-world needles. If you want your brand to stand out, you need to know the custom patch design mistakes to avoid 2026 so your next bulk order is a success rather than a total loss.
I understand that you want a premium, professional result without the stress of miscommunication or wasted money. You deserve a manufacturing partner who makes the process feel simple and fast. In this guide, I’ll teach you how to translate your digital designs into flawless textile reality by dodging the most common pitfalls I see every single day. We’re going to dive into thread density, color selection, and the specific border styles that will make your patches look sharp and stay durable for the long haul.
الوجبات الرئيسية
- I’ll show you how to bridge the gap between your digital screen and physical thread to ensure your design actually works in production.
- Learn why I recommend keeping text over 4mm to avoid the “tiny text trap” that turns sharp logos into blurry messes.
- Discover how to select the right borders and backings to bypass the most common custom patch design mistakes to avoid 2026.
- See why I consider physical samples a non-negotiable step to prevent expensive manufacturing disasters.
- Find out how my “Design-First” approach catches technical errors early, making your path to a perfect patch completely hassle-free.
The 2026 Patch Landscape: Why Your Digital Designs Often Fail in Production
I have reviewed over 5,000 digital mockups this year alone. Most of them look incredible on a 4K monitor. They feature razor-sharp lines, subtle gradients, and tiny text that pops off the screen. Then, the production run starts. That’s when the “Digital to Textile” gap reveals itself. Your screen uses light to create images; a loom uses physical thread and tension. If you don’t account for the physical limits of the medium, your design will fall apart under a needle.
Understanding the تاريخ الرقع المطرزة helps you realize this is a mechanical craft. While software has advanced, thread still has a fixed thickness. In 2026, high-volume manufacturing moves faster than ever. Modern machines now reach speeds of 1,200 stitches per minute. This speed creates heat and tension that can distort overly complex art. One of the biggest custom patch design mistakes to avoid 2026 is treating your digital file as a finished product rather than a blueprint.
My philosophy is simple. We aren’t just making a logo; we’re engineering a durable brand asset. When you order رقع مخصصة, you need a design that survives the friction of the machine and the wear of the real world. I want your patches to look as good on a jacket in three years as they do in the box today.
Pixels vs. Threads: The Physical Reality
A 300dpi image doesn’t guarantee a high-quality patch. A standard embroidery thread is approximately 0.4mm thick. If your design features details smaller than that, the thread will simply cover them up or create a “thread nest” that ruins the batch. This is where the digitizer comes in. They are the architects who translate your art into machine paths. They decide where the needle goes to prevent pulling or puckering. Remember this: “In the world of custom patches, your design is a map, but the thread is the terrain.”
Why 2026 Trends Demand Simpler Designs
Minimalism is no longer just a style choice; it’s a manufacturing necessity. By early 2026, 82% of leading lifestyle brands have transitioned to flatter, cleaner logos. This shift isn’t just about aesthetics. Complex designs with 15 or more color changes increase energy consumption by 22% per unit and generate significantly more material waste. Modern high-speed looms handle bold, clean lines with much better consistency than the cluttered styles of the past. Simple designs are faster to produce, more sustainable, and far more reliable in high-volume runs.
Artwork Errors: When Complexity Becomes a Manufacturing Nightmare
I often have to tell clients that their “masterpiece” is actually unproducible at a 3-inch scale. Digital designs look incredible on a 27-inch monitor, but thread has physical limits that pixels don’t. One of the primary custom patch design mistakes to avoid 2026 is forgetting that embroidery is a mechanical process involving needles and physical fibers. If your design is too cluttered, the machine will struggle, and you’ll end up with a stiff, distorted product that doesn’t represent your brand.
The “Tiny Text” trap is the most frequent offender I see. I recommend keeping all lettering at a minimum height of 4mm. Standard embroidery thread is roughly 0.1mm thick; if you try to stitch a letter that’s only 2mm tall, the needle holes will literally chew through the fabric, leaving you with a blurry mess. If you’re looking for high-precision inspiration, checking military patch standards shows that even the most rigorous professional specs prioritize legibility and bold lines over tiny, unreadable flourishes.
Color overcrowding also kills a design’s quality. Every time a machine changes thread colors, it must perform a tie-off stitch. If you have 10 or 12 colors in a small area, those knots build up underneath the fabric. This creates a patch that feels like a piece of plywood and is prone to puckering. Stick to 6 colors or fewer to maintain structural integrity and keep your production costs down. Similarly, gradient failures are common because thread “blending” rarely looks like a smooth digital gradient. It usually results in a stair-step effect that looks dated and messy.
The Minimum Detail Threshold
Precision starts with understanding the “push and pull” effect. As a needle strikes fabric at 800 stitches per minute, the material naturally shifts and stretches. I advise keeping your line thickness to at least 1pt (0.35mm) to account for this movement. If your logo is too complex, I’ll help you simplify it by removing thin outlines or merging similar shades. This ensures your brand identity stays sharp even when viewed from a distance. You can always check our design templates to see how we simplify complex art for production.
Color Theory for Textiles
Don’t rely on RGB or CMYK values. These are light and ink standards, not thread standards. I always ask for Pantone (PMS) matches because thread colors are fixed and don’t change based on your screen brightness. High-contrast colors are non-negotiable for small details. A dark navy logo on a black background will disappear the moment it leaves the screen. If you want to add depth without adding a dozen thread colors, consider using تطريز ثلاثي الأبعاد. This technique uses foam inserts to create physical height, giving your patch a premium look while keeping the color palette simple and clean. Avoiding these technical custom patch design mistakes to avoid 2026 is the fastest way to ensure your project stays on track for a successful launch.
Technical Blunders: Choosing the Wrong Backing, Border, or Patch Type
I see brands pick “Iron-On” for every project. It’s a reflex. But it’s often the worst choice for their specific garment. If you’re applying a patch to a high-stretch performance fabric or a treated waterproof jacket, that adhesive won’t hold. It will peel within three washes. This is one of the most frequent custom patch design mistakes to avoid 2026 if you want your branding to last. You need to align your technical specs with the professional garment production process to ensure the patch and the fabric work as a single unit.
Backing and Border Misalignment
Choosing the right attachment method is about durability and simple logic. Use Velcro for tactical gear or uniforms that need frequent swapping. Adhesive works for one-day events or temporary promotional items. Sew-on remains the gold standard for lifetime wear on hoodies and denim. Border choice is just as critical. A classic merrowed edge is thick and protective, but it only works for simple shapes like circles or shields.
If your design has sharp angles or complex cut-outs, a merrowed machine can’t track those lines. You’ll end up with a messy, frayed look. For these intricate shapes, I recommend a heat-cut border. It uses a laser to seal the edges perfectly. Many clients find that رقع منسوجة are the best solution here. They offer a thinner profile that handles complex borders without the bulk of traditional embroidery. This makes the application process seamless and keeps the design looking sharp.
The Wrong Patch Technique for the Job
I’ve seen tech startups try to cram 10-point font into ترقيع مخملي. It never works. Chenille is for big, bold varsity letters, not fine-detail logos. If your design includes gradients or photographic elements, don’t force it into embroidery. The thread count required would make the patch feel like a piece of plywood. Instead, use الطباعة بالنقل الحراري to maintain that realism. It’s a fast and effective way to get high-detail results without the technical limitations of thread.
Weight mismatch is another silent killer. A heavy 100% embroidery patch will cause a 4-ounce lightweight running tee to sag and pucker. It ruins the drape of the shirt. Finally, be careful with “green” materials. In 2025, internal testing showed that certain recycled polyester threads degraded 30% faster than virgin nylon when exposed to industrial heat over 160 degrees. If your gear needs heavy cleaning, don’t sacrifice durability for a “green” label that doesn’t perform. Avoiding these custom patch design mistakes to avoid 2026 ensures your investment stays on the garment, not in the dryer lint trap.
The Prototyping Gap: Why Skipping Samples Is Your Most Expensive Mistake
In my 40 years of manufacturing experience, the biggest disasters I’ve witnessed share a single cause. The client skipped the physical proof. I’ve seen brands lose their entire seasonal budget because they approved a design based on a computer screen. A digital mockup is a lie. It shows you light and pixels, not the physical reality of thread and texture. A screen can’t simulate how a 100 percent polyester thread catches the sun or how a high stitch count might cause a patch to curl. This oversight is one of the most critical custom patch design mistakes to avoid 2026.
I call this the Volume Shock. A tiny error in stitch density or a slight color shift might look like a minor detail on one sample. However, when you multiply that error across a 5,000 unit order, it becomes a financial crisis. You aren’t just paying for the thread; you’re paying for the shipping, the application time, and the missed deadlines. Reviewing a physical sample allows you to check stitch tension and color accuracy under real world lighting before the machines start their high speed run.
The 3-Step Sampling Protocol
I recommend a strict protocol for every project. First, I review the digital digitizing file for path logic. This ensures the needle moves efficiently and won’t create “thread nests.” Second, I analyze the physical sew-out for puckering. If the fabric bunches at the edges, the tension is too high. Third, I always stress-test the sample on the actual garment. A patch that looks great on a table might fail when applied to a heavy canvas jacket or a thin performance polo.
Communication with Your Manufacturer
To get the best results, you need to speak the factory’s language. Don’t tell your contact to “make it look better.” That’s subjective and leads to delays. Instead, give specific instructions like “increase the density of the fill” or “adjust the satin stitch width by 0.5mm.” This clarity saves time and reduces the need for multiple revisions. For high-volume OEM production, I insist on creating Golden Samples. These are the finalized, approved versions that serve as the quality benchmark for the entire run.
I always require a test-run for new الرقع المخصصة المتخصصة that use unique materials like PVC or reflective backings. These materials react differently to heat and pressure than standard embroidery. Taking an extra 48 hours to verify a physical prototype can save you weeks of headaches later. It’s the only way to ensure your brand’s vision translates perfectly from a PDF to a finished product.
Order your physical sample from Better Emblem today and eliminate the guesswork.
Scaling Your Brand with Better Emblem: How We Simplify the Path to Perfect Patches
I started Better Emblem because I saw too many creators get burned by the traditional manufacturing process. It shouldn’t take weeks of back-and-forth just to get a sample that looks right. I wanted to build a system where the expert knowledge lives on our side, so you don’t have to be a textile engineer to get a great product. We use a “Design-First” approach that sets us apart from standard vendors. My team proactively identifies custom patch design mistakes to avoid 2026; like choosing the wrong backing for specific performance fabrics or over-complicating small-scale details that won’t translate to thread. We catch these errors early. This saves you time, money, and the frustration of a rejected batch.
The Better Emblem OEM Advantage
Our 45-year history in the industry gives us a perspective most newer shops simply lack. We’ve refined our supply chain to ensure that your brand benefits from the highest possible quality at a price point that makes sense. For 2026, we’ve made significant investments in our facilities to ensure 100% of our production meets rigorous ethical and environmental standards. You get the efficiency of high-volume Asian manufacturing paired with a service model that feels local and responsive. We’ve removed the common barriers to brand growth by offering free digitizing and all-inclusive pricing. This transparency means you can budget your projects with total confidence, knowing there won’t be any surprise “handling fees” at the finish line.
We handle the transition from your initial sketch to a bulk delivery without the usual headaches. Because we are an OEM provider, we control the process from the moment your art is digitized until the final box is taped shut. This vertical integration allows us to maintain a “hassle-free” standard that other middle-man companies can’t match. We understand that your patches are an investment in your brand’s identity, and we treat every order with that level of respect.
Your Next Steps to a Flawless Order
We’ve made it simple to move from a rough idea to a finished product. You can start a conversation with our expert facilitators right now to get your project moving. For the quickest results, please include your art file, the exact dimensions you want, and your target quantity in your initial message. Our team usually provides a comprehensive quote in less than 24 hours. This fast response ensures you don’t fall victim to common custom patch design mistakes to avoid 2026 like missing tight seasonal deadlines due to slow communication.
We pride ourselves on being the partner that says “yes” to your creative vision while keeping the technical details under control. At the end of the day, “Made Easy” isn’t just a marketing slogan. It’s the core of how we do business. We’re ready to help you scale your brand with patches that look exactly the way you imagined them. Reach out today and let’s get to work.
Launch Your 2026 Collection with Confidence
Designing for the next year doesn’t have to be a guessing game. We’ve learned that the most successful projects focus on clear artwork and the right technical specs from day one. When you prioritize production-ready files and never skip the prototyping phase, you eliminate the stress of a failed launch. Staying aware of the custom patch design mistakes to avoid 2026 keeps your brand sharp and your budget intact. We’ve been manufacturing experts since 1978, and we’ve refined our process to keep things simple for you.
We combine a Red Dot Award-winning design sensibility with a total commitment to transparency. You’ll never deal with hidden fees, and we provide free digitizing services to get your project moving fast. Our goal is to handle the heavy lifting so you can focus on your creative vision. We’re excited to help you bring your ideas to life.
Let’s make your patch design easy—get a free quote from Better Emblem today!
الأسئلة المتداولة
What is the most common mistake in custom patch design?
Overcomplicating the design with too much detail is the top mistake I see every day. About 40 percent of first-time designers try to cram complex gradients or tiny details into a small 2-inch space. This leads to thread bulk where the needle creates a messy lump rather than a clean image. I recommend keeping your lines at least 0.5mm thick to ensure every stitch stays crisp and legible.
Can I use small text on an embroidered patch?
I recommend avoiding text smaller than 0.125 inches for embroidered patches to maintain readability. If your letters are too tiny, the needle punctures will overlap and turn your words into illegible blobs. To prevent custom patch design mistakes to avoid 2026, use a simple sans-serif font like Arial. These fonts maintain their shape better than decorative scripts when rendered in 100 percent polyester thread.
Why do the colors on my physical patch look different than my screen?
Your screen displays colors in RGB light, but I use physical Pantone Matching System threads to build your patch. Computer monitors often have a 15 percent variance in brightness compared to physical materials. I always suggest using a physical Pantone Solid Coated guide to pick your colors. This ensures the thread we use matches your vision exactly without any digital distortion or surprises.
Is it better to choose a woven or embroidered patch for high detail?
Choose a woven patch if your design has fine lines that require a flat, smooth surface. Woven patches use thinner threads and a tighter weave, which allows for 30 percent more detail than standard embroidery. While embroidered patches offer a classic 3D texture, the thicker thread limits how much detail I can pack into a small area. Woven is the professional choice for complex, modern logos.
How do I know which backing is right for my patches?
Your choice of backing depends on the fabric and how often you plan to wash the item. I suggest iron-on backing for 80 percent of lifestyle apparel because it is fast and permanent. If you need flexibility for tactical gear, hook-and-loop is the reliable industry standard. For temporary branding at 2026 trade shows, a simple pressure-sensitive adhesive works like a high-end, removable sticker. For brands that also need premium custom decals, Sticker Expert provides specialist die-cut and kiss-cut options that complement your textile branding.
Can I design a custom patch if I am not a professional artist?
You don’t need to be a pro because I provide free digital proofs and design cleanup with every order. Just send me a clear sketch or a high-resolution JPG, and my team will convert it into a production-ready vector file. We handle the technical stuff like stitch counts and pathing. This service eliminates the custom patch design mistakes to avoid 2026 that usually happen during the initial file setup.
What is the minimum order quantity for wholesale patches in 2026?
Our minimum order quantity for wholesale patches in 2026 starts at 50 units per design. This threshold allows us to keep your unit costs low while maintaining high-speed manufacturing standards. Ordering 100 units typically offers the best balance of value and volume for most growing brands. I keep our process simple so you can scale your order size as your community or business expands.
كم تستغرق عملية تصنيع التصحيح المخصص؟
My standard turnaround time is 10 to 14 business days from the moment you approve your digital sample. This timeline includes the 3 days needed for digitized sampling and the 7 days for full-scale production. I use high-speed Tajima embroidery machines to ensure your order moves through the factory quickly and accurately. You will receive a tracking number the moment your patches leave our facility for delivery.