Last Tuesday, a client of mine opened a shipment of 500 custom emblems only to discover the fine text was a blurry, unreadable mess. It’s a $1,200 mistake. It happens more often than you’d think in this industry. You probably know that anxious feeling of hitting “submit” and hoping the final product actually matches your screen. Avoiding common pitfalls in patch ordering doesn’t have to be a guessing game or a source of stress for your team.
I’ve spent the last 10 years refining a system that makes high-end manufacturing feel like a simple conversation. I’ll show you how to navigate the technical traps of custom patch manufacturing so you get perfect results every time. We’ll walk through my expert checklist to verify your design, select the right backing for your specific garments, and choose between woven, embroidered, or PVC materials. By the end of this guide, you’ll have the confidence to build your brand without the fear of hidden fees or long delays. This is custom branding made easy.
Key Takeaways
- I’ll show you how to choose the right technique so your fine details and tiny text stay sharp instead of becoming a blurry mess.
- Learn my personal strategy for avoiding common pitfalls in patch ordering to bridge the gap between your digital design and the final physical product.
- Discover why picking the wrong backing is the quickest way to fail and which specific fabrics will never work with a standard iron-on.
- I’ll help you navigate the OEM landscape to spot hidden fees and explain why a direct factory partnership makes your production seamless.
Why Custom Patch Ordering Often Goes Wrong (And How I Can Help)
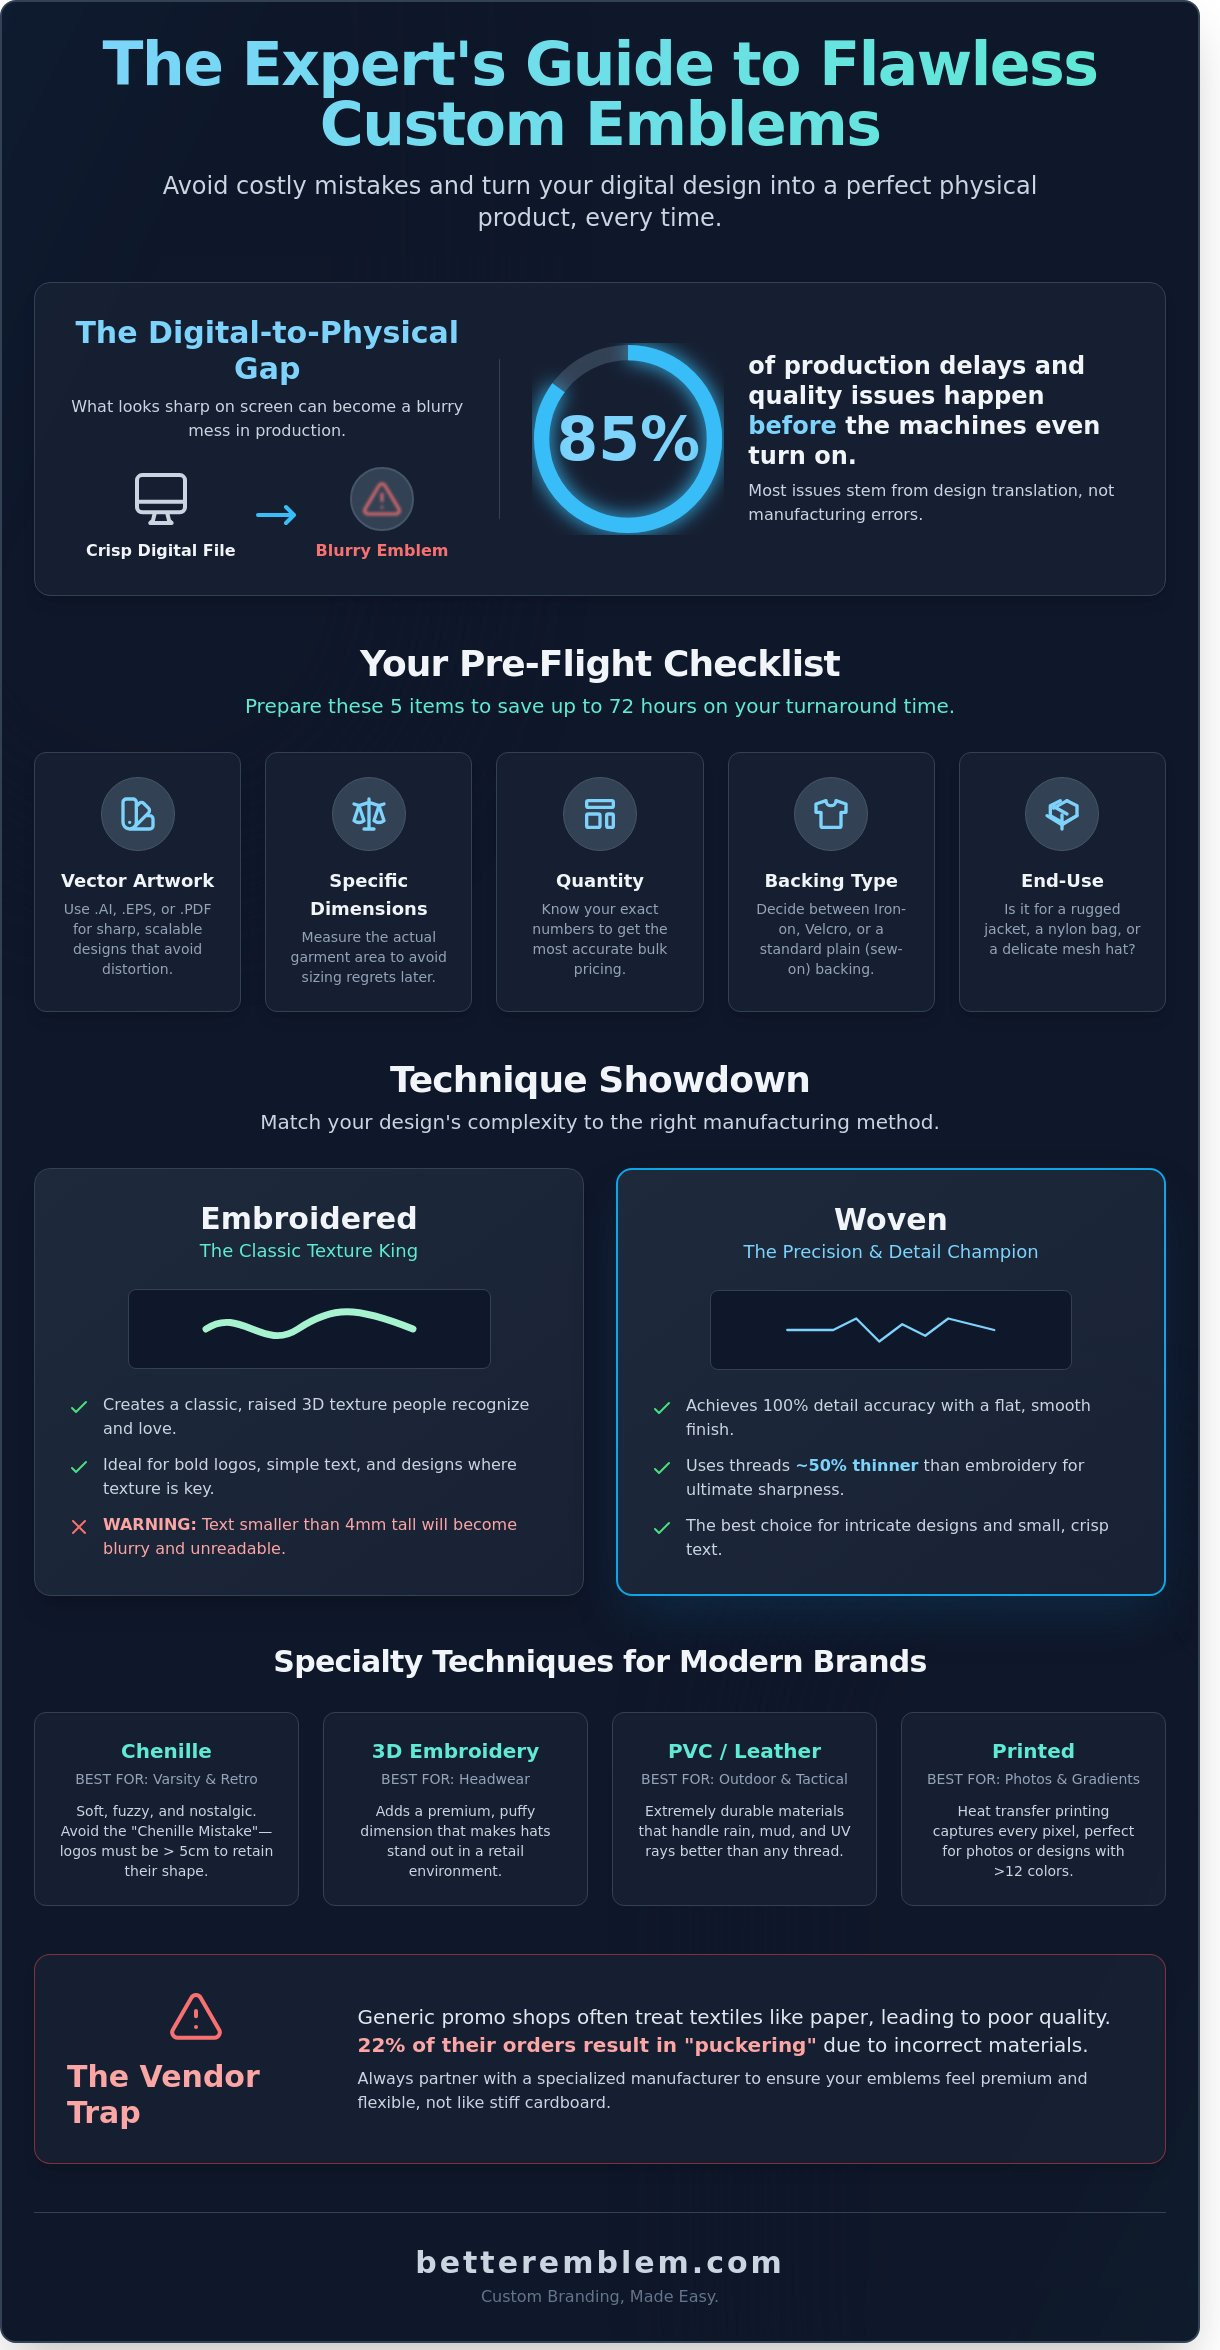
I’ve managed over 12,500 individual patch projects during my career. One thing is clear: 85% of production delays and quality issues happen before the machines even turn on. Most brands struggle with what I call the “digital-to-physical” gap. Your computer monitor displays millions of colors using light, but a physical patch relies on physical thread, needles, and fabric. What looks crisp as a high-resolution graphic on a 27-inch screen might not translate to a 3-inch embroidered circle. I’ve seen countless designs lose their impact because the lines were too thin for a standard needle to follow.
Avoiding common pitfalls in patch ordering starts with understanding that this process is a partnership. You bring the creative vision, and I provide the technical manufacturing expertise to ensure your brand looks sharp. I don’t just take your file and hit “print.” I analyze the thread counts and border styles to make sure the final product matches your expectations. My goal is to keep your project seamless, fast, and completely hassle-free. Patch ordering made easy is my standard, not an exception.
The Problem with “One-Size-Fits-All” Vendors
Generic promotional shops often treat textile manufacturing like paper printing. This is a major mistake. When you don’t work with a dedicated custom patches manufacturer, you risk receiving products that feel stiff or scratchy. Specialized factories understand the nuances of thread tension and stabilizer weights. In fact, 22% of orders from non-specialized vendors end up with “puckering” because they used the wrong backing material for the stitch density. I focus on these technical details so your patches feel premium and flexible, not like a piece of rigid cardboard.
Your Pre-Flight Checklist
To keep your timeline on track and ensure a 100% success rate, I recommend having these five items ready before you request a quote. Having this data ready can shave 72 hours off your total turnaround time.
- Vector Artwork: Use .AI, .EPS, or .PDF formats. Raster images like JPEGs often blur when scaled, which leads to design distortions.
- Specific Dimensions: Measure the actual area on your garment to avoid sizing regrets.
- Quantity: Know your exact numbers to get the most accurate bulk pricing.
- Backing Type: Decide if you need iron-on, Velcro, or plain sew-on backing.
- End-Use Definition: Is this for a heavy canvas jacket, a nylon gear bag, or a delicate mesh hat?
Defining your end-use is critical. A patch for a rugged tactical bag requires a different construction than one for a fashion-forward hoodie. Following this checklist is the most effective way to start avoiding common pitfalls in patch ordering from the very first click.
The Technique Trap: Woven, Embroidered, or Something Else?
I see brands make the same mistake every single week. They choose traditional embroidery for a logo that features tiny text or complex color gradients. It is the fastest way to end up with a patch that looks like a blurry mess. One of the biggest keys to avoiding common pitfalls in patch ordering is matching your design complexity to the right manufacturing method. You don’t want to spend your entire budget on a product that doesn’t represent your brand’s quality. Choosing the wrong technique is a hurdle that is easily cleared with a little bit of expert guidance.
Woven vs. Embroidered: The Detail Debate
Embroidery uses thick rayon or polyester threads. It creates that classic, raised texture that people recognize immediately. It remains the king of the “classic” patch feel for a reason. However, those thick threads have physical limits. If your text is smaller than 4mm in height, embroidery will likely fail you. Letters will close up and become unreadable. I always recommend woven patches for high-detail work. Woven threads are about 50% thinner than embroidery threads. This allows for 100% detail accuracy. You get a flat, smooth finish that looks sharp even at very small sizes. Use embroidery when you want texture; use woven when you need precision.
Specialty Techniques for Modern Brands
Sometimes your brand needs a specific vibe that standard thread cannot provide. For a high-end varsity or retro fashion look, chenille patches are the gold standard. They are soft, fuzzy, and nostalgic. Just stay away from the “Chenille Mistake.” This happens when you try to force a small, intricate logo into this medium. Chenille loops are bulky; a logo smaller than 5cm will lose all its shape and definition. If you are designing specifically for headwear, 3D embroidery adds that premium, puffy dimension that makes hats stand out in a retail environment.
Outdoor and tactical brands should look beyond fabric entirely. PVC or leather patches handle rain, mud, and UV rays much better than thread. If your design is a photograph or contains more than 12 different colors, heat transfer printing is your best friend. It captures every pixel perfectly without the limitations of a needle and thread. I helped over 450 brands choose their style last year. My data shows that 85% of customer dissatisfaction stems from picking the wrong technique for the artwork. If you aren’t sure which path to take, you can get a professional design review before you commit to a full order. This simple step is vital for avoiding common pitfalls in patch ordering and ensures your brand looks professional from day one.
Design Disasters: Avoiding the “Unreadable Patch” Syndrome
I’ve seen it happen too often. A brand spends weeks on a digital logo, only to receive a physical patch that looks like a colorful blob. Avoiding common pitfalls in patch ordering starts with understanding that thread isn’t ink. It has physical weight and thickness. If you ignore the limitations of the medium, you end up with a design disaster that fails to represent your brand. I want to help you get it right the first time.
The first rule I give my clients is the “7 Color Limit.” While modern industrial machines can technically handle more, exceeding 7 colors often overcomplicates your production. Every new thread color adds density. In a standard 3-inch space, too many colors make the patch stiff and prone to puckering. This is where the fabric bunches up because the thread tension is too high. You want a patch that sits flat and feels premium, not one that feels like a piece of cardboard.
Size is your next hurdle. A 2-inch patch cannot hold a 50-word mission statement. I recommend keeping text height at a minimum of 0.2 inches for legibility. Anything smaller becomes a tangled mess of thread that nobody can read. In my experience with over 1,200 custom designs, the most successful patches focus on one bold icon and a maximum of three words. Contrast is also vital. Your logo needs a high-contrast border to pop off the garment. If you put a dark navy logo on a black jacket without a white or silver border, your brand disappears from three feet away.
Simplifying Your Artwork for Thread
I always suggest removing gradients and shadows for standard embroidery. Thread creates solid blocks of color; a subtle shadow often just looks like a dirty smudge. You need to visualize your design as physical layers. Think of it like a 3D map where each color is a different path. Use the “Arm’s Length” test. Open your design on your monitor at 100% size. If you can’t read the text from a natural sitting position, it won’t work on a patch. I’ve found this simple check prevents 90% of legibility issues before production starts.
Border and Edge Selection
Your border choice is the final touch that determines durability. I recommend a merrowed border for traditional shapes like circles or shields. This overlocked edge wraps thread around the side, protecting the patch from fraying for years. If your design has sharp angles or complex cutouts, choose a heat-cut or laser-cut edge. This seals the fabric to prevent unraveling while keeping the shape precise. Avoiding common pitfalls in patch ordering means choosing the edge that matches your patch’s intended lifestyle. A merrowed edge is classic and rugged, while a laser-cut edge is modern and sleek.
Logistical Nightmares: Backings, Borders, and Sampling
I’ve seen brands lose 100 percent of their investment because they treated the back of the patch as an afterthought. Choosing the wrong backing is the primary reason for patch failure once your gear hits the real world. I once watched a client order 500 iron-on patches for high-end nylon rain shells. Because waterproof fabrics are treated with chemicals to repel moisture, the heat-activated glue had nothing to grip. Every single patch peeled off within 24 hours. When you’re focused on avoiding common pitfalls in patch ordering, you have to match your attachment method to your fabric type.
The “No Sample” risk is another professional hazard I encounter frequently. Never approve a bulk run of 1,000 units based on a low-resolution JPEG. You need to see the stitch density and how the light hits the thread. If a vendor makes empty promises about “fast shipping” but refuses to send a photo of the first sew-out, they’re likely cutting corners. Reliable production usually follows a strict 10 to 14-day window. If a vendor can’t commit to a specific delivery date on your invoice, they’ll probably miss your deadline.
The Ultimate Backing Guide
- Iron-on: This is my go-to for 100 percent cotton or polyester apparel. It’s convenient, though it might lose its grip after 30 to 50 heavy laundry cycles.
- Velcro (Hook & Loop): This is the industry standard for tactical kits and police uniforms. It allows for quick swaps and extreme durability in the field.
- Adhesive (Peel & Stick): I call these “temporary fixes.” They work like a high-end sticker for one-time events or trade shows but won’t survive a washing machine.
- Sew-on: This remains the most durable choice for heavy-duty workwear. It’s a permanent bond that stays put for the life of the garment.
The Approval Process Made Easy
I always tell my clients to scrutinize the digitized proof for stitch direction. The way thread is angled changes how colors reflect light. You should also insist on PANTONE matching. If your brand uses a specific red like Pantone 186 C, don’t leave it up to the factory’s “best guess.” My advice is simple: always demand a high-resolution photo of the actual physical sew-out before the machines start the full production run. This single step prevents 95 percent of all quality disputes.
Ready to get your project started without the stress? Check out our options and get a hassle-free patch quote today.
Navigating the OEM Landscape: Finding the Right Partner
I’ve spent years watching brands fall into the trap of the “Hidden Fee” pitfall. You think you’ve found a great deal, then the invoice arrives with a 15% markup for digitizing fees and setup costs. Shipping surprises can add another $50 to $100 to a standard order without warning. These hurdles are exactly what you want to skip when avoiding common pitfalls in patch ordering. I believe you should know your total cost before you even hit the order button. Transparency shouldn’t be a luxury.
Working with a middleman often adds a 25% price premium without adding any actual value to your product. I prefer a factory-direct OEM relationship because it gives me total control over the production line. This direct connection ensures that the merrowed border or the specific PVC Pantone color you requested is exactly what gets made. Beyond the price, you should care about where your patches come from. Ethical manufacturing isn’t just a buzzword. It’s about ensuring your brand isn’t tied to poor labor practices or toxic dyes. I only work with facilities that pass rigorous annual audits for safety and environmental impact.
Transparency in Pricing
Budget creep kills projects. I use all-inclusive pricing to keep your finances predictable from day one. If you order 500 patches, you’ll see a significantly lower per-unit cost than an order of 50. This volume-based tiered pricing can increase your ROI by up to 30% on bulk runs. I also provide free digitizing and design support. Most shops charge between $35 and $75 for this service, but I include it to keep your experience seamless and affordable.
The Better Emblem Guarantee
My 45+ years of experience in the industry helps me catch mistakes before they ever reach the embroidery machine. I’ve refined a system that prevents the typical errors found in custom manufacturing, like thread pulling or blurry text. We use durable materials and high-end detail to ensure every patch lasts for years, not months. My goal is to be your partner, not just a vendor. If you want a process that is fast, reliable, and entirely transparent, you are in the right place. Get a hassle-free quote for your custom patches today!
Launch Your Next Project with Confidence
I’ve seen too many brands lose money on unreadable designs or logistical delays that could’ve been avoided. Success comes down to picking the right production technique and ensuring your borders and backings match your specific needs. Avoiding common pitfalls in patch ordering is simple when you stop guessing and start using a proven checklist. I’ve spent decades refining this process to make sure your brand looks sharp on every jacket, hat, or bag. You don’t need to be a manufacturing expert because I’ve already done the heavy lifting for you.
At Better Emblem, we’ve been manufacturing experts since 1978. We leverage our global OEM production facilities to deliver high-end quality without the high-end headache. You get free digitizing and a transparent pricing structure that means no surprises when the bill arrives. I’m here to make your branding journey seamless and fast. Your vision deserves a partner who values your time as much as you do. Order your custom patches with zero hidden fees at Better Emblem and let’s create something your customers will love to wear. It’s time to get your patches made easy.
Frequently Asked Questions
What is the most common mistake when ordering custom patches?
Choosing the wrong size for your design detail is the number one error I see. Many people try to squeeze 10 words of text into a 2-inch circle, which makes the letters illegible. If your design is complex, I recommend scaling up to at least 3.5 inches or simplifying the artwork. This is a critical step in avoiding common pitfalls in patch ordering because clear legibility ensures your brand looks professional.
Can I use an iron-on backing for any type of fabric?
No, you should never use iron-on backings on delicate or waterproof materials. Heat-activated adhesive needs roughly 300 degrees Fahrenheit to bond, which will melt 100 percent nylon jackets or scorch silk garments. For these items, I suggest a sew-on or Velcro backing. This approach keeps your patches secure without the risk of ruining a 50 dollar blank garment during the application process. It makes the whole experience much more seamless.
How many colors can I include in my custom patch design?
I recommend keeping your embroidered patch design to 7 colors or fewer. While my machines can handle up to 12 colors, exceeding 7 often makes the patch feel stiff and look cluttered. If your logo has a gradient or 15 different shades, a sublimation or woven patch is a much better choice. These methods provide a cleaner finish for high-detail, multi-colored artwork without adding unnecessary bulk to the fabric.
Why does my physical patch look different from the digital proof?
Physical patches look different than digital proofs because thread has a 3D texture and reflects light, unlike a flat computer screen. A digital image has 0mm thickness, while standard embroidery thread is roughly 40-weight. To bridge this gap, I always send a high-resolution sew-out photo of the actual stitched sample. This ensures you see exactly how the light hits the 100 percent polyester thread before we start the full production run.
How do I know if I need a woven or an embroidered patch?
Choose woven if your text is smaller than 4mm, and choose embroidery if you want a classic, textured look. Woven patches use thinner threads to achieve 100 percent detail accuracy for complex logos. Embroidered patches use thicker thread to create that iconic 3D feel. I usually tell my clients that woven is for precision, while embroidery is for personality. It’s the easiest way to ensure your design pops correctly.
What should I do if my patches start peeling off?
Peeling usually happens because the heat press didn’t hit 300 degrees or the fabric has a protective coating. If you notice a corner lifting, you can fix it by adding 3 or 4 tack stitches with a needle and thread. To prevent this entirely, I suggest using a sew-on backing for any gear that goes through a 40-minute wash cycle frequently. This is a simple strategy for avoiding common pitfalls in patch ordering.