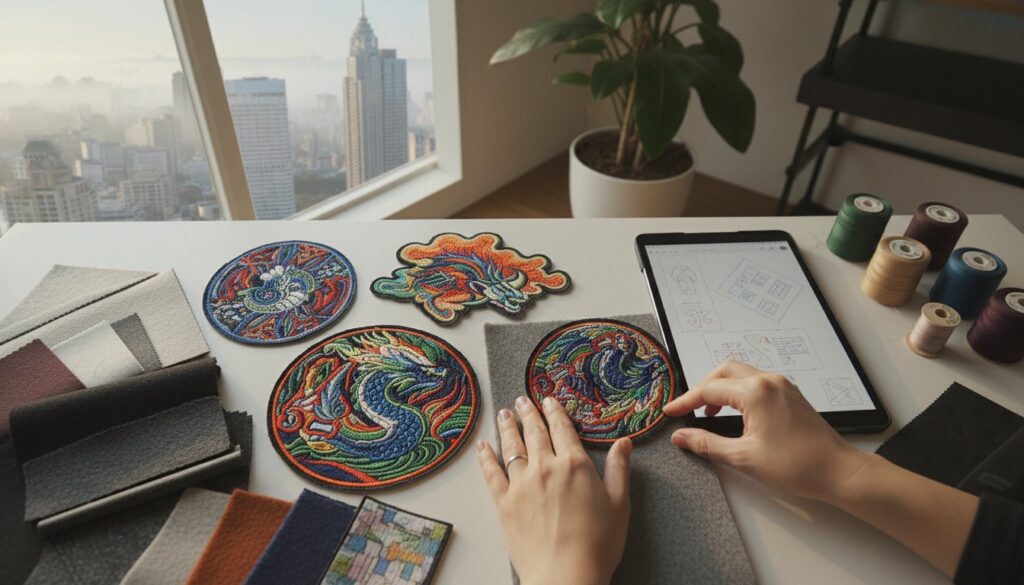
Thinking about a custom embroidered patch but getting stuck on the details? Jargon like “thread coverage” and “backing types” can make a simple project feel complicated. You have a great design, and you’re worried it won’t translate perfectly into thread. Worse, you’re concerned about making a costly mistake on a bulk order. We get it, and we’re here to make it easy.
This is your complete buyer’s guide for 2026. We’ll walk you through every decision, from choosing the right thread to selecting the perfect backing for your needs. You’ll learn how to prepare your artwork for flawless production and understand the key components that make a high-quality patch. This guide gives you the confidence to get your order right the first time, every time.
Stop guessing and start creating. Your perfect patch is just a few simple steps away.
Key Takeaways
- Select the perfect backing and border for your project to ensure your patch is durable and has a professional finish.
- A premium custom embroidered patch is a powerful branding tool. Discover the key components that guarantee a high-impact result.
- Turn your idea into a production-ready design, even without professional art skills, by following a simple artwork checklist.
- Sidestep the common ordering mistakes that lead to costly remakes and get your patches made right the first time.
What Makes a Custom Embroidered Patch Stand Out?
A custom embroidered patch is more than just a logo-it’s artwork created with thread. This technique gives your design a classic, textured dimension that print can’t match. For decades, this timeless appeal has made the Embroidered patch a staple for brands, teams, and organizations looking to add a mark of quality to uniforms, jackets, hats, and bags. While woven patches offer higher detail for complex designs, embroidery provides a bold, durable look with a premium feel that stands the test of time.
The Classic Look: Why Brands Choose Embroidery
Brands choose embroidery for one simple reason: perceived value. The raised texture of the thread gives your logo a tangible quality that feels high-end and permanent. Unlike printed designs that can fade or peel, embroidered patches are built to last, ensuring your brand looks sharp for years. This versatility works for everything from a simple, bold monogram to more complex company crests, making it a reliable choice for any project.
Key Terms Every Buyer Should Know
Understanding a few key terms is the first step to ordering your perfect custom embroidered patch, hassle-free. Getting these details right ensures your final product matches your vision exactly.
- Backing: This is what’s on the back of your patch. It determines how you’ll attach it-options include iron-on, adhesive, velcro, or a simple plastic backing for sewing.
- Border: The finished edge of your patch. A “Merrowed” border is the classic, raised edge for simple shapes, while a “Hot Cut” border is cut precisely to the shape of your design.
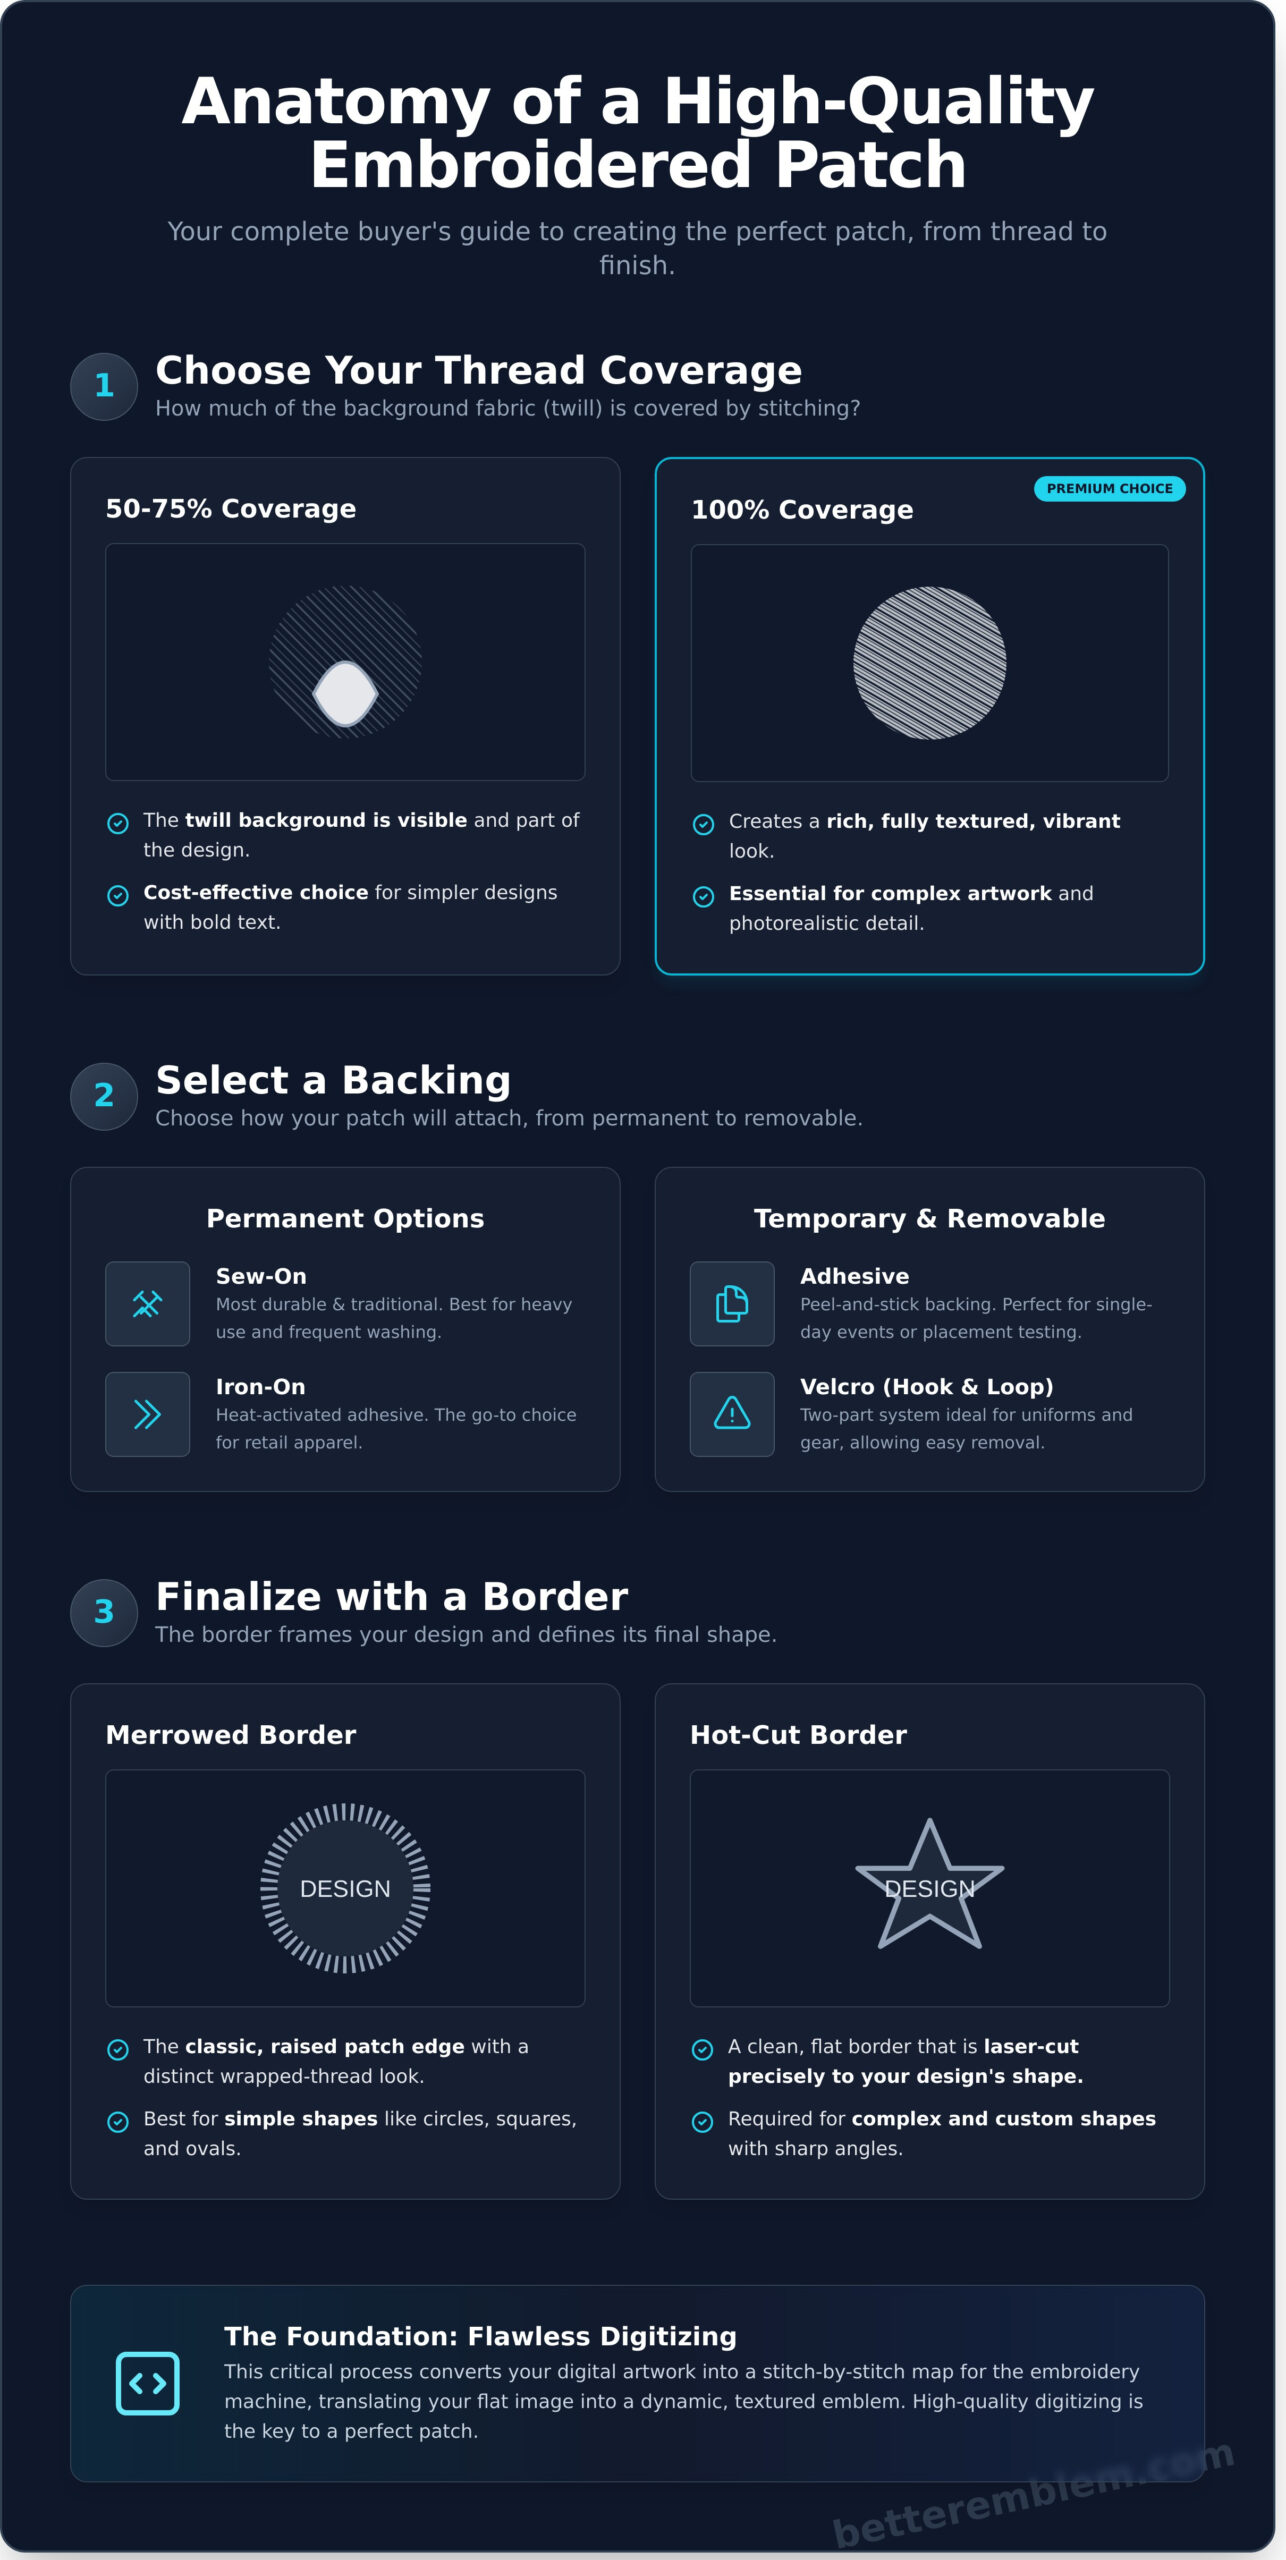
- Thread Coverage: This refers to how much of the twill backing is covered by stitching. 100% coverage creates a solid, vibrant look, while lower percentages (like 75%) let the backing color show through as part of the design.
- Digitizing: The critical process of converting your digital artwork file into a stitch-by-stitch map that an embroidery machine can read.
Flawless digitizing is the foundation of a high-quality embroidered patch; it translates your vision from a flat image into a dynamic, textured emblem.
The Anatomy of a High-Quality Embroidered Patch
Creating the perfect patch means understanding its parts. Every decision-from the thread to the border-shapes the final look, feel, and function of your product. Your choices determine how your patch attaches, how it wears over time, and how accurately it represents your design. Let’s break down the key components so you can build your ideal custom embroidered patch with confidence.
Thread & Coverage: Translating Color and Detail
Your design’s vibrancy comes from two things: thread and coverage. We use durable polyester thread for its strength and colorfastness, and we can match any Pantone (PMS) color to keep your branding exact. Embroidery coverage refers to how much of the fabric background (twill) is covered by thread.
- 50-75% Coverage: Cost-effective for simpler designs with bold text and open space. The twill background is a visible part of the design.
- 100% Coverage: Creates a rich, textured look where the entire surface is covered in thread. This option is essential for complex artwork and photorealistic detail.
Translating a detailed digital file into thread is the core of the modern textile design process, and higher coverage ensures that detail is fully captured. As a rule of thumb: the more intricate your design, the higher the coverage you’ll need.
Backing Options: From Iron-On to Velcro
How will you attach your patch? Your choice of backing depends entirely on its final use. Each option offers a different balance of permanence and flexibility, making your patch work for you.
Permanent Backings
- Sew-On: The most durable and traditional option. Best for items that see heavy use or frequent washing, like workwear or leather goods.
- Iron-On: The go-to for retail apparel. A heat-activated adhesive provides a strong, permanent bond to jackets, hats, and jeans.
Temporary & Removable
- Adhesive: A temporary peel-and-stick backing. Perfect for single-day events, trade shows, or testing placement.
- Velcro: Ideal for uniforms and gear. This two-part system (hook and loop) lets you easily remove and reapply patches.
Border Types: Merrowed vs. Hot-Cut
The border frames your design and defines its shape. You have two excellent choices, and the right one depends on the complexity of your artwork. The difference is immediately clear when you see them side-by-side.
Merrowed Border
This is the classic, raised patch edge. It wraps around simple shapes like circles and squares, creating a clean, traditional look.
Hot-Cut Border
For complex and custom shapes, the hot-cut border is the solution. A laser precisely cuts the patch to your design’s outline, sealing the edges.
Designing Your Patch: A 4-Step Artwork Guide for Beginners
Turning your idea into a professional custom embroidered patch is simpler than you think. You don’t need to be a graphic designer. This guide breaks down the artwork process into four easy steps, bridging the gap between your concept and a high-quality finished product. Remember, our expert team is here to help refine your design for free, so you can submit your artwork with total confidence.
Step 1: Simplify Your Artwork for Thread
Embroidery uses physical thread, not ink, which means your design needs to be adapted for the medium. For the best results, think bold and simple. Complex details like gradients and shadows don’t translate well into stitches, often looking muddy or unclear. Focus on what makes a design pop.
- Use strong lines and distinct, solid color blocks. This creates a clean, professional look.
- Avoid photographic elements, color gradients, and drop shadows. They can’t be replicated with thread.
- Ensure all text is at least 4mm high (about 0.16 inches) to remain crisp and legible.
Following these simple rules ensures your final patch is sharp, vibrant, and impactful.
Step 2: Choose the Right Size and Shape
The perfect patch size depends entirely on its destination. Before you decide, measure the application area on your garment or accessory. A 3-inch patch fits perfectly on the front of a cap, while a jacket back can handle a large 10-inch design. The size directly impacts the level of detail we can achieve-bigger patches allow for more intricate artwork. For custom shapes with sharp angles or interior cut-outs, we use a hot-cut border to create a precise, sealed edge.
Step 3: Submitting Your File for a Flawless Proof
You can send us almost any standard art file. We make the process fast and hassle-free. For the quickest turnaround, we recommend vector files, but high-resolution images work great, too.
- Preferred Formats: AI, EPS, PDF
- Also Accepted: High-resolution JPG, PNG, PSD
After you submit, we’ll create a digital proof. This is a realistic mockup showing exactly how your design will be stitched. It’s your critical chance to review and approve every detail before production begins. Have a design ready? Get a free quote and digital proof today!
Step 4: Review and Approve with Our Experts
This is where our partnership truly begins-you’re not on your own. Our in-house design team reviews every single submission to ensure it will produce a fantastic custom embroidered patch. If we spot an element that won’t embroider well, like text that’s too small or a line that’s too thin, we’ll suggest a simple fix to guarantee a flawless result. This final check removes all the guesswork and ensures your patches will look incredible.
Common Pitfalls: 3 Mistakes to Avoid When Ordering Patches
Ordering custom products can feel like a risk. You have a vision, but what if the final product doesn’t match it? Don’t worry. Most issues are completely avoidable with a little expert guidance. We see these common mistakes all the time, and we’ve built our process to help you sidestep them completely.
Think of these not as mistakes, but as the final details that turn a good patch into a great one.
Mistake #1: Overly Complex Designs & Tiny Text
Every custom embroidered patch starts with a great design, but not all digital art translates perfectly to thread. Thread has a physical thickness, which means extremely fine lines, tiny gradients, and small text can become blurry or unreadable.
DESIGN EXAMPLE:
Imagine a complex logo with thin, wispy lines and tiny “TM” text. (BAD)
Now, imagine that same logo with slightly thicker, bolder lines and the “TM” removed or enlarged. (GOOD)
For clear results, we recommend text be at least 0.25 inches high. Our design team reviews every piece of art for free, suggesting simple tweaks to ensure your design looks sharp and professional.
Mistake #2: Ignoring Thread Coverage Percentage
Thread coverage refers to how much of the twill backing is covered by embroidery. Choosing the wrong percentage can impact both your budget and your patch’s final look. A simple design with bold text doesn’t need 100% coverage; you’d be paying for stitching you don’t need. Conversely, a highly detailed illustration with 50% coverage can look sparse and unfinished. Our experts will recommend the optimal coverage for your specific artwork, giving you the best look without unnecessary cost.
Mistake #3: Choosing the Wrong Backing for the Garment
The right backing makes your patch last. The wrong one can lead to damage or disappointment. It’s crucial to match the backing to the material you’re applying it to.
- Iron-On: This is a fantastic, easy option for cotton and denim. However, you should never use it on heat-sensitive materials like nylon, leather, or certain polyesters. The high heat required for application can melt or damage the fabric.
- Sew-On: For maximum durability, nothing beats a sew-on patch. This is the only truly permanent application and is recommended for items that will be washed frequently or put under heavy stress, like workwear or bags.
- Adhesive (Peel-and-Stick): This is a temporary solution, perfect for a single event or non-permanent branding. It is not designed to withstand a washing machine.
Getting your custom embroidered patch perfect is our job. We guide you through these choices so you can order with total confidence. Ready to start without the guesswork? Get your free quote today.
Get Your Patches Made: The Better Emblem OEM Process
You’ve learned the essentials of great design. Now it’s time to bring your vision to life with a partner you can trust. Moving from concept to a finished custom embroidered patch should be simple and fast. At Better Emblem Company Ltd., we’ve engineered our entire process around that principle. We eliminate the guesswork so you can focus on your brand.
Why Partner with an OEM Manufacturer?
Working directly with an experienced Original Equipment Manufacturer (OEM) means you get unparalleled control and consistency. Since 1978, we have been the trusted production partner for global brands, government agencies, and creative businesses. We manage every step in-house, ensuring superior quality control, perfect material consistency, and guaranteed brand color reproduction. Whether you need 50 pieces or 50,000, our process is built to scale without sacrificing quality.
Our Simple Quote & Proofing Process
We believe getting a quote for your custom embroidered patch should be hassle-free. There are no complex forms and no hidden fees. Just a straightforward path from your design to our production floor, guided by our expert team. Your success is our priority, and our process reflects that commitment.
Here’s how easy it is:
- Step 1: Submit Your Art. Upload your design and tell us your specs. Our team will review it instantly.
- Step 2: Get a Free Quote. We deliver a clear, all-inclusive price with no obligations. What you see is what you pay.
- Step 3: Approve Your Digital Proof. We create a detailed digital sample for your review. You see exactly what you’re getting before production begins.
- Step 4: We Get to Work. Once you approve the proof, we move your order into production. It’s that simple.
Your project deserves professional quality and a seamless experience. Let us handle the details so you can get back to business. Ready to see your design in thread? Get your free quote today.
Your Custom Patches, Made Simple
You now have the complete roadmap to creating an exceptional patch. The key takeaways are simple: focus on high-quality materials, prepare clean and clear artwork, and steer clear of common design mistakes. Following this guide ensures your final custom embroidered patch will look professional and make a lasting impression on anyone who sees it.
Navigating the production process shouldn’t be complicated. That’s where we come in. At Better Emblem, we’ve perfected a seamless OEM manufacturing system trusted by global brands since 1978. We handle the technical details and expert quality control so you can focus on your vision. Our process is built on transparency and support, which is why we offer free artwork assistance and digital proofs with every order.
Ready to bring your idea to life? Turn your design into a high-quality emblem with a partner you can trust. Get Your Free Quote & Digital Proof today and see how easy it is.
Your brand’s next great emblem is just a click away.
Frequently Asked Questions
What is the minimum order quantity for custom embroidered patches?
We make ordering easy with a low minimum of just 50 patches. This quantity ensures you get the best value, as it covers the custom setup for your unique design. Ordering in bulk always provides a better price per patch. If your project requires a smaller quantity, reach out to our team. We’re here to find a solution that works for you and gets your project moving forward without a hassle.
How much do custom embroidered patches cost?
The price of your patch depends on a few key factors: its size, the number of thread colors, your order quantity, and the backing type you choose. Larger, more complex designs naturally cost more. The best way to get an exact price is to request a free, instant quote. We provide all-inclusive pricing with no hidden fees, so the price you see on your quote is the price you pay. Guaranteed.
How long does it take to get my custom patches?
You get your patches fast. Our standard turnaround is approximately 10-14 business days, from the moment you approve your digital proof to the day they arrive at your door. This includes both production and shipping. If you’re facing a tight deadline, we also offer rush production and expedited shipping options. Your free quote will include a precise timeline so you know exactly when to expect your order.
Can you embroider a photograph onto a patch?
Embroidery uses thread, which can’t replicate the smooth gradients and photorealistic detail of a photograph. For these types of images, we recommend a dye-sublimated patch. This modern process prints your image directly onto the fabric, capturing every detail and color with perfect clarity. It’s the ideal solution for turning complex artwork or photos into a crisp, vibrant, and durable patch.
What’s the difference between embroidered and woven patches?
The key difference is detail and texture. Embroidered patches have a classic, raised texture from thicker thread, making them perfect for bold logos and text. Woven patches use thinner threads for a tight weave, creating a flat, smooth surface. This allows them to capture extremely intricate details and small lettering that embroidery cannot. Think of embroidery as painting with a thick brush and woven as drawing with a fine-point pen.
How do I apply an iron-on patch correctly?
Applying your iron-on patch is simple. First, set your home iron to a high-heat, no-steam setting (around 350°F / 175°C). Place your garment on a flat, heat-resistant surface and position the patch. Cover it with a thin cloth and press down firmly with the iron for 15-20 seconds. Let it cool completely before checking the bond. For a permanent hold on frequently washed items, we also recommend adding a few stitches around the edges.
Will my patch look exactly like the digital proof?
Your digital proof is a precise blueprint for our machines, showing placement, colors, and dimensions. While we match thread colors as closely as possible, the final patch will have a tangible texture and light-reflecting quality that a flat screen can’t fully capture. Colors may also vary slightly due to monitor settings. Our experts guarantee your patch will be a high-quality, accurate representation of the approved proof.
What is ‘digitizing’ and why is there a fee for it?
Digitizing converts your art file (like a JPG or PNG) into a special stitch file our embroidery machines can read. A technician manually maps out every single stitch and color path to create your custom embroidered patch. This expert process is crucial for quality and ensures your design is translated perfectly into thread. The one-time digitizing fee covers this foundational setup for your specific artwork, making a professional result possible.