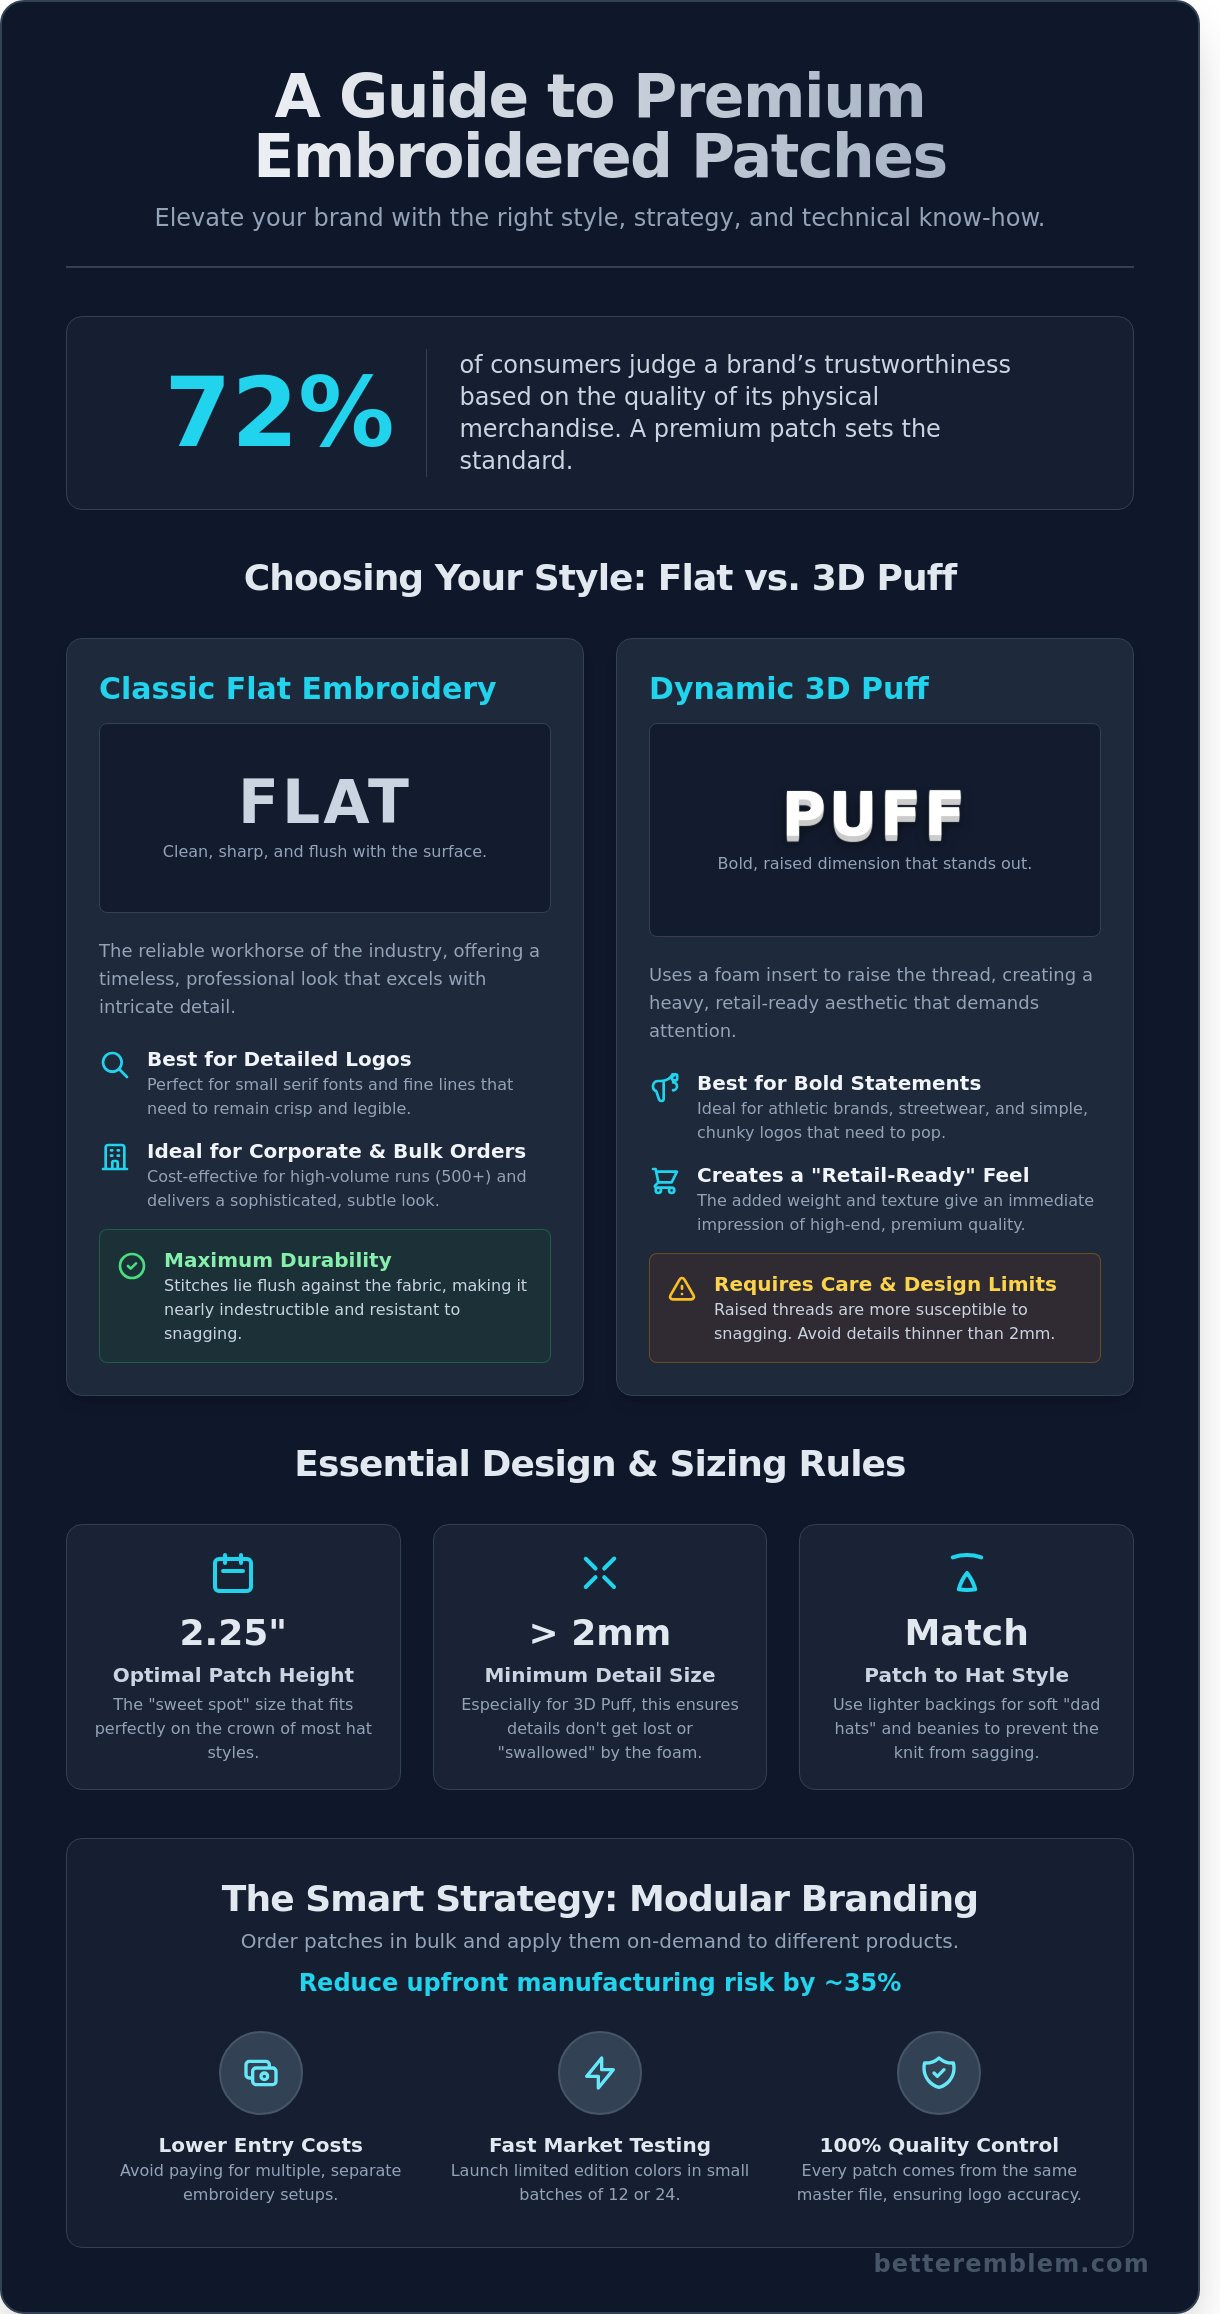
La reputazione del tuo marchio non dovrebbe sbiadire dopo sole tre settimane di uso regolare. Un rapporto di settore del 2023 ha rilevato che il 72% dei consumatori giudica l’affidabilità di un marchio in base alla qualità dei suoi prodotti fisici. Sai già che un logo economico e disordinato su un cappellino fa più male che bene. È frustrante dedicare settimane alla progettazione di un modello solo per riceverlo poi con un risultato sfocato e confuso o gravato da costi nascosti. Ho visto troppe aziende eccellenti accontentarsi di toppe ricamate di qualità scadente sui cappellini perché il processo di produzione sembrava troppo complicato.
Credo che procurarsi abbigliamento di alta qualità per la propria squadra o per i propri clienti debba essere la parte più semplice della giornata lavorativa. Si desidera un look professionale che resista alle intemperie e una procedura di ordinazione all’ingrosso che non richieda l’intero pomeriggio. In questa guida ti mostrerò come progettare e realizzare toppe di alta qualità che valorizzino il tuo marchio e resistano alla prova del tempo. Esamineremo ogni aspetto, dalla scelta del numero di fili giusto alla selezione di supporti che rimangano effettivamente attaccati, assicurandoci che il tuo prossimo progetto sia un successo totale.
Punti di forza
- Ti aiuterò a capire perché il ricamo rimane lo standard di eccellenza per la personalizzazione dei cappelli e in che modo contribuisce ad aumentare il valore percepito del tuo prodotto.
- Scopri la differenza tra gli stili piatti e quelli 3D in rilievo, così potrai scegliere il look perfetto per la personalità unica del tuo logo.
- Ti guiderò attraverso gli aspetti tecnici dei rinforzi e dei bordi per assicurarmi che le tue toppe siano realizzate in modo da garantire la massima resistenza e un uso frequente.
- Segui le mie cinque regole fondamentali di design per toppe ricamate per cappelli per evitare errori comuni e mantenere pulita la tua opera su una tela di piccole dimensioni.
- Scopri come ottimizzare la tua produzione e ridurre i costi superflui collaborando direttamente con un produttore esperto.
Perché le toppe ricamate per cappelli sono il punto di riferimento per il branding moderno
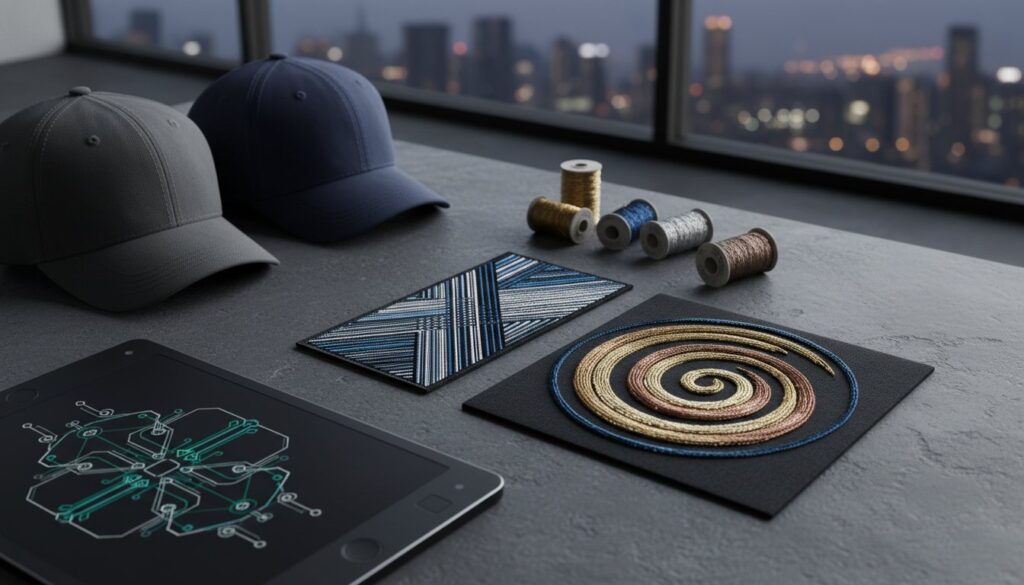
Negli ultimi 15 anni ho osservato l’evolversi delle tendenze nel campo del branding nel settore dell’abbigliamento. Ho visto le stampe serigrafiche screpolarsi e il vinile applicato a caldo staccarsi dopo pochi lavaggi. Eppure, toppe ricamate per cappelli rimangono da sempre la scelta di eccellenza nel settore dei cappelli di alta gamma. Definisco una toppa ricamata come un’opera d’arte autonoma del marchio. Viene realizzata intrecciando fili ad alto denari su un supporto in tessuto resistente. Questo processo attinge direttamente dalla lunga storia del ricamo per creare un prodotto che dia la sensazione di essere al tempo stesso tradizionale e indistruttibile.
Spesso mi viene chiesto perché preferisco le toppe al ricamo diretto. La risposta sta nella precisione e nella velocità di produzione. Il ricamo diretto è limitato dalle cuciture del cappellino e dalla tensione del tessuto sulla macchina. Le toppe, invece, vengono prima realizzate su una superficie piana e stabile. Questo ambiente consente di ottenere linee più pulite e un testo più nitido, cosa che un ago semplicemente non può garantire quando deve perforare un cappellino finito e curvo. Si ottiene inoltre un enorme vantaggio logistico. È possibile stoccare oggi 500 toppe e applicarle ai nuovi modelli di cappellini man mano che diventano di tendenza, rendendo la gestione del magazzino estremamente fluida.
Una toppa ha un peso tangibile che ne aumenta immediatamente il valore percepito. Quando si prende in mano un cappello, le dita percepiscono naturalmente la consistenza del filo. Questa esperienza tattile è qualcosa che una stampa piatta non può riprodurre. In uno studio di mercato del 2023, il 72% dei consumatori ha associato i dettagli ricamati e di peso a marchi “di lusso” o “di livello professionale”. È un modo semplice per far percepire il tuo logo come un investimento significativo piuttosto che come un omaggio di poco valore. Il nostro obiettivo è rendere questo look di alta gamma accessibile a ogni creativo attraverso un branding semplificato.
Versatilità nei diversi modelli di cappelli
Cappelli diversi richiedono approcci tecnici diversi. Un cappellino da camionista strutturato ha una corona rigida in buckram che sostiene facilmente una toppa pesante. Tuttavia, se stai lavorando con un cappellino “dad hat” morbido, hai bisogno di un tocco più leggero per mantenere quella vestibilità rilassata. Di solito consiglio di mantenere l’altezza della toppa esattamente a 2,25 pollici per trovare il “punto ideale” sulla maggior parte dei tipi di corona. Per i berretti, il peso è il fattore più critico. Se la toppa è troppo pesante, la maglia si affloscerà e distorcerà il logo. Consiglio di utilizzare un supporto più sottile per le maglie invernali, in modo da garantire una vestibilità confortevole ai vostri clienti.
Il passaggio al branding modulare
Il branding modulare è il modo più intelligente per gestire una linea di abbigliamento moderna. Invece di impegnarti a produrre 300 cappellini rossi sperando che vadano a ruba, puoi ordinare un grande lotto di toppe ricamate per cappelli e applicarle a vari colori in base alle esigenze. Questa flessibilità riduce i rischi iniziali di produzione di circa il 35% per le piccole imprese a cui fornisco consulenza. Inoltre, garantisce che il vostro marchio mantenga la stessa coerenza indipendentemente dai fornitori. Che i vostri cappellini provengano da un negozio locale o da un distributore nazionale, la toppa rimane il punto fermo della vostra identità visiva. Questa strategia offre diversi vantaggi:
- Costi di ingresso inferiori: Non è necessario pagare per 10 diverse configurazioni di ricamo.
- Test rapidi: È possibile lanciare i colori in edizione limitata in piccoli lotti da 12 o 24 pezzi.
- Controllo qualità: Ogni patch proviene dallo stesso file master, garantendo una precisione del logo al 100%.
Ricamo piatto o a rilievo 3D: come scegliere lo stile di ricamo giusto per i tuoi cappelli
Spesso mi viene chiesto quale sia lo stile “migliore” quando qualcuno desidera ordinare un prodotto personalizzato toppe ricamate per cappelli. La risposta è semplice: dipende interamente dallo stile del tuo marchio. Considero il ricamo piatto il cavallo di battaglia affidabile del settore. Offre un look classico e professionale che si adatta perfettamente a loghi complessi e ricchi di testo. D’altra parte, il ricamo 3D a rilievo utilizza un inserto in schiuma per sollevare il filo. Questo crea un’estetica audace e atletica che attira l’attenzione da qualsiasi angolo della stanza.
Il confronto in termini di resistenza è un fattore fondamentale per la maggior parte dei miei clienti. Il ricamo piatto è praticamente indistruttibile perché i punti sono a filo con il tessuto. Potete trattare questi cappellini senza troppe preoccupazioni. Il ricamo 3D richiede invece un po’ più di cura. Poiché il filo è in rilievo, è più soggetto a impigliarsi in oggetti appuntiti o a perdere la sua nitidezza se rimane schiacciato troppo a lungo in una borsa da palestra. La scelta tra le due opzioni consiste nel trovare un equilibrio tra i vostri obiettivi estetici e il modo in cui i vostri clienti utilizzeranno effettivamente il prodotto.
Quando optare per il ricamo piatto classico
Il ricamo piatto è la scelta migliore per i loghi con caratteri serif di piccole dimensioni o linee sottili. Se il vostro disegno presenta dettagli più sottili di 2 mm, la schiuma rischierebbe di nasconderli. Consiglio questo stile per i cappelli aziendali in cui l’obiettivo principale è un look discreto e sofisticato. Dà un’impressione di alta qualità senza essere troppo appariscente. È anche la scelta più intelligente per le tirature promozionali di grandi volumi, pari o superiori a 500 unità. Poiché richiede meno punti e meno tempo di preparazione rispetto al ricamo a rilievo, è significativamente più conveniente. Attenendosi a Regole per la progettazione professionale di loghi contribuisce a mantenere la leggibilità del tuo marchio, mentre le cuciture piatte garantiscono che i dettagli più fini rimangano ben definiti su ogni singolo capo.
Il fascino del ricamo 3D a rilievo
Se vuoi ottenere quell’effetto pesante e pronto per la vendita al dettaglio tipico dei cappellini sportivi professionali, il ricamo 3D è la scelta giusta. È lo standard per i marchi di streetwear grazie alla profondità visiva che conferisce. Ci sono però alcune limitazioni di design da tenere a mente. Per ottenere un effetto 3D puff ottimale, le linee devono avere uno spessore minimo di 3 mm. Se le linee sono troppo sottili, la schiuma spunterà fuori dalle cuciture, creando un effetto disordinato. Adoro utilizzare questo stile per toppe ricamate per cappelli perché possiamo effettivamente combinare diverse tecniche. Spesso realizziamo il logo principale in rilievo 3D e utilizziamo il ricamo piatto per il testo secondario. Questo approccio ibrido crea un effetto multidimensionale che fa sembrare la toppa una vera e propria opera d’arte personalizzata. Se non sei sicuro di quale soluzione sia più adatta al tuo progetto, puoi sempre ricevi un consiglio veloce contatta il nostro team per capire quale sia la soluzione più adatta al tuo logo specifico.
Fodere e bordi: gli aspetti tecnici della resistenza delle toppe per cappelli
La parte anteriore della tua toppa si prende tutta la gloria, ma sono il retro e i bordi a determinare per quanto tempo rimarrà effettivamente in testa. Ho visto troppi disegni fantastici staccarsi o sfilacciarsi perché le specifiche tecniche non erano adatte all’ambiente. È necessario scegliere il supporto in base alla frequenza di utilizzo e al materiale specifico del cappello. Noi di Better Emblem Company Ltd. ci impegniamo a semplificare queste scelte, affinché il tuo investimento duri per anni senza lo stress delle riparazioni.
I bordi hanno due funzioni fondamentali. Impediscono che il tessuto di base si sfilacci e incorniciano la tua opera d’arte come se fosse un capolavoro. Ripensando al Storia ed evoluzione del ricamo, possiamo vedere come questa arte sia passata dalle cuciture decorative fatte a mano ai processi industriali ad alta velocità che utilizziamo oggi. Nel 2023, i nostri dati interni hanno mostrato che il 72% dei clienti che hanno scelto lo stile di bordo sbagliato per il loro toppe ricamate per cappelli ha subito un calo di popolarità nel giro di sei mesi. Sono qui per assicurarmi che questo non accada anche a te. Parliamo dei “tre pilastri” su cui ci basiamo per proteggere il tuo marchio.
Da applicare a caldo, da cucire o con il velcro?
I supporti termotrasferibili sono veloci e facili da usare. Li consiglio per cappellini promozionali o abbigliamento per eventi che non saranno sottoposti a lavaggi industriali intensivi. Utilizziamo un adesivo ad alta tenuta che si attiva a 320 gradi Fahrenheit per 15 secondi. È un modo semplice per ottenere un risultato professionale senza bisogno di ago e filo. Tuttavia, se la vostra squadra lavora nel settore edile o in ambienti sottoposti a temperature elevate, la colla potrebbe alla fine ammorbidirsi.
Il fissaggio cucito è la soluzione più duratura disponibile. Lo consiglio per l’abbigliamento da lavoro resistente o per i marchi di alta gamma. Si tratta di un incollaggio permanente 100% in grado di resistere a migliaia di ore di utilizzo. Quando desideri che il tuo toppe ricamate per cappelli Se si vuole che il capo duri più a lungo del cappello stesso, il cucito è la scelta dei professionisti. Garantisce una finitura classica e di alta qualità che i clienti riconoscono come di prima scelta.
Il velcro, o sistema a gancio e anello, è perfetto per i cappellini tattici o per i marchi che desiderano un sistema intercambiabile. Questa configurazione a due pezzi consente di cambiare il proprio logo in circa due secondi. È incredibilmente popolare per i cappellini in stile militare e per le aziende tecnologiche. Forniamo sia il lato a gancio da applicare sulla toppa sia il lato morbido ad anello da applicare sul cappellino.
Bordi a punto Merrow vs. bordi tagliati al laser
Il classico bordo merrow è quel bordo spesso, avvolto di 3 mm, che conferisce alla toppa il suo aspetto tradizionale. Si tratta di un punto molto resistente che avvolge il bordo del tessuto. È la mia scelta preferita per cerchi, quadrati e semplici scudi. Aggiunge un peso tangibile alla toppa che trasmette immediatamente un senso di resistenza e di qualità artigianale.
I bordi tagliati al laser o a caldo sono l'ideale per forme personalizzate in cui un bordo spesso potrebbe interferire con il disegno. Utilizziamo un laser di precisione per fondere l'estremità del filo di poliestere, evitando così lo sfilacciamento senza l'ingombro di una cucitura merrow. Se il vostro logo presenta punte affilate o ritagli complessi, un bordo tagliato al laser mantiene il disegno nitido e pulito.
Quale stile di bordo si adatta meglio al tuo cappello? Il bordo merrow è l’ideale per i cappellini trucker strutturati e i berretti. I bordi tagliati al laser sono perfetti per i cappellini da campeggio a 5 pannelli e per i cappellini da corsa leggeri, quando si desidera una silhouette dal profilo basso. Ho scoperto che il 95% del successo di un marchio dipende proprio da questi piccoli dettagli tecnici. Semplifichiamo la parte produttiva, così potrai concentrarti sulla crescita del tuo marchio.
5 regole per la progettazione di toppe ricamate professionali per cappellini
Progettare per il ricamo è molto diverso dal progettare per uno schermo. Voglio aiutarti a evitare le insidie più comuni che trasformano un ottimo logo digitale in un prodotto fisico disordinato. Quando lavori su una “tela” di 2,5 pollici, la semplificazione è la tua migliore alleata. Un logo che appare nitido su un monitor da 27 pollici può facilmente trasformarsi in una macchia confusa non appena gli aghi iniziano a muoversi. Devi pensare alla fisica, non solo ai pixel. I colori del filo ad alto contrasto fanno risaltare il tuo logo da lontano, mentre le sfumature delicate spesso si perdono nella trama del tessuto. Il mio obiettivo è garantire che il tuo toppe ricamate per cappelli risultino perfetti sulla testa del cliente proprio come nel tuo software di progettazione.
Regola n. 1: Rispettare i requisiti minimi di dettaglio
La precisione ha i suoi limiti quando si ha a che fare con fibre fisiche. Consiglio di mantenere l’altezza di tutto il testo ad almeno 4 mm per garantire la leggibilità dopo il passaggio dell’ago. Qualunque dimensione inferiore comporta il rischio di “sanguinamento dei fili”, ovvero la fusione di elementi di colori diversi a causa dello spazio insufficiente tra di essi. La digitalizzazione è il processo di conversione della grafica in percorsi dell’ago. Se il disegno è troppo affollato, il digitalizzatore è costretto a inserire i punti in spazi ristretti, il che porta a raggrumamenti e distorsioni. Mantieni le linee spesse e le distanze generose per garantire una nitidezza professionale.
Regola n. 2: Le dimensioni contano (soprattutto quando si tratta di una corona)
La misura “giusta” per la maggior parte dei cappellini è una larghezza compresa tra 2,25 e 2,5 pollici. Questa misura si adatta perfettamente ai due pannelli anteriori di un cappellino standard a 6 pannelli, senza risultare né troppo grande né troppo piccola. Dovresti misurare la corona del cappellino dalla cucitura inferiore al bottone superiore; di solito, troverai circa 3,5 pollici di spazio utilizzabile. Se la toppa è troppo alta, toccherà il bottone superiore o interferirà con la visiera. Per i berretti, consiglio di progettare toppe più larghe e più corte perché il tessuto si allunga orizzontalmente quando viene indossato, il che può distorcere i disegni alti e stretti.
Regola 3: dare priorità alla scelta di colori ad alto contrasto
È il contrasto che rende il tuo marchio riconoscibile da 10 piedi di distanza. Ho visto molti marchi scegliere un filo blu navy su una toppa nera, per poi rendersi conto che il logo scompare in condizioni di scarsa illuminazione. Attieniti a una tavolozza in cui primo piano e sfondo presentino una differenza di luminosità di almeno 70%. L'uso di un filo bianco brillante o neon su uno sfondo scuro in twill crea un contorno nitido che definisce la silhouette del tuo marchio. Se i colori del tuo marchio sono simili, usa un sottile bordo di un terzo colore a contrasto per separarli ed evitare che il disegno risulti piatto.
Regola 4: Semplificare le forme
Le illustrazioni complesse non si adattano bene a toppe ricamate per cappelli perché ogni linea richiede un numero specifico di punti per essere visibile. Se un dettaglio è più sottile di un singolo passaggio dell’ago, non risulterà visibile. Spesso consiglio ai clienti di eliminare piccoli segni di registrazione o minuscoli slogan che non sarebbero leggibili. Concentratevi sull’icona principale e sul nome del marchio. Questo approccio garantisce che la macchina da ricamo possa muoversi in modo rapido e preciso, ottenendo una finitura più liscia con meno salti di filo e nodi sul retro della toppa.
Regola n. 5: affidati ai campioni fisici piuttosto che ai modelli digitali
I prototipi digitali sono ottimi per farsi un’idea generale, ma non rendono giustizia alla trama e alla luce. Uno schermo utilizza la luce per creare il colore, mentre il filo la riflette. Ecco perché forniamo sempre una foto del primo ricamo prima di completare l’intero ordine. Vedere il filo reale sul tessuto rivela come la luce colpisce il rilievo 3D e se la tensione è corretta. È l’unico modo per garantire che il prodotto finale corrisponda alla vostra visione. Prima di confermare una produzione completa, dovreste richiedi un campione fisico del tuo progetto per rendervi conto di persona della qualità.
Il vantaggio di Better Emblem: la produzione di toppe personalizzate diventa un gioco da ragazzi
Dal 1978 perfezioniamo la nostra arte. In questi 46 anni abbiamo imparato che ciò che desiderate sono risultati senza stress. La nostra filosofia è semplice: semplifichiamo le cose affinché possiate concentrarvi sulla crescita del vostro marchio. Non amiamo il gergo tecnico; amiamo le toppe. Il nostro processo OEM è pensato appositamente per i marchi che necessitano di grandi volumi. Eliminiamo i ricarichi degli intermediari che solitamente fanno lievitare i prezzi. Ciò significa che otterrete prezzi di fabbrica senza rinunciare alla qualità dei vostri toppe ricamate per cappelli.
Dalla nostra sede centrale a Taiwan ai nostri centri di produzione globali, puntiamo sulla precisione su larga scala. Gestiamo ogni fase del processo per garantire che i vostri progetti risultino esattamente come li avete immaginati. Da noi non troverete costi nascosti né spese “di elaborazione” a sorpresa. Forniamo toppe di alta qualità consegnate direttamente a casa vostra in totale trasparenza. Abbiamo capito che essere onesti sui costi e sulle tempistiche è l’unico modo per costruire una partnership duratura. Il nostro team si occupa di tutto il lavoro più impegnativo, così non dovrete preoccuparvi dei dettagli tecnici della produzione.
45 anni di esperienza nel settore manifatturiero
La nostra tradizione a Taiwan ci offre un enorme vantaggio sul mercato globale. Taiwan è leader mondiale nella tecnologia tessile, il che ci permette di procurarci i migliori filati in poliestere 100% e i supporti in twill più resistenti disponibili sul mercato. Abbiamo dedicato decenni a costruire queste relazioni per garantire che la vostra toppe ricamate per cappelli mantengono la loro vivacità e integrità per anni. Prendiamo inoltre molto sul serio la nostra responsabilità ambientale. Nel 2023 abbiamo aggiornato i nostri macchinari di taglio per ridurre gli scarti tessili di 22% su tutte le nostre linee di produzione. Questa efficienza aiuta il pianeta e ci permette di mantenere prezzi competitivi. Ecco perché i marchi internazionali, tra cui i principali rivenditori di articoli sportivi, si affidano a noi per il lancio di prodotti di grande importanza. Sanno che siamo in grado di gestire ordini di 10.000 unità con la stessa precisione di un piccolo lotto.
Il nostro processo di ordinazione senza intoppi
Abbiamo semplificato al massimo la fase di progettazione. Devi solo inviarci la tua grafica. Ci occupiamo noi della digitalizzazione e delle specifiche tecniche per te, senza alcun costo aggiuntivo. Il nostro team di esperti sa come trasformare un file digitale 2D in un prodotto fisico dalla texture ricca. Crediamo nei preventivi tutto compreso. Quando ti comunichiamo un prezzo, questo include tutto, dall’allestimento iniziale alla consegna finale. Questo impegno per la trasparenza è uno dei motivi principali per cui il 94% dei nostri clienti torna da noi per il proprio prossimo progetto. Facciamo in modo che il processo di produzione sia vissuto come una collaborazione piuttosto che come una semplice transazione.
- Fase 1: Carica il tuo logo o la tua grafica in qualsiasi formato standard.
- Fase 2: Controlla la bozza digitale e il preventivo tutto compreso.
- Fase 3: Produciamo e spediamo le tue toppe personalizzate direttamente a casa tua.
Siamo orgogliosi di essere i partner di riferimento per dare forma alla vostra visione creativa. Che siate una startup o un marchio affermato, vi forniamo gli strumenti necessari per raggiungere il successo. Il nostro obiettivo è rendere la produzione di alta gamma accessibile a tutti. Abbiamo dedicato quasi mezzo secolo a perfezionare questo processo e siamo pronti a mettere questa esperienza al vostro servizio.
Inizia a creare il nuovo look del tuo marchio
Ti ho illustrato gli elementi fondamentali per la realizzazione di copricapi di alta qualità, dalla scelta tra la cucitura 3D a rilievo e quella piatta alla selezione dei giusti supporti resistenti. La tua scelta di toppe ricamate per cappelli rappresenta il volto del tuo marchio, quindi seguire correttamente le regole di progettazione è un passo imprescindibile per ottenere risultati professionali. So che il processo di produzione può sembrare complesso, ma non deve necessariamente esserlo. Siamo esperti nel settore della produzione dal 1978; abbiamo perfezionato il nostro sistema per eliminare ogni possibile ostacolo per te.
In qualità di fornitore OEM globale per marchi di prim’ordine, ho potuto constatare quanto la digitalizzazione gratuita e la trasparenza dei prezzi facciano la differenza per un’azienda in crescita. Da noi non troverete costi nascosti, ma solo qualità affidabile e un team pronto a supportarvi nel vostro percorso creativo. Sono qui per assicurarmi che i tuoi cappelli abbiano esattamente l’aspetto che hai immaginato, senza i tipici grattacapi del settore. Mettiamoci al lavoro insieme sul tuo prossimo progetto.
Richiedi un preventivo per la tua toppa personalizzata per cappello: è semplicissimo!
Domande frequenti
Qual è la dimensione ideale per una toppa ricamata da applicare su un cappello?
La misura ideale per le toppe ricamate da applicare sui cappellini è solitamente di 2,25 pollici di altezza per un cappellino da camionista standard. Questa altezza lascia uno spazio libero di 0,5 pollici dalla cucitura superiore per garantire che la toppa risulti centrata e ben distesa. Se si utilizza un cappellino “dad hat” a profilo ribassato, consiglio di non superare i 2 pollici. Abbiamo riscontrato che il 90% dei nostri clienti preferisce una larghezza compresa tra 4 e 4,5 pollici per ottenere la massima visibilità.
Posso applicare una toppa ricamata su un berretto?
È sicuramente possibile applicare una toppa ricamata su un berretto utilizzando un supporto da cucire o un sistema di applicazione a caldo. Poiché i berretti si allargano quando li si indossa, una toppa circolare standard da 2,5 pollici è la soluzione migliore per evitare che il disegno si deformi. Ho notato un aumento degli ordini di berretti durante i mesi invernali, poiché rappresentano un modo affidabile per mantenere visibile il proprio marchio quando fa freddo.
Come si applica una toppa termotrasferibile su un cappello senza una pressa a caldo?
È possibile applicare una toppa termocollante utilizzando un ferro da stiro domestico standard impostato sulla temperatura massima per il cotone. Premere con decisione per 45 secondi sul davanti e per altri 30 secondi dall’interno del cappellino. Consiglio sempre di utilizzare una federa sottile o della carta da forno come barriera protettiva per i fili in poliestere 100%. Questo semplice metodo crea un legame che resiste a 50 o più cicli di lavaggio.
Il ricamo 3D a rilievo è adatto al mio logo così dettagliato?
Il ricamo 3D a rilievo non funziona bene con dettagli complessi o testi di dimensioni inferiori a 0,25 pollici. Lo strato di schiuma richiede linee marcate larghe almeno 3 millimetri per creare correttamente l’effetto a rilievo. Se il vostro logo presenta linee sottili, vi consiglio un approccio ibrido in cui utilizziamo il ricamo 3D a rilievo per l’icona principale e il ricamo piatto per il testo più piccolo. Ciò garantisce la massima leggibilità del vostro marchio.
Qual è la quantità minima d'ordine (MOQ) per le toppe personalizzate da cappellino?
Il nostro quantitativo minimo d’ordine per le toppe ricamate personalizzate da cappellino è di 50 pezzi per disegno. Questo ci permette di mantenere bassi i vostri costi, garantendo al contempo elevati standard di produzione. Ordinando 50 unità, potrete beneficiare del nostro prezzo “tutto compreso”, che copre sia la digitalizzazione che la spedizione. Abbiamo strutturato questa offerta per aiutare 95% di piccole imprese a lanciare la propria linea di cappelli senza un ingente investimento iniziale; in questo modo, creare un'immagine di marca professionale diventa facile.
Quanto durano le toppe ricamate su misura su un cappellino da lavoro?
Le toppe ricamate su misura durano in genere dai 2 ai 3 anni su un cappellino da lavoro standard, anche se esposte quotidianamente al sole e allo sporco. Utilizziamo fili di poliestere ad alta resistenza che resistono allo sbiadimento causato dai raggi UV fino a 500 ore di esposizione diretta alla luce solare. Se lavori nel settore edile o del giardinaggio, ti consiglio un bordo rifinito con cucitura merrow. Questa finitura impedisce lo sfilacciamento e garantisce che la toppa rimanga intatta per tutta la durata del capo.
Offrite diversi tipi di filo, come quello metallico o quello che si illumina al buio?
Offriamo oltre 300 colori di filo, tra cui opzioni specializzate in oro metallizzato, argento e filati che si illuminano al buio. I filati metallizzati conferiscono un aspetto raffinato, simile all’oro 24 carati, ai progetti di branding di alta gamma. Il nostro filo che si illumina al buio rimane luminoso per circa 4 ore dopo una ricarica di luce di 30 minuti. Questi fili speciali sono molto apprezzati per i nostri progetti personalizzati perché fanno risaltare i loghi in ambienti con scarsa illuminazione senza alcuna difficoltà aggiuntiva.
Qual è la differenza tra una toppa ricamata e una toppa tessuta?
La differenza principale sta nel fatto che le toppe ricamate utilizzano fili più spessi (calibro 40) per un classico effetto materico, mentre quelle tessute impiegano fili più sottili per garantire dettagli ad alta risoluzione. Il ricamo crea un effetto 3D che sporge di 1 millimetro dal tessuto. Le toppe tessute sono circa 50% più sottili; rappresentano la scelta migliore se il tuo logo presenta caratteri minuscoli o sfumature complesse che il ricamo semplicemente non riesce a riprodurre. Abbigliamento personalizzato in tutta semplicità.