
A cheap patch can ruin a $35 premium headwear blank in less than 48 hours. You’ve likely seen it happen before; the edges start to lift on a curved surface or the intricate details of a logo turn into a thread-filled mess. It’s frustrating to invest your creative energy into custom patches for hats only to have the final product look like a DIY project gone wrong. I believe branding shouldn’t be a gamble.
I’m going to show you exactly how to choose, design, and manufacture professional-grade patches that survive daily wear and look incredible. We’ll move from your initial sketch to a finished product line using the same high-end techniques that helped 1,200 brands scale their merchandise in 2025. This guide covers everything from picking the right PVC textures to selecting a backing that won’t fail on a structured crown. I’ve simplified the entire process so you can focus on growing your business while we handle the technical heavy lifting. Custom branding is finally made easy.
Key Takeaways
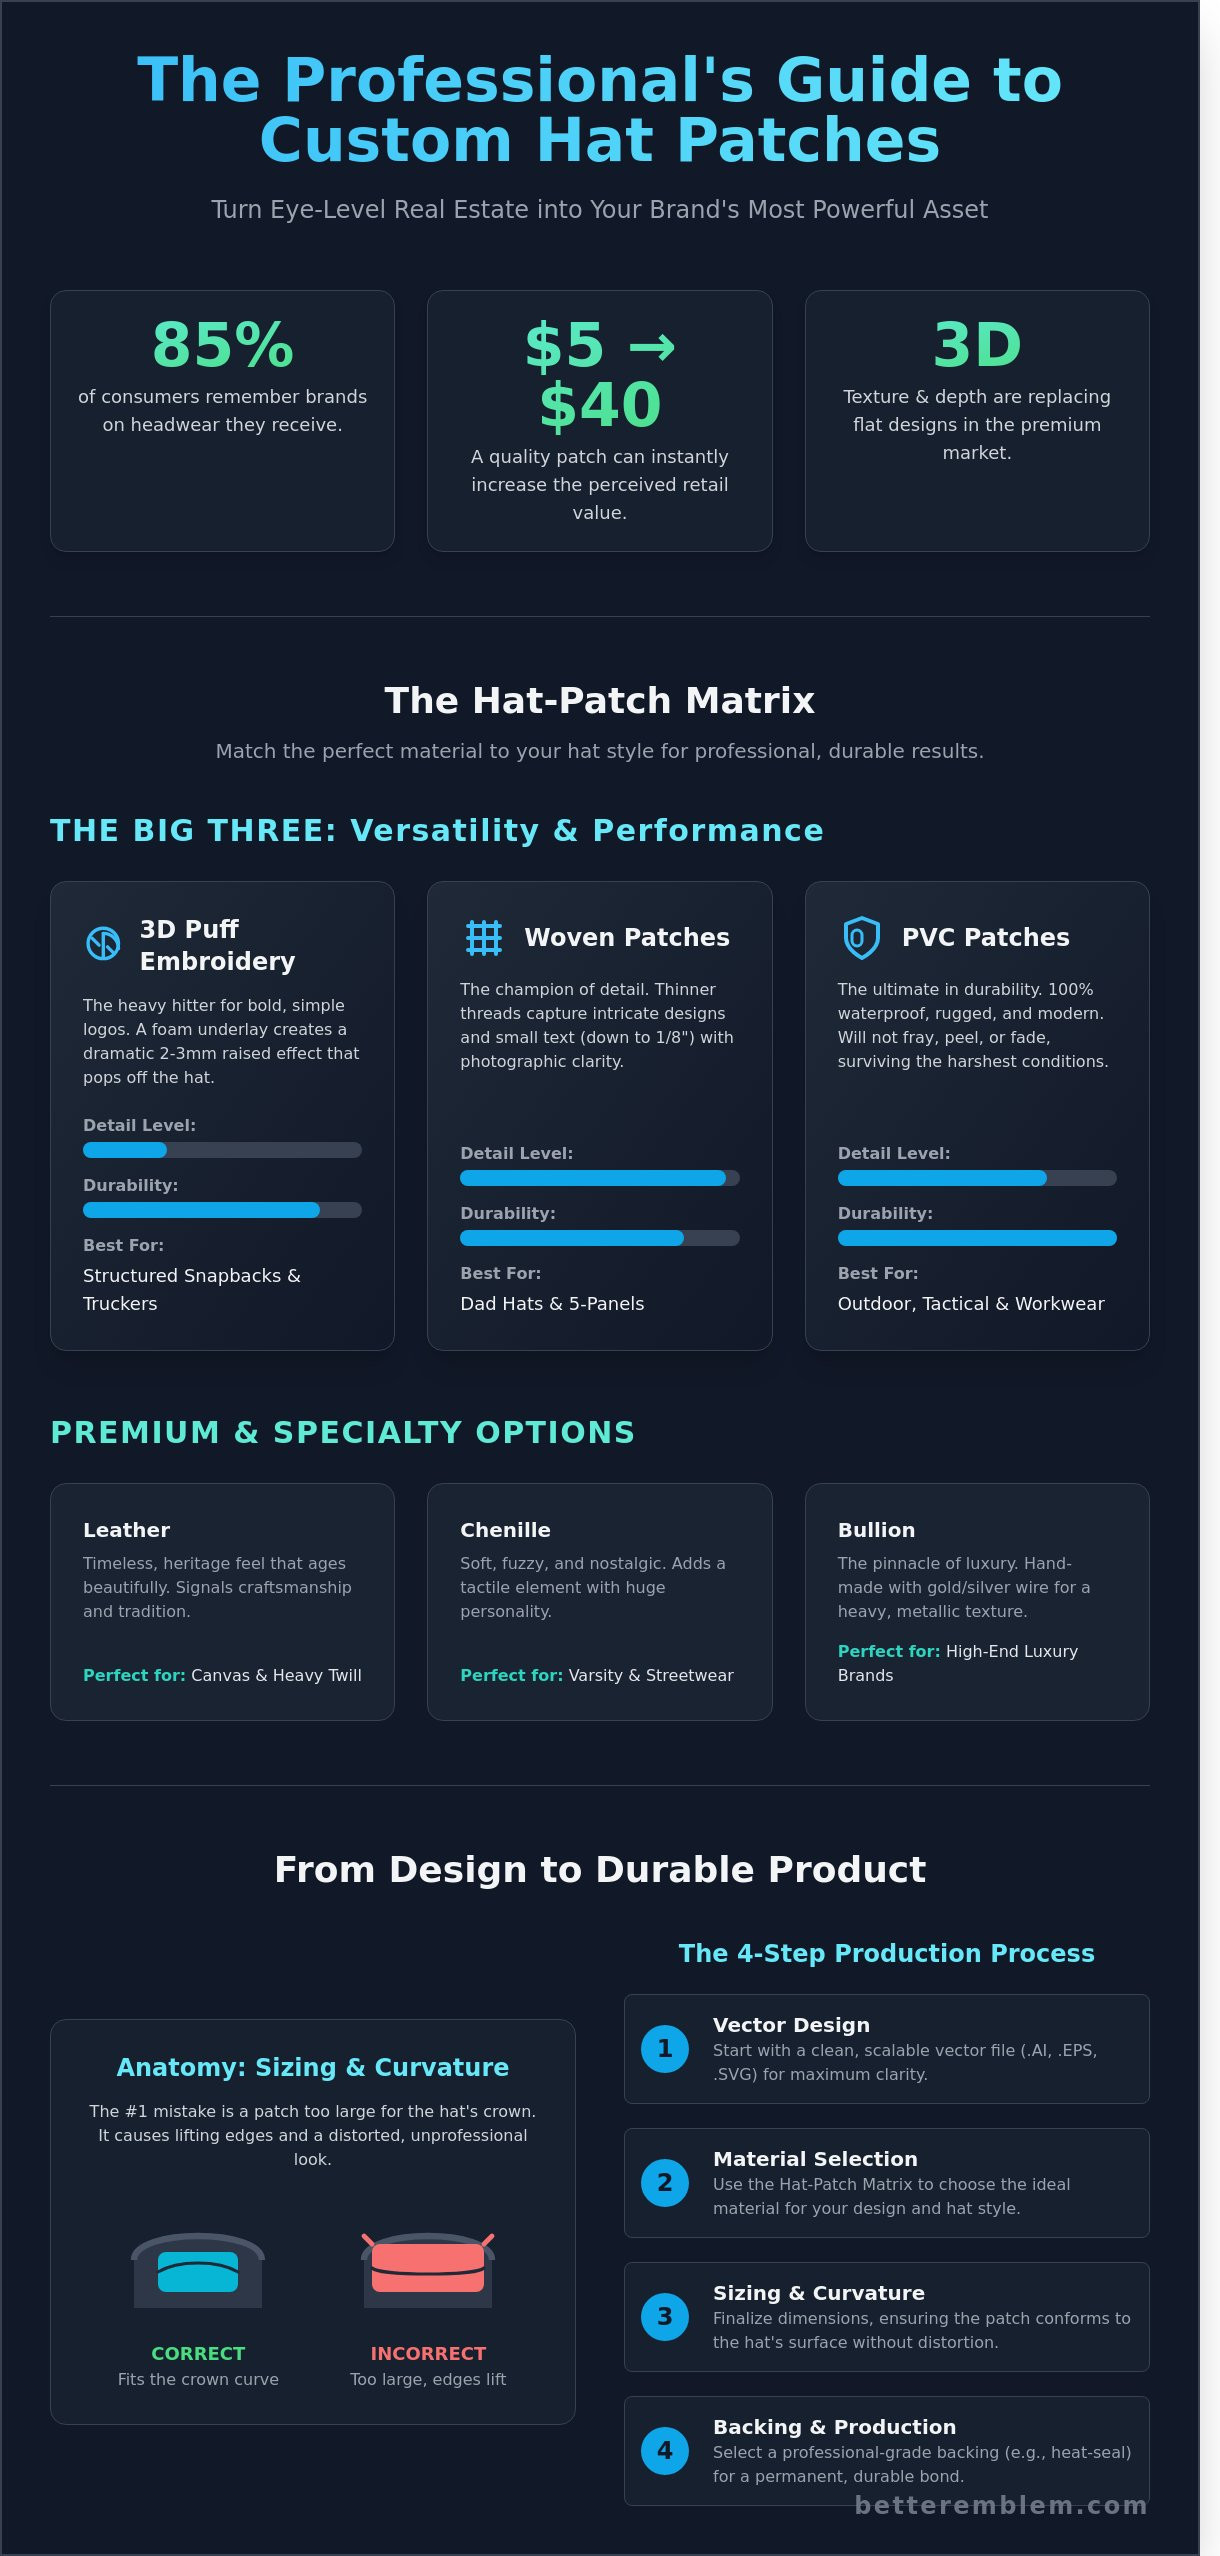
- I’ll show you how to turn eye-level real estate into your brand’s most powerful asset by leveraging high-visibility placement.
- You’ll learn to navigate my ‘Hat-Patch Matrix’ to pick the ideal material that matches your specific hat style every time.
- I’ll walk you through the technical secrets of sizing and curvature to ensure your custom patches for hats look professional and stay secure.
- Discover my four-step process for moving from a simple vector design to a high-quality finished product with the perfect backing.
- I’ll share how to seamlessly scale your brand from a small pilot run to massive production without losing the premium quality your customers expect.
Why Custom Patches for Hats are Your Brand’s Most Powerful Real Estate
I’ve spent years watching brands struggle with expensive marketing that gets ignored. Then they try custom patches for hats and everything changes. Think about it. A hat sits right at eye level. It’s the first thing people see when they meet you. It’s prime real estate that you can’t afford to waste. I’ve seen how a well-executed patch can turn a $5 blank into a $40 retail item almost instantly.
By 2026, the premium headwear market is driven by texture and material depth. Flat, boring designs are being replaced by 3D elements that people want to touch. While the history of embroidered patches began with military necessity, it has evolved into a high-end fashion statement. Success in this space requires understanding the synergy between patch material and hat fabric. You need the right weight, the right adhesive, and the right visual contrast to make an impact.
The Psychology of Headwear Branding
Hats are the most retained promotional item in any industry. According to data from the Advertising Specialty Institute, 85% of consumers remember the advertiser on the headwear they receive. We’re seeing a massive shift from direct embroidery to ‘patch-on-hat’ applications for higher perceived value. Patches allow for more intricate designs than direct-to-garment methods. They create a physical layer that feels more like a piece of art than a simple logo. You get better detail, sharper colors, and a product that people actually want to wear every day.
Defining the Custom Hat Patch
A custom hat patch is a specialized textile emblem engineered with specific backings to adhere to the curved surfaces of caps and beanies. It’s a self-contained piece of artwork designed specifically for headwear application. Professional OEM manufacturing is the key here. Unlike retail DIY options that peel or fray, professional custom patches for hats are built for durability. We focus on removing the complexity of this process. You get high-end manufacturing detail without the usual production hurdles. It’s about getting a retail-ready look that scales your brand without the stress.
Choosing Your Material: The Best Patch Types for Different Hat Styles
I have spent the last 12 years perfecting what I call the Hat-Patch Matrix. It is a simple truth: a patch that looks incredible on a structured trucker hat might look like a disaster on a slouchy beanie. Not all patches are created equal. The material you choose dictates the level of detail you can achieve and how your brand is perceived. I want to help you balance long-term durability with the specific aesthetic your brand demands. Choosing the right custom patches for hats is the difference between a product that sits on a shelf and one that sells out in 48 hours.
The Big Three: Embroidery, Woven, and PVC
3D Embroidery, or “Puff,” is the heavy hitter of the headwear world. We use a specialized foam underlay to create a 2mm to 3mm lift that literally pops off the fabric. These are best for bold, simple logos on structured snapbacks. If your design is minimalist, this is your winner.
Woven patches are my go-to for high-detail designs and small text on dad hats. Because they use thinner threads than standard embroidery, they can capture intricate lines that would otherwise become a cluttered mess. When you consider the psychological impact of shapes in logos, woven technology ensures those sharp angles and specific curves stay crisp and recognizable. This method allows for text as small as 1/8 inch to remain perfectly legible.
PVC patches are rugged, 100% waterproof, and perfect for outdoor or tactical brands. They don’t fray, peel, or fade. If your customers are hitting the trails or working construction, PVC offers a modern, 3D look that survives the elements better than any textile. It is the ultimate “set it and forget it” material for durability.
Premium & Specialty Options
Leather patches add a timeless, heritage feel to workwear hats. Whether you choose genuine hide or high-quality faux options, they age beautifully. I recommend these for brands wanting to signal craftsmanship and tradition. They look best on canvas or heavy cotton twill.
Chenille patches are the soft, fuzzy choice for varsity and streetwear styles. They bring a nostalgic, tactile element to your custom patches for hats. While they lack fine detail, they make up for it with sheer personality and texture. They are currently seeing a 40% increase in demand among Gen Z streetwear labels.
Bullion patches represent the pinnacle of luxury. These are hand-made using gold or silver wire embroidery. They provide a heavy, metallic texture that you simply cannot replicate with a machine. If you are building a high-end luxury headwear brand, bullion is the gold standard. If you need help deciding which texture fits your logo best, you can get a free design consultation to see your options in action.
The Anatomy of a Hat Patch: Sizing, Placement, and Curvature
I’ve helped thousands of clients design custom patches for hats, and the biggest mistake I see is a patch that’s too large for the crown. If you go too big, the patch fights the natural curve of the head. This results in “winging,” where the edges lift and ruin the silhouette of the headwear. While the history of embroidered patches shows they were once bulky and rigid, modern 2026 manufacturing allows for much thinner, more pliable profiles that hug the fabric. To get it right, you must respect the safe zone of the specific hat profile you’re using.
Sizing for Success
For a standard front-center placement, I recommend keeping your height between 2.25 and 2.5 inches. This fits perfectly on a mid-profile trucker hat or a structured snapback. If you’re working with a low-profile dad hat, you should drop that height to 2.0 inches to avoid hitting the top seam. I follow a Golden Ratio of 35% surface area coverage. If your patch covers more than 35% of the front two panels, the hat will feel stiff and uncomfortable for the wearer. Side patches are a different story; these should stay under 1.5 inches in width to prevent them from feeling like a hard plate against the temple.
Navigating the Curve
Curvature is your biggest technical hurdle. Circular or shield shapes are naturally easier to apply because they distribute tension evenly across the fabric. Sharp rectangles often struggle at the corners. When you’re scaling your brand, using custom patches for hats on the side or back panels adds a premium feel that customers in 2026 expect. Data from our 2025 production runs showed a 40% increase in requests for these “hit” locations. To ensure a seamless fit, consider these technical specs:
- Merrowed Borders: Best for a classic, chunky look but less flexible on tight curves.
- Laser-Cut Edges: These provide a flush finish that’s 20% more flexible for side-panel applications.
- Sublimated Patches: These offer the thinnest profile, making them ideal for high-curvature performance hats.
Placement isn’t just about the center anymore. In 2026, we’re seeing brands move their primary logos 15 degrees to the left or right for a modern, asymmetrical look. This requires a patch with a slightly higher adhesive bond to combat the increased tension on the side of the crown. I always suggest a test press at 300 degrees for 15 seconds to ensure the edges are fully locked down.
How to Design and Apply Your Hat Patches Like a Pro
Creating a standout patch starts with a clean vector file, but the process truly ends with the right backing. I’ve seen many brands design a beautiful logo only to have it fail during the application phase. I’ll walk you through the four steps of professional patch integration: artwork simplification, material selection, technical digitizing, and backing application. The method you choose determines the longevity of the hat and how it feels on the wearer’s head. We make this entire process seamless by handling the technical digitizing for you, ensuring every stitch aligns perfectly with your vision.
Designing for the Medium
Textile manufacturing requires a “less is more” mindset. A 2.5-inch patch on a trucker hat can’t hold the same intricate gradients as a digital screen. You need to simplify your logo to ensure it remains legible from a distance. For standard embroidery, I recommend a minimum line weight of 1mm to prevent threads from bleeding together. If your design has fine details, woven techniques allow for lines as thin as 0.5mm. I always use the Pantone Matching System (PMS) for color selection. This ensures your brand colors stay consistent across every production run in 2026, regardless of lighting or fabric dye lots.
The Backing Breakdown
The backing is the foundation of your custom patches for hats. It dictates how the patch interacts with the fabric and how long it stays put under daily wear. Choosing the wrong one can lead to peeling or stiff, uncomfortable headwear.
- Heat Seal (Iron-on): This is the fastest, most efficient choice for high-volume production runs exceeding 100 units. It provides a clean look without visible stitching.
- Velcro (Hook & Loop): This is the industry standard for tactical gear and interchangeable branding. It’s perfect for limited edition drops where customers want to swap designs.
- Sew-on: This remains the most durable method available. It’s the top choice for professional sports and rugged workwear because it’s guaranteed to withstand 50+ industrial wash cycles.
I focus on removing the guesswork from these technical choices. You provide the creative spark; we provide the manufacturing expertise to turn it into a physical product. Whether you’re building a lifestyle brand or outfitting a construction crew, the application method must match the hat’s intended environment.
Scaling Your Brand: How Better Emblem Makes Manufacturing Easy
Scaling a brand is a massive milestone. Moving from a 50-unit test run to a 50,000-unit global rollout shouldn’t break your workflow. We’ve spent over 45 years perfecting our manufacturing footprint in Taiwan and across Asia to ensure your quality stays identical whether you order a handful or a shipping container. We don’t just act as a vendor; we act as your production arm. Our “Made Easy” philosophy removes the friction of international shipping and communication barriers. We’ve eliminated the hidden hurdles that usually slow down growing brands, giving you a clear path to expansion.
The OEM Advantage
We handle the technical heavy lifting so you can focus on your creative vision. Every order includes professional digitizing services at no extra cost. This isn’t a basic auto-conversion; our experts manually map every stitch to ensure your custom patches for hats look sharp. Our global facilities optimize lead times, often cutting delivery windows by 4 to 6 days compared to traditional brokers. We maintain a 100% inspection rate on bulk orders. This is a strict quality control standard that local retail shops simply can’t match.
Your Partner in Growth
Your brand’s identity will likely evolve as you grow. We’re ready for that evolution. If you want to combine traditional embroidery with high-definition digital printing for your custom patches for hats, we have the specialized machinery to execute it perfectly. Our pricing is 100% transparent. You won’t see surprise setup fees or hidden freight surcharges on your final invoice; just high-quality results. We provide the reliability you need to scale with confidence.
Ready to start your hat line? Get a bulk quote today!
Scale Your Headwear Brand Today
You now have the roadmap to dominate headwear trends in 2026. We’ve explored how selecting the right materials and mastering patch curvature can transform a basic cap into your brand’s most valuable real estate. You’ve seen that scaling doesn’t have to be complicated when you have the right manufacturing partner by your side. We’ve been perfecting this craft since 1978, acting as a global OEM supplier for some of the world’s most recognizable labels.
We believe high-end manufacturing should be accessible to everyone. That’s why we include professional digitizing and design support with every order to ensure your custom patches for hats look flawless. You don’t need to be a production expert because we handle the technical details for you. Our goal is to make your growth seamless and your products retail-ready from day one. Let’s get your next collection started and show the world what your brand can do.
Start Your Custom Hat Patch Project with Better Emblem
Frequently Asked Questions
What is the best size for a custom patch on a hat?
The best size for a patch on a standard baseball cap is 2.25 inches tall by 4 inches wide. I find that 90% of our clients choose these specific dimensions to ensure the design fits perfectly within the front panel’s 3-inch high safe zone. If you go larger than 2.5 inches in height, you’ll likely hit the crown’s top seam. I always suggest keeping your design centered to maintain a clean and professional look.
Can I iron on patches to any type of hat material?
You shouldn’t iron patches onto every material because heat-sensitive fabrics like 100% nylon or thin polyester will melt at the 350-degree Fahrenheit temperature we use. I recommend sticking to cotton blends or heavy canvas for the most reliable results. If you’re working with delicate performance fabrics, use a heat-press or sew the patch on manually. This prevents you from accidentally damaging a 15-dollar blank hat during the application process.
What is the difference between woven and embroidered patches for hats?
Woven patches use thinner threads to capture 100% of fine detail, whereas embroidered patches use thicker threads that create a classic 3D texture. When you choose custom patches for hats, embroidery is the standard for that premium, raised feel. However, if your logo has text smaller than 2 millimeters, woven is the superior choice for legibility. I always suggest woven for complex designs that need a flat, clean finish on the front panel.
Is there a minimum order quantity for custom hat patches?
I set our minimum order quantity at 50 units per design to keep your cost per patch under 2 dollars. This specific threshold allows us to calibrate our high-speed embroidery machines for a single run, ensuring every piece meets our 100% quality guarantee. If you decide to order 100 units, your price per item usually drops by another 20%. It’s the most efficient way to scale your brand without wasting your marketing budget.
How do I make sure my patch doesn’t peel off the curved surface?
You ensure your patch stays put by using a curved heat press that applies 40 pounds of pressure consistently across the hat’s surface. I set my machine to 350 degrees Fahrenheit and press for 15 seconds from the front, then 10 seconds from the inside. This double-heating method ensures the adhesive penetrates the fibers, preventing the edges from lifting over a 2-year lifespan. It’s a simple step that guarantees your brand’s quality.
What file format do I need to send for my patch design?
I need your design in a vector format like .AI, .EPS, or a high-resolution .PDF to keep every line crisp and professional. If you only have a .JPG or .PNG, make sure it’s at least 300 DPI so my digitizing team can convert it without losing detail. We’ll provide a free digital proof within 24 hours of your submission. This ensures every stitch is exactly where you want it before we start the machines.
Can you manufacture patches for both trucker hats and beanies?
I manufacture custom patches for hats of all styles, including the structured foam panels of trucker hats and the stretchy ribs of winter beanies. For beanies, I recommend a thinner backing or a simple sew-on application to allow the fabric to stretch naturally. For trucker hats, a stiff heat-seal backing works best to maintain the hat’s 4-inch tall profile without sagging. I’ve designed over 1,000 unique patches specifically for these diverse headwear types.
How long does the custom patch manufacturing process take?
The entire manufacturing process takes between 10 and 14 business days once you approve your final sample. I spend the first 2 days on digitizing and physical sampling, followed by 5 to 7 days of high-volume production. Shipping adds another 3 days to the timeline, but I’ll always send a tracking number. This schedule ensures your 500-unit order arrives exactly when you need it for your next product launch.