Your brand deserves more than flat, forgettable merchandise. You need apparel that feels premium, looks professional, and literally stands out from the competition. If you’re looking for that high-impact finish, 3D embroidery is the answer. But the process can seem intimidating. You’re probably wondering if your logo is suitable, if the technique is too complex, or if the cost will break your budget. These are the exact hurdles we’re here to help you clear, hassle-free.
Consider this your complete roadmap for 2026. We’re stripping away the manufacturing jargon to give you the clear, actionable information you need. In this guide, you will learn exactly how 3D puff embroidery is made, discover the essential design rules for a flawless result, and get the facts to confidently decide if it’s the right investment for your brand. It’s time to elevate your merchandise. Let’s get started.
Key Takeaways
- Learn the simple technique that makes a design physically stand out and when to choose it over flat embroidery.
- Get the design rules that work best for 3D embroidery and see why bold, simple shapes deliver a premium finish.
- Discover why hats and headwear are the perfect canvas for making your logo pop on promotional apparel.
- Understand the manufacturing process from start to finish so you know what to expect from a quality supplier.
What is 3D Embroidery (And How Is It Different?)
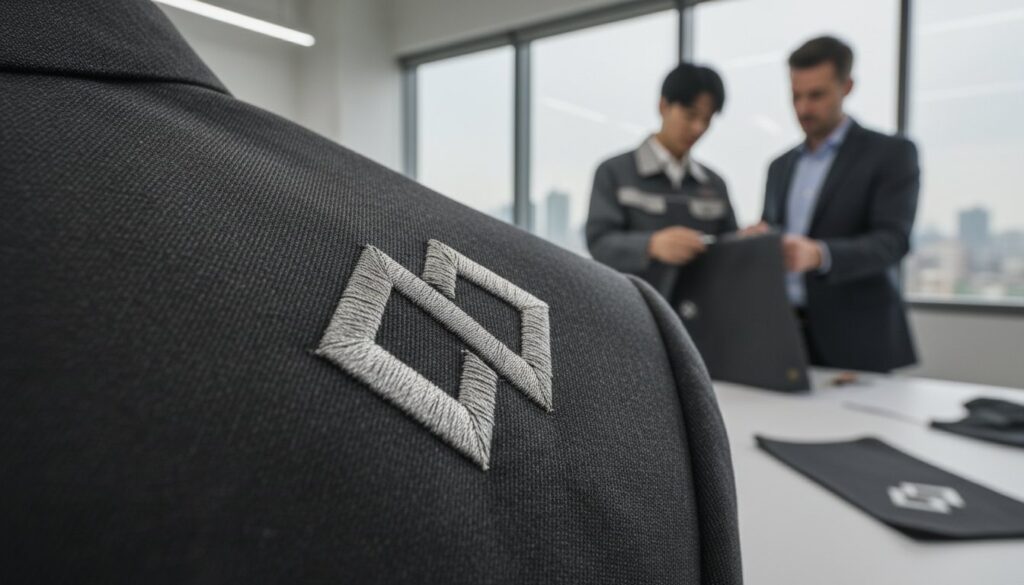
3D embroidery, often called puff embroidery, is a technique that uses a foam underlay to make your design literally stand off the fabric. The process involves stitching over a piece of special foam, which raises the thread and creates a striking, three-dimensional effect. It’s the fastest way to add depth and a premium feel to your custom patches and apparel.
Here’s the core difference: While traditional embroidery sews into a fabric, 3D embroidery sews over a foam foundation to rise dramatically above it.
This added height creates distinct shadows and highlights that catch the eye instantly. It gives your patches a substantial, high-value feel that is perfect for bold brand logos, team emblems, and statement headwear. This modern, machine-driven process is built for commercial speed and durability. It’s distinct from the intricate art of hand-sewn ‘stumpwork,’ which is part of the rich history of embroidery but serves a different, more delicate purpose.
Flat vs. 3D Embroidery: A Visual Comparison
Imagine a standard embroidered patch-the design is smooth, detailed, and lies flat against the twill. Now, picture a 3D patch. The design has physical depth, creating a tactile texture you can see and feel. This dimension makes the colors appear more dynamic and the logo more prominent.
- Flat Embroidery: Best for intricate logos, small text, and designs with fine, complex details.
- Puff Embroidery: Excels at bold lettering, simple shapes, and logos where you want a specific element to pop.
The Key Component: Embroidery Foam
The magic behind the ‘puff’ is a material called embroidery foam, typically a sheet of high-density EVA foam. We place this foam on the patch area before the machine starts stitching. The machine uses a high stitch count to cut through the foam and wrap the threads tightly around it. Once complete, the excess foam is torn away, leaving only your perfectly raised design.
Foam comes in different thicknesses to create varying levels of height. You don’t need to worry about the technical specs. Our experts automatically select the ideal foam for your artwork, guaranteeing a professional and durable finish. It’s all part of our seamless process.
The Manufacturing Process: How 3D Patches Are Made
Ever wonder how a flat design gets its signature pop? Creating a 3D embroidery patch is a precise blend of modern technology and hands-on skill. While the effect is complex, the process is straightforward when handled by experts. We’ve broken down the entire manufacturing journey into three simple steps, so you know exactly how your vision comes to life.
This process requires specialized industrial embroidery machines and highly trained operators who can manage the unique demands of puff foam and dense stitching. It’s a craft where precision is everything.
Step 1: Digitizing Your Design
Everything starts with your artwork. Before any thread hits the fabric, your design must be converted into a digital stitch file that our machines can read-a process called digitizing. For 3D designs, this step is critical. The digitizer creates a special file with higher stitch densities and unique “capping” stitches designed to completely cover the foam. The skill involved is immense, turning a flat image into a dimensional blueprint. It’s a modern craft that echoes the artistry seen in traditional techniques like hand-stitched 3D zardozi embroidery, where every detail is meticulously planned for maximum effect. Flawless digitizing is the foundation of a premium patch.
Step 2: The Stitching Process
With the digital blueprint ready, your patch moves to the production floor. The process is fast and precise:
- Placement: The machine first runs a simple outline stitch directly onto the base fabric. This shows our technicians exactly where to place the puff foam.
- Stitching: A sheet of 3D embroidery foam is laid over the outline. The machine then begins stitching over it with extremely dense satin stitches.
- Perforation: As the needle rapidly lays down thread, it also perforates the foam around the edges of your design. This acts like a precision cutting tool, making the excess foam simple to tear away cleanly.
Step 3: Finishing and Quality Control
The final stage is all about achieving that clean, sharp finish. Once the machine is done, technicians carefully “weed” the patch by tearing away the perforated excess foam. This reveals the raised, three-dimensional elements of your design. For ultimate precision, a heat gun is used to shrink and eliminate any tiny foam remnants that might remain, ensuring your patch has incredibly crisp edges. Finally, every single patch goes through a rigorous quality control inspection to guarantee clean lines and a flawless final product.
Designing for 3D Embroidery: Best Practices for Brands
To get the most from your design, remember one core rule: simplicity and boldness work best. The magic of 3D embroidery comes from creating clean, raised shapes that catch the eye. This isn’t a limitation-it’s a feature. The focused design is what creates the high-impact, premium look that makes your patches stand out. For a deeper dive, check out our complete Designing for 3D Embroidery: A Guide for Brands.
Here’s a quick guide to what works and what to avoid.
What Works Well:
- Bold Lettering: Simple, blocky fonts and single letters create a powerful effect.
- Simple Logos: Icons and logos with clear, distinct shapes translate perfectly.
- Wide Shapes: Thick lines and solid forms give the foam a strong foundation.
What to Avoid:
- Thin Lines: Delicate lines don’t have enough surface area to support the puff effect.
- Complex Details: Intricate patterns and tiny elements get lost and look messy.
- Small Text: Any text under a quarter-inch tall will be unreadable and fail to stitch correctly.
Ideal Design Characteristics
For flawless results, keep your lines between 3mm and 12mm wide. This is the sweet spot for maximum lift and durability. We also recommend using rounded corners and smooth curves, as sharp points can perforate the fabric and cause the foam to poke through. Finally, always use satin stitches to cover the foam; wider fill stitches can compress the puff and flatten your design.
Common Design Mistakes to Avoid
Avoid placing small, standalone text in your design, as it lacks the structure to rise properly. Also, remember that this technique uses solid thread colors, so color gradients and photorealistic details are not possible. A critical mistake is placing 3D elements too close together. Leave ample space between raised sections to prevent the machine’s presser foot from flattening adjacent stitches.
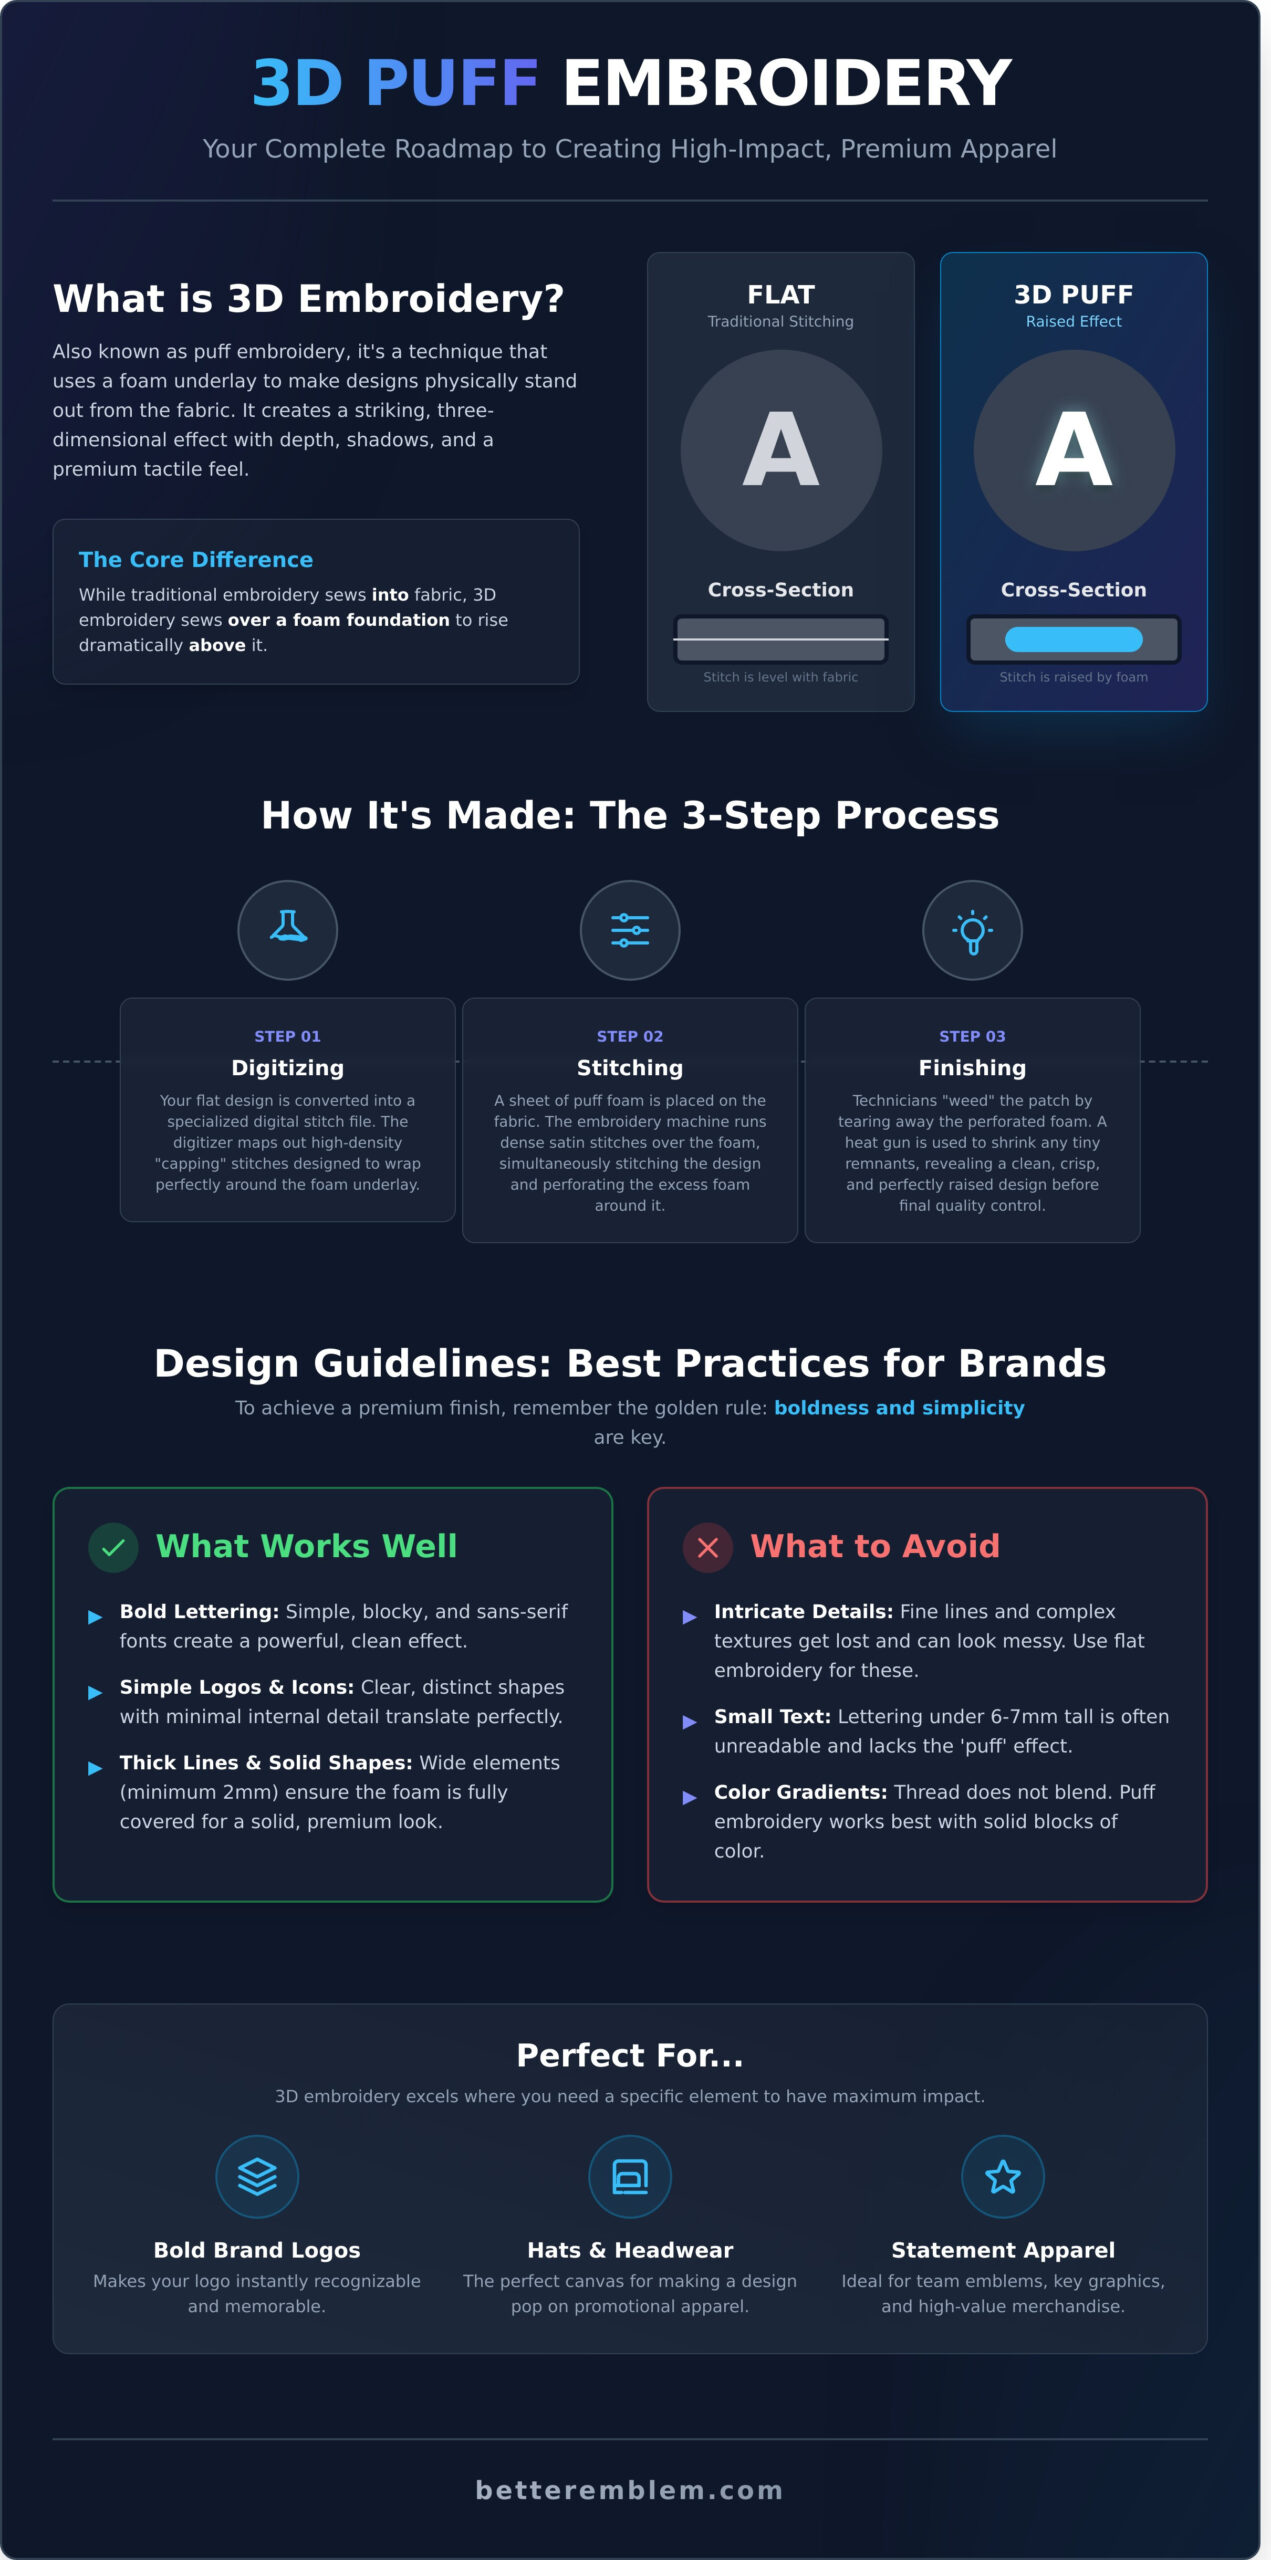
Key Applications: Where 3D Embroidery Shines
You’ve seen how 3D embroidery works, but where does it make the biggest impact? This technique is all about creating a focal point. It turns standard promotional products into premium, high-value merchandise that people notice and remember. While it’s not for every design, it’s the perfect solution for making your logo literally stand out.
From corporate swag to retail-ready apparel, puff embroidery elevates your brand on products that are built to last. Let’s look at the most common and effective applications.
Headwear: The Classic Use Case
There’s a reason hats are the number one product for this style. The stiff, structured front panels of baseball caps and snapbacks create the perfect canvas. This stable surface allows the puff foam and dense stitching to create a clean, sharp, and elevated design.
You see it everywhere:
- Sports Teams: The iconic, raised logos on professional team caps.
- Streetwear Brands: Bold, simple logos that pop with texture and depth.
- Corporate Merch: Company logos transformed into premium gifts that look and feel high-end.
This method delivers a professional, retail-quality finish that commands attention. In fact, creating custom embroidered hat patches with a 3D effect is one of the fastest ways to turn a simple hat into a must-have item.
Apparel and Accessories
While hats are the most popular choice, the application of 3D embroidery extends to other durable goods. Think of it as a statement piece for your apparel and gear. A raised logo on the left chest of a hoodie or the back of a varsity jacket adds a tactile quality that standard embroidery can’t replicate.
It’s also an excellent choice for patches on tougher items like backpacks, duffle bags, and workwear. The dense stitching and raised profile give these items a rugged, durable look that signals quality. By adding a three-dimensional element, you’re not just applying a logo-you’re creating a permanent, high-value feature of the product itself.
Ready to see how your design looks with a premium, dimensional finish? Get your free quote and see your vision come to life.
Ordering Custom 3D Embroidery: What to Expect
You’ve learned the techniques and seen the potential. Now, let’s bring your project to life. The key takeaway is simple: 3D embroidery is for brands that refuse to blend in. It’s the best choice for bold, clean designs that need to physically stand out and command attention. When you’re ready to order, working with the right partner makes the entire process seamless.
A good manufacturer does more than just stitch. They provide a complete service package that guarantees a premium result. This includes an initial design consultation, expert digitizing to translate your art into a flawless stitch file, and a curated selection of high-quality materials. They are your expert partner, ensuring your investment pays off with a product that looks and feels incredible.
When it comes to cost, expect a modest increase over standard embroidery. This premium is due to the extra materials, like the specialized puff foam, and the additional machine time required to create that impressive height. The result, however, is a high-impact product that offers a far greater perceived value.
Finding the Right Manufacturing Partner
Your partner’s experience is critical for a successful 3D embroidery project. Look for a supplier with a strong, diverse portfolio of 3D work-it’s proof they can handle the technical demands. Ask about their digitizing process. A true expert will review your design and advise if it’s a good candidate for 3D or if small adjustments would yield a better result. This guidance is invaluable and saves you from costly mistakes.
Getting Your Project Started
We make the process fast and straightforward. There are no complex forms or hidden hurdles. To get a quote for your project, you just need to follow three simple steps:
- Submit your design file (any common format works).
- Specify your desired quantity and patch size.
- Mention that you want the 3D puff effect.
That’s it. An expert partner takes it from there, handling the technical details so you can focus on your brand. The process is designed to be hassle-free, from your initial idea to the final product delivered to your door.
Ready to make your brand pop? Get a free quote for your 3D embroidery project today.
Elevate Your Brand with Custom 3D Embroidery
You now have the complete blueprint for making your brand pop. We’ve covered how this technique creates a premium, high-impact look and why smart design-focusing on bold shapes and clear lines-is crucial for success. From hats and jackets to high-end accessories, the right 3D embroidery offers a powerful way to add tangible quality and dimension to your products.
Ready to turn that knowledge into action? The manufacturing process doesn’t have to be complex. At Better Emblem Company Ltd., we make it fast and hassle-free. As an expert OEM partner trusted by top global brands since 1978, we provide the guidance you need at every step. Our all-inclusive service includes free design consultation and professional digitizing to ensure your vision is perfectly translated into a stunning final product.
See how easy it can be to get started. Get a Free Quote for Your Custom 3D Patches and let our team handle the rest. Your brand is ready for the next dimension.
Frequently Asked Questions About 3D Embroidery
Is 3D embroidery more expensive than flat embroidery?
Yes, 3D puff embroidery typically costs more than standard flat embroidery. This is because it requires an extra material-the puff foam-and a more complex digitizing process to create the raised effect. However, the premium, high-impact look provides significant value for brands looking to stand out. We provide a clear, all-inclusive quote upfront, so you’ll see the exact cost difference with no hidden fees. Your investment goes directly into a superior, eye-catching product.
How durable is 3D puff embroidery? Will it flatten over time?
Our 3D puff embroidery is built to last. We use a high-density foam core that resists crushing and is securely encased by tight satin stitching. With proper care, your design will maintain its raised, three-dimensional shape for years without flattening. It’s a durable choice for premium hats, jackets, and bags that need to make a lasting impression. You get a bold look that’s as tough as it is impressive, guaranteed to hold its shape.
What is the minimum order quantity for custom 3D embroidered patches?
We make getting started simple. Our minimum order quantity (MOQ) for custom 3D embroidered patches is just 50 units. This low minimum allows you to test a new design or create an exclusive run without a massive upfront investment. Whether you’re a growing brand or gearing up for a big event, we’ve structured our process to be flexible and accessible. Getting premium patches is now hassle-free, even for smaller orders, with no setup fees.
Can my existing logo be converted to a 3D embroidery design?
Absolutely. Most logos can be converted into a stunning 3D embroidery design. The best candidates have bold shapes, thick lines, and minimal fine detail, as these elements translate best to the raised puff effect. Unsure if your logo is a good fit? Just send it to us. Our experts provide a free design review to assess its suitability and suggest any simple tweaks needed for a perfect, premium finish. We handle all the technical work for you.
What’s the difference between 3D embroidery and chenille patches?
The main difference is texture and structure. 3D embroidery uses foam underneath tight satin stitches to create a sharp, hard, and raised effect with a smooth finish. It’s modern and precise. Chenille, on the other hand, uses yarn loops to create a soft, fuzzy, carpet-like texture, commonly seen on varsity jackets. While both add dimension, 3D puff is for crisp, defined logos, while chenille offers a retro, tactile softness for a completely different feel.
How do I care for garments with 3D embroidery?
Caring for your 3D embroidered items is easy. For best results, turn the garment inside out before washing to protect the raised stitching. Use a gentle cycle with cold water and a mild detergent. We strongly recommend air-drying by laying the item flat or hanging it. Avoid high-heat dryers and ironing directly on the design, as extreme heat can damage the internal foam and compromise the 3D effect. This simple care keeps your design looking sharp. For any high-value custom apparel, professional services are often the best choice for long-term care; experts like Your Tailor Robin can provide guidance on maintaining premium garments.
What is the typical turnaround time for a bulk order of 3D patches?
We pride ourselves on a fast, reliable turnaround. Once you approve your digital proof, a typical bulk order of 3D patches is produced and shipped within 10-14 business days. For more complex designs or very large quantities, it may take slightly longer. We always provide a guaranteed delivery date with your final quote, ensuring you know exactly when to expect your order. Our process is built for speed and transparency, getting your premium patches to you on time.