Ever wondered how to make chenille patches that look truly professional? You’ve got the perfect design for a letterman jacket or a varsity-style bag, but the next steps feel unclear. Is this a simple DIY project, or does it require specialized factory equipment? You’re not alone. Many creators get stuck worrying if their design will translate correctly or which materials and stitches to choose.
We’re here to make it simple. This guide pulls back the curtain on the entire professional manufacturing process. Forget the guesswork-we’ll walk you step-by-step from a digital file to the final, fluffy stitch. You’ll see exactly how industrial machines create those iconic textures and clean, embroidered details that make chenille so unique and durable.
By the end, you’ll understand what separates a hobby craft from a high-quality investment. You will have the confidence to prepare your artwork for production and know exactly what to look for in a reliable supplier. Your vision, made easy.
Principales conclusiones
- Learn the two core components-chenille yarn and a felt backing-that define a true, professional-grade patch.
- Discover the 7-step industrial process for how to make chenille patches, from digital design to the final stitch on specialized machinery.
- Get simple design rules for chenille to ensure your artwork translates perfectly into a bold, textured final product.
- Understand why partnering with a manufacturing expert is the fastest and most reliable way to get high-quality custom chenille patches made.
What Defines a ‘True’ Chenille Patch?
Before you learn how to make chenille patches, you need to know what separates the real deal from the imitations. A true chenille patch is a textured emblem made from yarn, famous for its soft, raised, and carpet-like feel. It’s the iconic look you see on varsity jackets and high-end apparel-a symbol of quality and tradition.
The magic is in its construction. A professional patch starts with a stiff felt backing that provides a stable foundation. Then, specialized machinery punches loops of chenille yarn through the felt to create the plush design. The unique properties of this yarn, which has a fascinating history of chenille fabric, give the patch its signature texture. This process creates a durable, dimensional emblem built for longevity, unlike ‘faux chenille’ from home machines that often lacks structure and fails under regular wear and tear.
The Anatomy of a Professional Chenille Patch
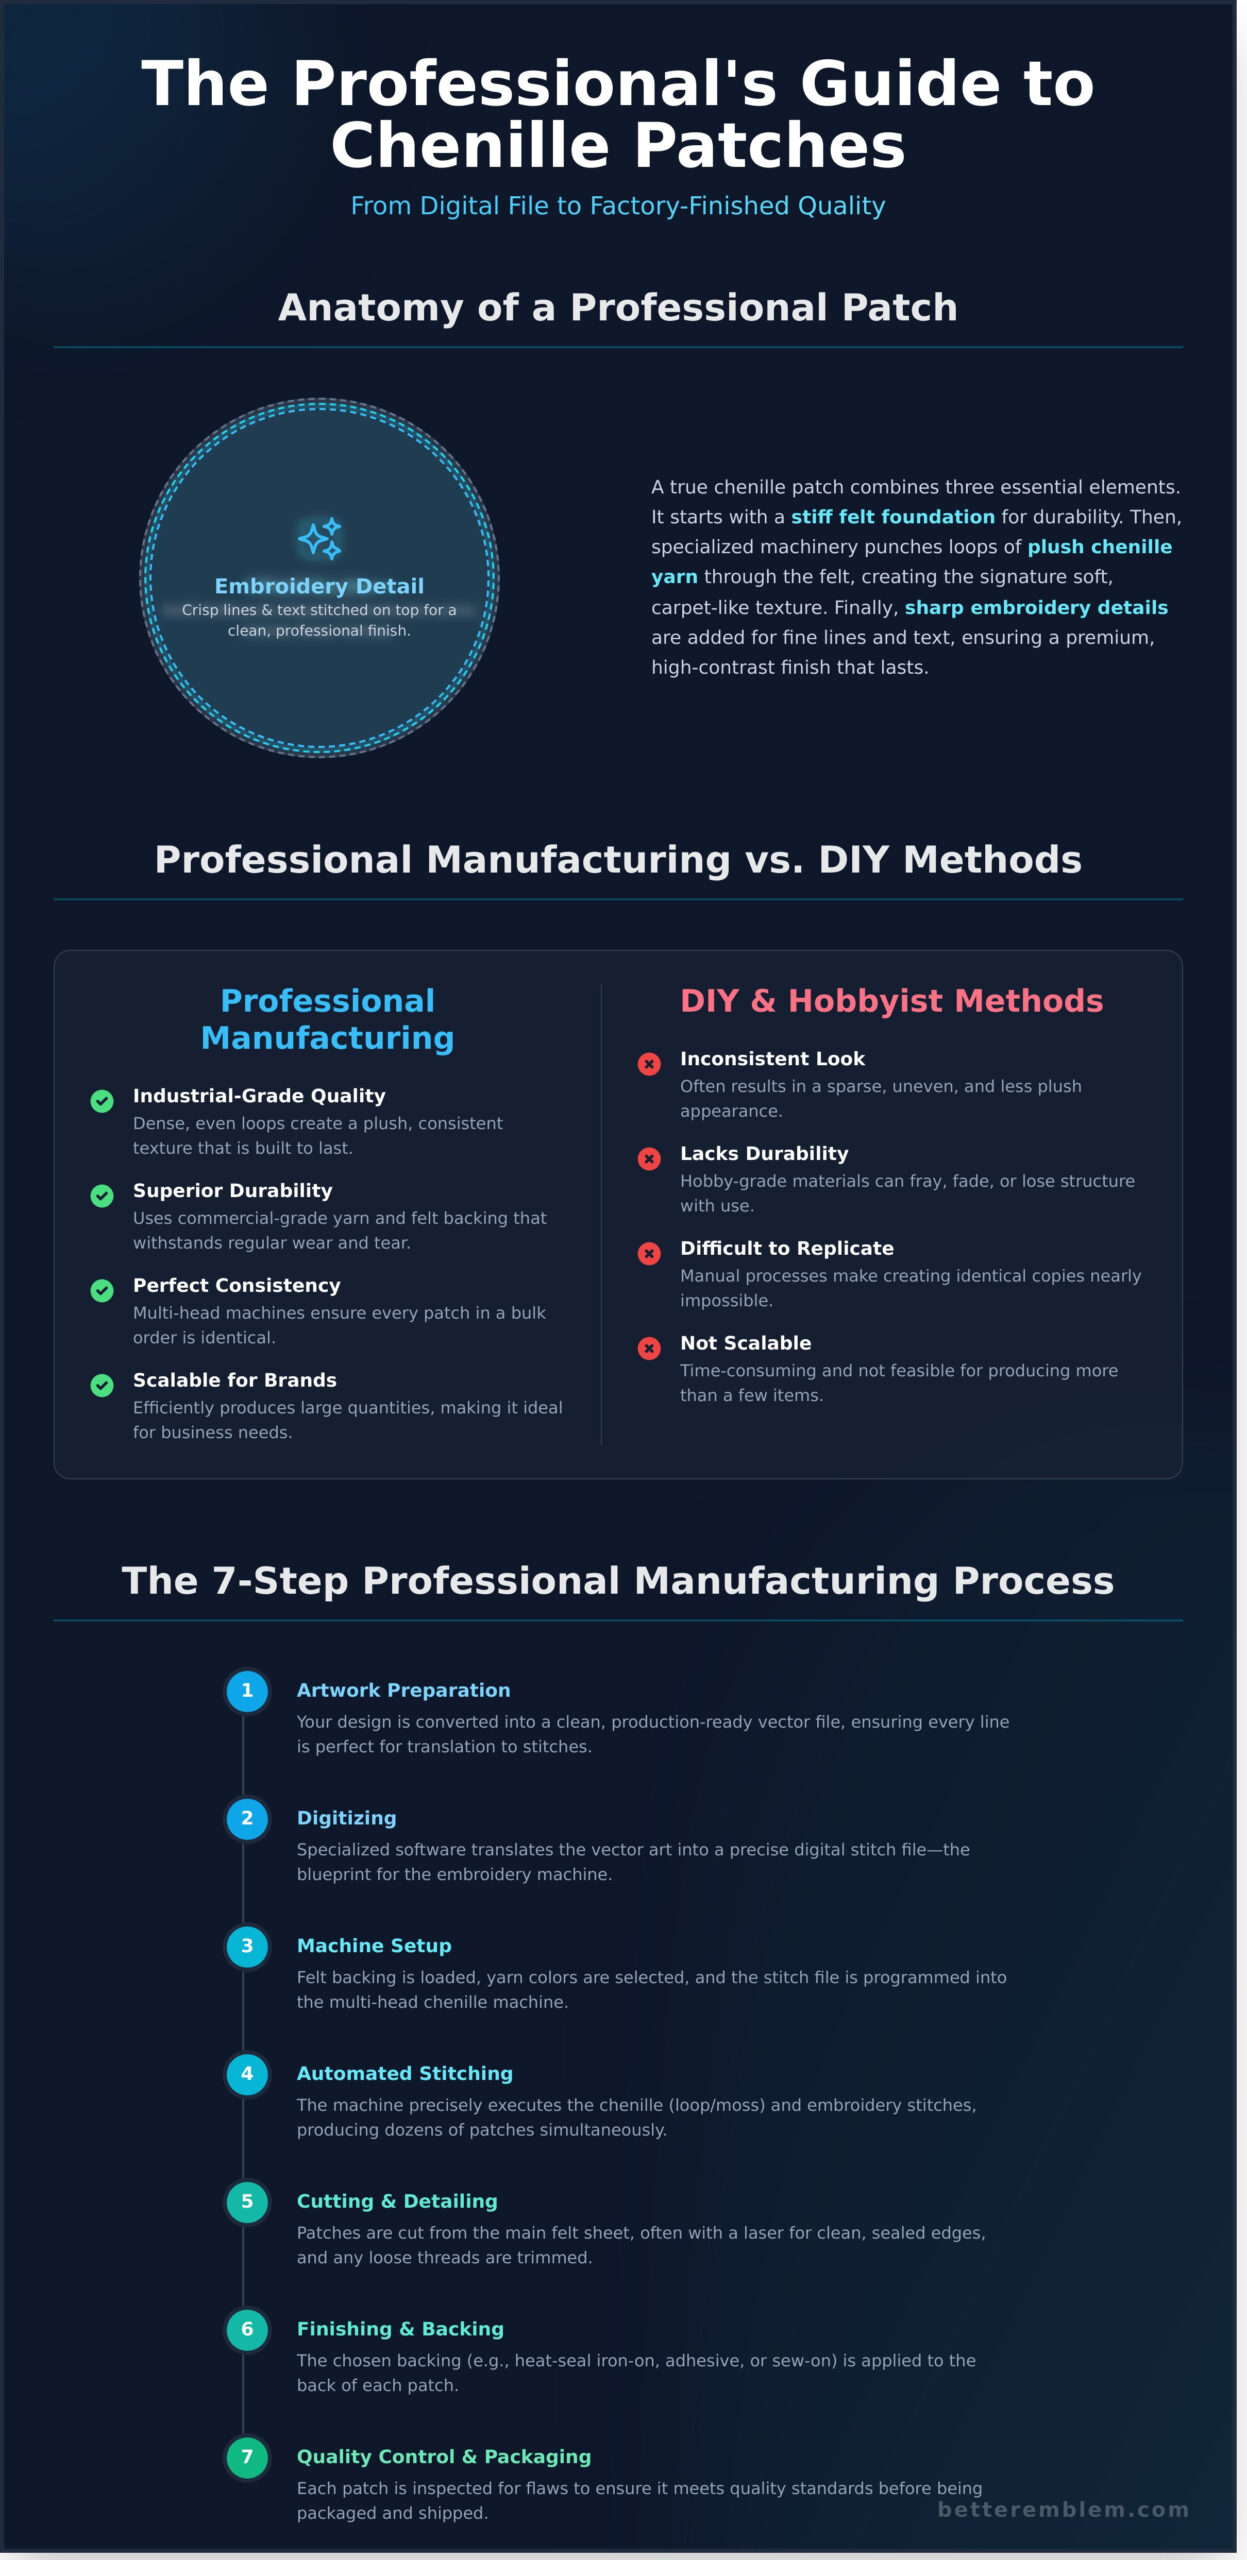
Every professional chenille patch is a combination of three key elements working together to create a premium, lasting product. Understanding these components is the first step to creating a design that stands out.
- Felt Layer: This is the stiff, stable foundation of the patch. It provides the structure and ensures your patch holds its shape for years.
- Chenille Yarn: The star of the show. This soft, fluffy yarn is looped to form the main fill of your design, creating that classic fuzzy texture.
- Embroidery Detail: For sharp edges, fine lines, and crisp text, standard embroidery thread is stitched on top of the chenille fill. This adds a clean, professional finish.
Why DIY Methods Fall Short for Brands
While DIY methods are great for personal projects, they don’t meet the quality standards required for a professional brand. If you’re exploring how to make chenille patches for your business, you need a process that guarantees consistency and durability.
DIY approaches can’t compete. They lack the specialized machinery needed for dense, even loops, resulting in a sparse and inconsistent look. The materials used are not designed for commercial-grade wear and tear, and most importantly, you simply cannot scale production for the bulk orders your business needs. For a professional look, you need a professional process.
The Essential Tools & Materials for Industrial Production
To create high-quality chenille patches, you need more than a simple sewing kit. The professional process relies on specialized industrial equipment and premium materials. This setup is a significant investment, marking the clear line between a craft project and commercial-grade production. It’s the factory-level answer to how to make chenille patches that look and feel truly premium.
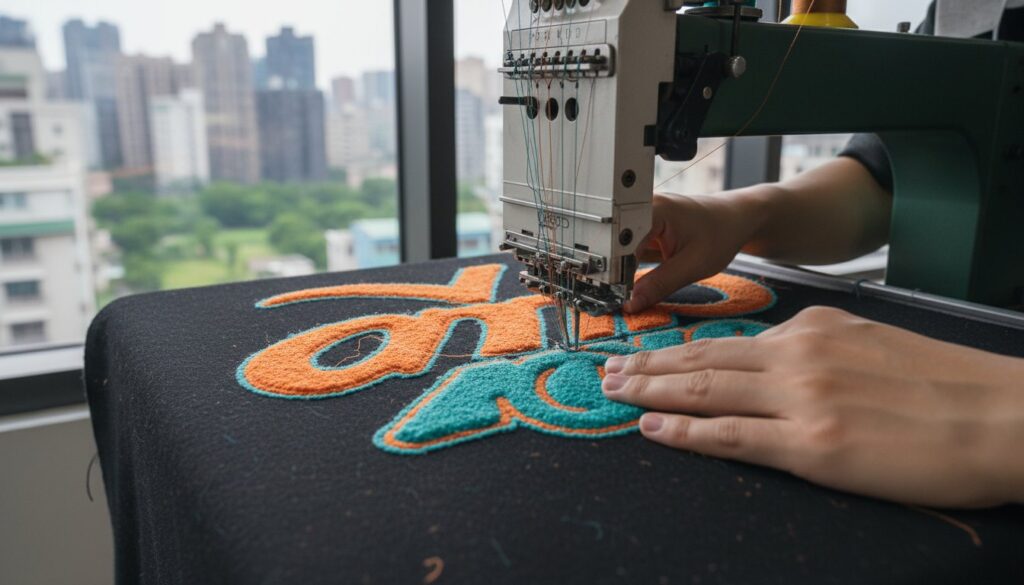
Before any machine starts, your design is converted using digitizing software. This advanced program translates your artwork into a precise stitch file-a digital blueprint that tells the machine exactly where to place every single loop and fill.
Specialized Chenille Machinery
The centerpiece of any professional operation is the multi-head chenille embroidery machine. Unlike a standard embroidery machine that creates flat stitches, this powerhouse uses a specialized looping mechanism to build that signature fuzzy texture. For maximum efficiency, these machines feature automatic color changing and large sewing fields, allowing us to produce dozens of your patches simultaneously with perfect consistency. They create two essential stitches:
- Moss Stitch: A dense, textured fill stitch that creates a flat, carpet-like surface.
- Loop (Chain) Stitch: The classic raised loop that gives chenille its iconic, fluffy dimension.
Professional-Grade Materials
The right machine needs the right materials. Quality isn’t just stitched in-it’s built from the ground up with components chosen for durability, texture, and vibrant appearance.
- Yarn: We use thick, brilliant acrylic or wool-blend yarns. These are engineered for their plush feel and excellent colorfastness, ensuring your patch won’t fade. The unique construction of this yarn is a key element in modern chenille manufacturing, creating that iconic soft pile.
- Respaldo: A chenille patch needs a strong foundation. We use one or two layers of stiff, high-quality felt. This provides critical structure, prevents the patch from curling, and gives it a substantial, premium weight.
- Finishing: The final touch is the backing that fits your application. You can choose from a simple sew-on finish, a convenient heat-seal (iron-on) backing, or a versatile pressure-sensitive adhesive for temporary placement.
The 7-Step Professional Chenille Manufacturing Process
Most guides give you a surface-level overview. We believe in transparency. Understanding the professional process of how to make chenille patches shows you the precision and care that goes into every order. This is the behind-the-scenes look at how your vision becomes a high-quality, tangible product, perfected by technology and expert hands.
We’ve refined this process for maximum quality and speed. Here’s exactly how we do it.
Steps 1-3: Design, Digitizing, and Machine Setup
The foundation of a perfect patch is laid long before the first stitch. This initial phase is all about translating your creative idea into a flawless digital blueprint.
- 1. Artwork Preparation: It starts with your design. Our artists take your submitted artwork-whether it’s a simple sketch or a professional logo-and convert it into a production-ready vector format. This ensures every line is clean and every color is perfectly matched for manufacturing.
- 2. Digitizing: This is where art meets science. A skilled technician uses specialized software to manually plot every single stitch of your patch. They assign the chenille “moss” stitches for the fuzzy fill and “loop” stitches for texture, creating a digital file that acts as the master instruction for our machines.
- 3. Machine Setup: With the digital blueprint ready, we prepare the machine. A large sheet of high-quality felt is secured, and spools of colorful chenille yarn are threaded into the machine heads. Your digitized design file is loaded, telling the machine exactly where to stitch.
Steps 4-7: Stitching, Cutting, and Finishing
With the prep work complete, your patches come to life. This is the most visible stage of how to make chenille patches, where automated precision creates a consistent, stunning result.
- 4. Stitching the Chenille: The machine runs at high speed, rapidly stitching the yarn into the felt base to create that iconic fuzzy texture. The needles work in perfect sync to build the layers of color and texture defined in the digital file.
- 5. Adding Embroidery Details: For fine lines, small text, or sharp outlines, a separate embroidery head takes over. It uses standard thread to add crisp details that chenille yarn is too thick to create, giving your patch a clean, professional look.
- 6. Laser Cutting: Once stitching is complete, the entire sheet of felt is moved to a cutting machine. A high-intensity laser, guided by a digital outline, cuts each patch out with microscopic precision. This guarantees a perfectly clean edge every time.
- 7. Applying the Backing: In the final step, your chosen backing is applied. For an iron-on patch, a sheet of heat-activated adhesive is placed on the back and fused to the felt using an industrial heat press. The result is a durable, ready-to-apply chenille patch.
Designing for Chenille: Tips for a Perfect Patch
You understand the manufacturing process. Now, let’s ensure your artwork is perfectly prepared for it. A great design is the most critical step in creating a patch you’ll love. The good news? It’s simpler than you think. Following a few key rules will prevent common mistakes and guarantee your design translates into a lush, textured chenille patch.
If you don’t have a finalized logo or need help creating a new design from scratch, a professional design agency can be a valuable partner. Those looking for creative support can visit DesignEdge to see examples of strong branding.
Keep It Bold and Simple
Chenille’s magic is in its fluffy, raised texture. To make the most of it, your design needs to be bold. Tiny, complex details get lost in the yarn and can look muddy or undefined. For chenille, always think big, clean, and open.
- Go Thick: As a rule, all chenille lines and shapes should be at least 3mm (0.12 inches) thick. Anything thinner won’t have enough space for the yarn to loop and create that classic fuzzy feel.
- Avoid Complexity: Steer clear of small internal details within a single chenille color. Save the fine points for embroidery.
Using Embroidery for Fine Details
The secret to a professional-looking patch is the hybrid approach. This is where knowing how to make chenille patches moves from basic to expert. You combine the best of both worlds: chenille for the body and standard embroidery for the details.
Use chenille for large color fills-the main body of a mascot, the fill of a large letter, or a bold background shape. Then, use embroidery to add the sharp, crisp elements that chenille can’t handle. This includes:
- Text and lettering
- Sharp outlines around chenille shapes
- Facial features on a mascot
- Any detail smaller than 3mm
This combination gives you the soft texture of chenille and the high-definition clarity of embroidery, creating a truly premium product.
Color and Texture Considerations
When it comes to color, less is often more. Most classic chenille patches use just 2-3 colors to create a timeless, high-impact look. A limited palette keeps the design clean and readable from a distance.
Don’t forget that the felt base is a key part of your design. The color of the felt that extends beyond the chenille stitching creates a built-in border. Use this to your advantage. A contrasting felt color can make your design pop, while a matching color creates a more subtle, tonal effect.
Ready to see how your idea will look? Our team can review your artwork and provide a realistic preview, completely free. We make sure your design is optimized for production before you commit.
Get a free quote and expert feedback from our team.
Partnering with an Expert: Chenille Patches Made Easy
As you’ve seen, creating a high-quality chenille patch is a multi-step process that demands specialized machinery, precise techniques, and years of expertise. From digitizing artwork to operating chenille embroidery machines and finishing the edges, every stage requires a professional touch. While understanding the process is valuable, executing it is a different challenge.
You don’t need to invest in expensive equipment or a steep learning curve. Better Emblem Company Ltd. handles all the technical steps for you, transforming your vision into a professional-grade product with a seamless, stress-free process. We make getting premium chenille patches simple.
Why Choose a Specialist Manufacturer?
Your brand deserves flawless execution. When you partner with a specialist, you’re not just buying a patch; you’re investing in guaranteed quality. We ensure every patch in your bulk order is perfectly consistent. Our design experts will review your artwork and optimize it for the best possible result, ensuring clean lines and vibrant textures. With experience dating back to 1978, we’ve perfected our craft so you can be confident in the final product.
Your Simple Path to Custom Chenille Patches
Forget the complexities of manufacturing. We’ve streamlined the entire journey into three simple steps. This is how to make chenille patches the easy way:
- Step 1: Submit Your Design. Upload your artwork or idea, and we’ll send you a free, no-obligation quote within 24 hours. There are never any hidden fees.
- Step 2: Approve Your Digital Proof. Our team creates a detailed digital mock-up of your patch. You can request unlimited revisions until it’s exactly what you want.
- Step 3: We Get to Work. Once you approve the proof, we handle the entire production process. We manage the stitching, cutting, and finishing before shipping the final patches directly to your door.
You get the iconic, textured look of chenille without any of the manufacturing headaches. Ready to bring your design to life with unmatched quality and speed? Let’s get started.
Get Your Free Quote Today & See How Easy Custom Patches Can Be.
Your Chenille Patch Project, Simplified
Creating a true chenille patch is a detailed craft, blending classic artistry with modern precision. It demands specialized equipment, high-quality materials, and an eye for design that works with the unique, fuzzy texture. You now have a clear understanding of how to make chenille patches at a professional level-from the importance of a solid felt base to the final stitch that locks it all together. The process is intricate, but the result is a patch with unmatched depth and character.
But you don’t have to manage that complexity alone. Partnering with an expert is the fastest way to get a flawless product. As manufacturing experts since 1978, we specialize in high-volume OEM production and have perfected a seamless process for our clients. We simplify your project with free design proofs on every single order, ensuring you can approve the final look with total confidence before production even begins.
Ready to bring your vision to life? Start Your Custom Chenille Patch Project Today. We’re excited to help you create something amazing.
Preguntas frecuentes
What is the main difference between a chenille patch and an embroidered patch?
The key difference is texture and detail. Chenille patches use thick yarn loops to create a soft, fuzzy, 3D finish, perfect for bold letters and mascots. In contrast, embroidered patches use thinner thread for a flat, smooth surface that captures fine lines and intricate details. Think of a classic varsity letter (chenille) versus a detailed corporate logo (embroidery). Your design’s complexity will determine the best choice for your project.
Can you make chenille patches with very small text or intricate details?
No, chenille is best for bold, simple designs. The process of how to make chenille patches uses thick, looped yarn, which makes it difficult to render small text or intricate lines clearly. We recommend a minimum line thickness of 3mm. If your design has fine print or complex shapes, a hybrid patch combining a chenille base with embroidered details is the perfect solution. This gives you the best of both worlds.
What is the best backing for chenille patches on a letterman jacket?
A sew-on backing is the gold standard for letterman jackets. This traditional method provides the strongest and most durable bond, ensuring your patch stays secure on heavy wool or leather for decades. While an iron-on backing offers convenience, sewing is the professional choice for garments that will see significant wear. It guarantees your patch won’t peel or lift over time, protecting your investment and your school pride.
How durable are chenille patches? Can they be washed?
Chenille patches are built to last. The dense yarn construction is highly durable, making them a perfect match for jackets, hoodies, and bags. You can wash them, but we advise taking simple precautions. Turn the garment inside out, use a gentle cycle with cold water, and always hang it to dry. Avoid high-heat dryers, as they can damage the fuzzy texture. Proper care keeps your patch looking vibrant for years.
What is the minimum order quantity for custom chenille patches?
We make professional quality accessible to everyone. Our minimum order quantity (MOQ) for custom chenille patches is just 10 units. This low minimum is perfect for small teams, limited-edition apparel, or personal projects. You get the same fast turnaround, free design proof, and outstanding customer service whether you order ten patches or ten thousand. Getting started is simple and hassle-free, with no hidden fees.
How long does it take to produce a bulk order of chenille patches?
We deliver speed and quality you can count on. A standard bulk order of custom chenille patches typically takes 10-14 business days for production after you approve your final design. Shipping is always fast and free. If you’re working with a tight deadline, just let us know. We offer rush production options to ensure your patches arrive exactly when you need them, without compromising the quality of your design.