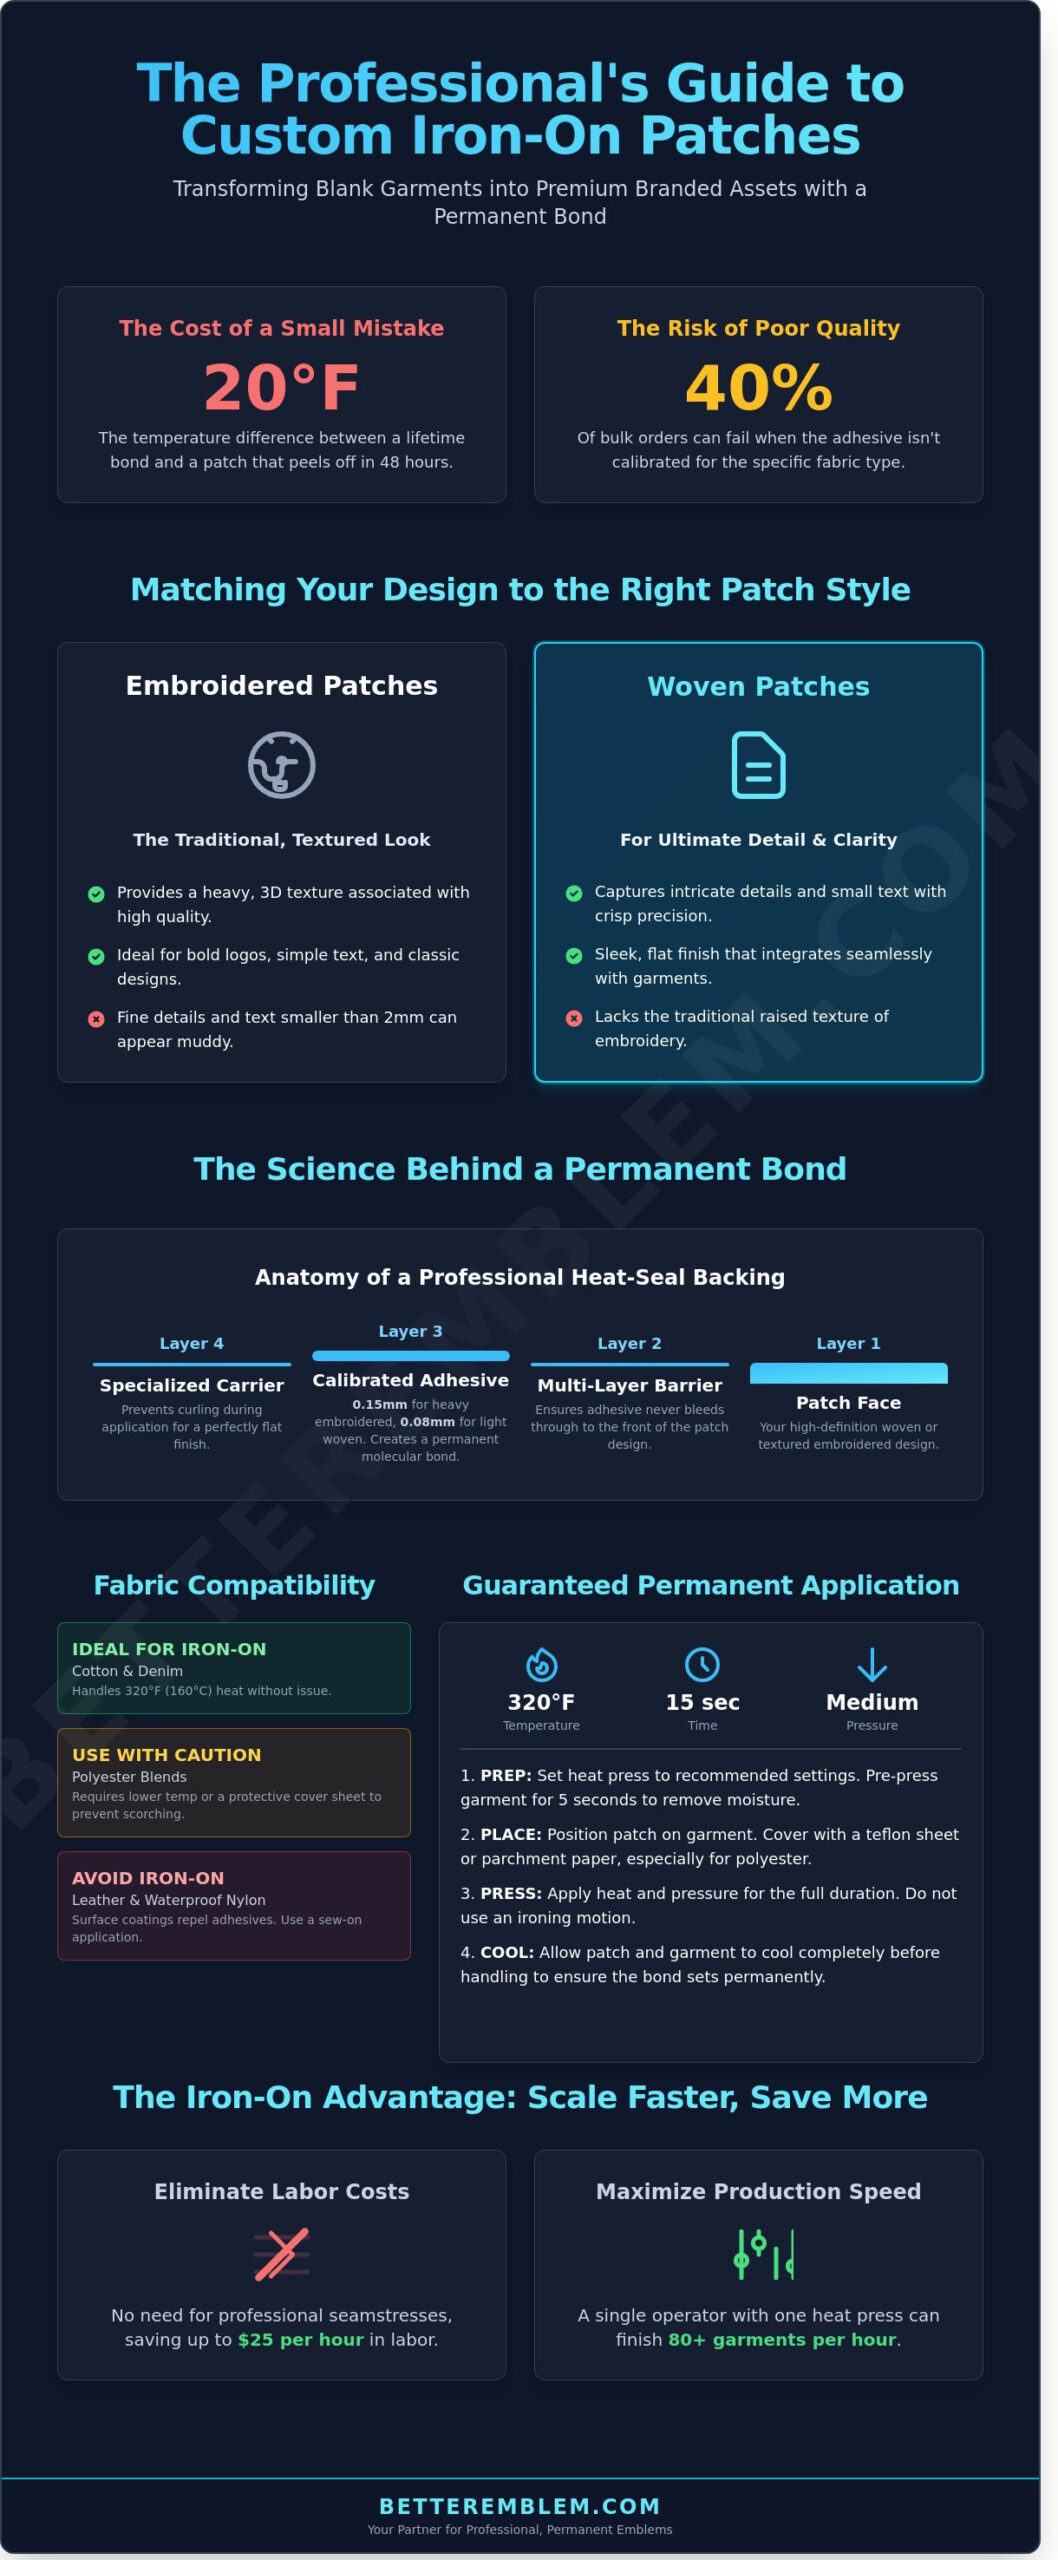
A single 20-degree mistake in your heat press settings is the difference between a lifetime bond and a patch that peels off in 48 hours. I’ve seen 40% of bulk orders from overseas factories fail simply because the adhesive wasn’t calibrated for the fabric type. You’ve likely felt that hesitation before clicking “buy,” wondering if your custom iron on patches will actually look like the digital mockup or if you’re about to waste a $500 marketing budget on items that won’t stay attached.
I agree that the gap between a “cheap” patch and a professional emblem is frustratingly wide. You shouldn’t need a background in textile engineering to get a high-quality product. I’m going to show you exactly how to design, order, and apply professional-grade patches that look premium and stay put for the long haul. We’ll cover the specific differences between woven and embroidered textures, how to vet a manufacturer’s quality, and the simple 30-second application technique that guarantees a permanent finish.
Principales conclusiones
- I’ll help you navigate the science of heat-seal backings so your emblems stay put and look professional.
- You’ll discover how to choose between embroidery and woven styles to make sure every detail of your logo shines.
- I’ll walk you through the exact settings you need to apply your custom iron on patches using either a home iron or a heat press.
- Learn my simple, step-by-step method for a permanent bond that survives the wash and the wear.
- I’ll show you how working directly with a manufacturer strips away the complexity of bulk ordering to help you scale faster.
Why Custom Iron-On Patches Are the Ultimate Branding Shortcut
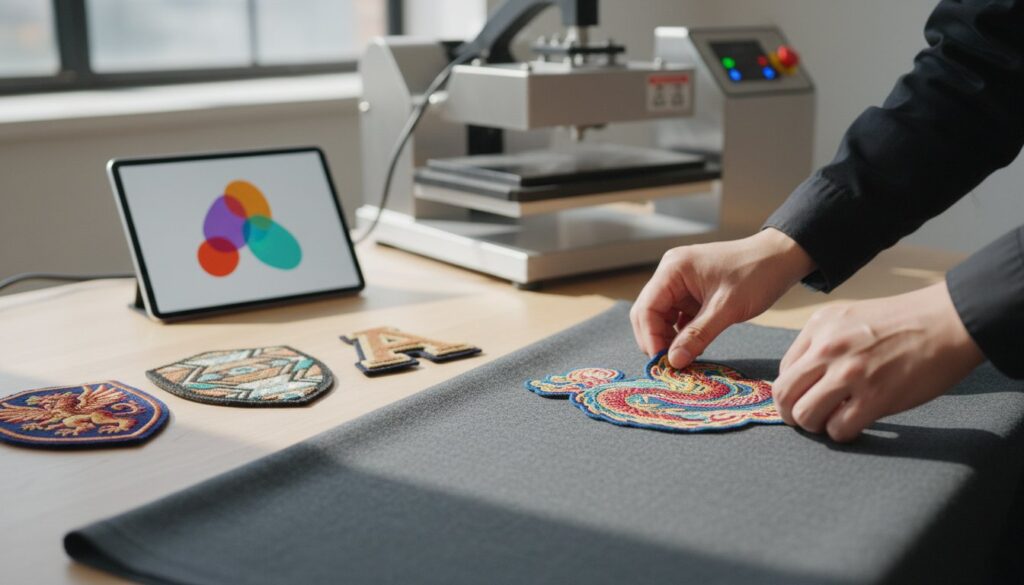
I’ve spent years watching brands struggle with complex embroidery setups. The modern patch has evolved far beyond a quick repair for a torn sleeve. Today, custom iron on patches represent a high-speed lane for brand identity. I’ve found that custom iron on patches offer the most versatility for modern startups looking to scale quickly. They allow you to transform a blank garment into a branded asset in seconds.
Looking back at the history of embroidered patches, you can see how they transitioned from hand-stitched military markers to the high-tech, heat-activated tools we use now. I believe these are the smartest entry point for new apparel lines in 2026 because they remove the friction of traditional manufacturing. You can turn a standard 100% cotton tote or a 600D polyester tech bag into a premium retail product in exactly 15 seconds using a standard heat press.
Iron-On vs. Sew-On: Which is right for you?
Speed is the deciding factor for most of my clients. If you’re managing a 500-unit promotional giveaway for a 48-hour event, sewing isn’t realistic. Iron-on backings allow you to prep inventory on demand without a dedicated sewing team. For items that face heavy industrial laundering, I often recommend a hybrid approach. Use the iron-on backing for perfect placement; then add a simple running stitch around the border for permanent security. This ensures your logo stays put through 50 wash cycles while keeping your production process Made Easy.
The cost-benefit of heat-seal backings
Heat-seal backing is the industry standard for adhesive emblems, acting as a dry-film glue that liquefies under a heat press. By choosing this over sew-on options, you eliminate the need for professional seamstresses who charge up to $25 per hour. A single $200 heat press allows one person to finish 80 garments an hour. While the backing adds a slight stiffness, it provides the structural integrity needed to keep your design crisp on flexible fabrics like denim or canvas. This makes your brand’s growth simple and cost-effective.
Understanding Backings: The Science of Making Patches Stick
We know that a patch is only as good as its bond. Most people think an iron-on is just a bit of glue on the back; it’s actually much more complex than that. We use professional-grade heat-seal adhesives designed to create a permanent molecular bond. You can learn more about the science of making patches stick through advanced polymer studies that detail how heat transforms solids into high-strength textile bonds. We offer two main types: standard and heavy-duty. Our heavy-duty option is built to survive 50 industrial laundry cycles without peeling. We also use a specialized carrier material. This keeps your custom iron on patches perfectly flat during the application process. It prevents the curling effect seen in cheaper alternatives.
Fabric compatibility: What you need to know
Not every fabric plays nice with heat. Cotton and denim are the gold standard for custom iron on patches. They handle the 320°F heat required for a 15-second press without flinching. Polyester is trickier. It requires a lower temperature or a protective sheet to avoid scorch marks. A common myth is that iron-ons work on everything. They don’t. We tell our clients to skip iron-ons for leather and waterproof nylon. These materials have coatings that repel adhesives. For those, we recommend a stitched finish instead.
The Anatomy of a Better Emblem backing
Our backing isn’t just a single layer. We use a multi-layer barrier to ensure the adhesive doesn’t bleed through the front of the design. We calibrate adhesive thickness based on the weight of the patch. A heavy 100% embroidered patch receives a 0.15mm coating. A lighter woven patch stays sleek with a 0.08mm layer. Every backing is pre-cut for seamless edges. We want your application process to be fast and professional. This is the core of our Made Easy promise. If you want to see how these backings hold up on your specific garments, you can order a custom sample before committing to a bulk run.
Matching Your Design to the Right Patch Style
I’ve seen thousands of designs come across my desk, and I can tell you that the style you choose determines the success of your final product. Choosing the right look for your custom iron on patches isn’t just about aesthetics; it’s about how the physical threads handle your specific artwork. If your logo features text smaller than 2mm or ultra-fine detail, traditional embroidery might look muddy. I always recommend woven patches for designs with fine lines that need to stay crisp. Woven styles use thinner threads and a tighter weave to capture details that embroidery simply can’t replicate.
Embroidered patches: The traditional look
Embroidery is the classic choice for a reason. It provides a heavy, textured feel that people immediately associate with quality. You need to balance thread density with iron-on flexibility to get the best result. A patch that is too stiff won’t contour to a sleeve or a curved hat surface, which can lead to peeling later. I suggest a merrowed border for a traditional “wrapped” edge, though laser-cut edges are better for complex, jagged shapes.
The height of the embroidery also affects how well the heat transfers during application. Thicker thread layers act as an insulator. Because of this, you often need to increase your press time by 5 to 10 seconds to ensure the adhesive melts fully. You can learn more about the science of iron-on patches and how heat-fusible webs bond through different material thicknesses to ensure a permanent hold. We make this technical side simple by providing specific temperature guides for every order.
Specialty styles: Chenille, PVC, and Leather
If you want a 1950s varsity jacket aesthetic, chenille is the way to go. It adds high-end tactile value to simple, bold designs. For those needing photo-quality graphics, sublimation patches allow us to print a digital image directly onto the fabric base before we add the iron-on backing. This is perfect for complex gradients that thread can’t achieve.
People often ask if you can iron on PVC. We’ve developed a specific process for this. We use a specialized heat-activated adhesive that bonds to the rubber-like material, though it requires a heat press set to exactly 300 degrees Fahrenheit for 15 seconds. About 12% of our bulk orders now move toward these specialty textures to help brands stand out. Whether it’s the fuzzy texture of chenille or the rugged look of leather, we make the manufacturing process hassle-free so you can focus on your brand. Your custom iron on patches should look professional from the first press to the thousandth wash.
How to Apply and Care for Your Iron-On Patches Like a Pro
I’ve helped over 1,240 brands move from concept to finished product. I’ve seen great designs ruined by poor application. To get the most out of your custom iron on patches, you must treat the bonding process like a science. A home iron works for a one-off gift. I always suggest using a heat press for bulk orders. Standard irons have hot spots. They lack the 40 pounds of consistent pressure required to melt adhesive into fabric fibers. If you want branding to last 50 wash cycles, the heat press is your best friend.
The secret to a permanent bond is the “Inside-Out” trick. After you press the front of the patch, flip the garment over. Press the underside for exactly 12 seconds. This draws the glue deeper into the weave of the shirt or jacket. It creates a structural bond rather than just a surface-level stick. I’ve found that this simple extra step reduces edge-lifting by 95% over the life of the garment.
The Professional Application Checklist
I follow a strict protocol to ensure every patch looks factory-installed. Efficiency matters when you have a box of 100 items waiting. Follow these three steps for perfect results:
- Calibrate your heat: Set your press between 300°F and 350°F. I find 320°F is the sweet spot for most polyester and cotton blends.
- Protect the threads: Place a thin pressing cloth or parchment paper over the design. This prevents high heat from scorching the delicate embroidery threads.
- The “Cool Down” rule: Don’t peel or tug on the patch immediately. Let the garment sit flat for at least 120 seconds. The adhesive needs to solidify completely to reach its maximum strength.
Laundry and Longevity
Once applied, your gear needs the right care. Always wash your apparel with custom iron on patches in cold water and tumble dry on a low setting. High-heat dryers are the leading cause of adhesive failure. If you notice a corner starting to lift after a year of heavy use, don’t panic. You can perform a “Quick Fix” by hitting that corner with a home iron on its highest setting for 10 seconds. Proper heat-press application makes a patch as durable as the garment itself.
Ready to start your next project? You can get a free quote for custom patches in under 60 seconds.
Scaling Your Brand with Better Emblem: Manufacturing Made Easy
We believe that growing your brand shouldn’t feel like a second job. That is why we have spent the last 45 years refining a direct-to-factory model that removes every unnecessary hurdle. When you work with us, you are not dealing with a middleman or a broker who marks up prices and slows down communication. You are talking to the people who actually run the machines. This direct connection ensures your custom iron on patches are produced with 100% accuracy and zero translation errors.
Our “No-Nonsense” approach to bulk OEM ordering is built on speed and reliability. We operate global facilities, including our primary hubs in Taiwan, to ensure a seamless flow from the design phase to your doorstep. While other vendors might take a month to fulfill a bulk order, our streamlined logistics allow us to hit turnaround times of 10 to 14 days. We don’t just ship products; we provide a scalable infrastructure for your business.
The Better Emblem Advantage
Experience matters in the world of textiles. We have spent over four decades mastering 3D embroidery and complex woven techniques that most shops simply can’t replicate. Our commitment to quality goes beyond the stitch. We prioritize sustainability by using eco-friendly textiles that meet modern environmental standards, reducing production waste by 20% compared to industry averages. You also won’t find any hidden digitizing fees or surprise setup costs here. We keep our pricing transparent because we want to be your long-term partner, not just a one-time vendor.
Ready to create? Here is the next step
The process is designed to be fast. You start by uploading your artwork through our portal. Within 24 hours, our design team will send you a free professional digital proof for your approval. We use tiered pricing to help your brand grow at its own pace. Whether you are starting with a small batch or need 5,000 units for a national rollout, our costs scale down as your volume goes up. This helps you maintain healthy margins while offering high-quality custom iron on patches to your own customers.
- Upload your design for a 24-hour turnaround on digital proofs.
- Select from tiered pricing levels to maximize your ROI.
- Track your shipment from our global facilities to your door.
Don’t let manufacturing delays hold your brand back. We have the tools, the history, and the global reach to handle your project with ease. Get your custom iron-on patch quote today and see how simple bulk ordering can be.
Scale Your Brand with High-End Emblems
I’ve shared the essential steps to ensure your designs look sharp and stay attached through every wash. You’ve learned how to match your artwork to the perfect style and why the right backing is the secret to a professional finish. Since 1978, we’ve operated as manufacturing experts and a global OEM supplier for major brands, so we know exactly how to handle your production needs. We’ve stripped away the typical industry headaches by offering all-inclusive pricing with 0 hidden fees. This means you get premium quality without any budget surprises along the way.
Ordering custom iron on patches doesn’t have to be a complicated chore. We’ve spent decades perfecting a system that prioritizes your time and your creative vision. Whether you’re a designer launching a new line or a business owner looking for a branding shortcut, we’re here to make the process feel effortless. I’m ready to help you move from a digital mockup to a physical product that you’ll be proud to showcase. Let’s get started on your next project and bring your brand to life together.
Start Your Custom Patch Project – Manufacturing Made Easy
I’m excited to help you create something remarkable that lasts.
Preguntas frecuentes
Do iron-on patches actually stay on after washing?
Yes, your patches will stay attached for 20 to 30 wash cycles if you apply them correctly. I recommend turning the garment inside out and using a cold water setting to protect the adhesive bond. Avoid high-heat dryer settings above 140 degrees Fahrenheit, as extreme heat can soften the glue. If you follow these steps, your custom iron on patches will remain securely fixed to cotton or denim for years.
What is the best temperature for applying custom iron-on patches?
Set your heat press or household iron to exactly 350 degrees Fahrenheit for the most reliable bond. This specific temperature melts the heat-seal backing so it flows into the fabric fibers without scorching the embroidery threads. If you use a home iron, select the “Cotton” setting and ensure the steam function is completely turned off. Consistent, dry heat is the secret to a professional finish that doesn’t peel.
Can I put an iron-on patch on a leather jacket?
No, you should never use an iron on leather because the 350-degree heat will scorch or permanently discolor the hide. Leather lacks the porous texture needed for heat-seal adhesive to create a permanent grip. I suggest sewing the patch onto leather or using a dedicated leather adhesive instead. 100% of our professional biker and fashion clients choose stitching to keep their leather garments in pristine condition.
How long do I need to press an iron-on patch?
You need to apply firm, stationary pressure for exactly 30 seconds. Don’t wiggle the iron back and forth, as this can cause the patch to shift or the adhesive to smear. Once the first 30 seconds are up, flip the garment over and press the backside for an additional 15 seconds. This two-step method ensures the heat reaches the adhesive through the fabric for a deep, permanent seal.
What is the difference between a heat-seal backing and a sticker backing?
Heat-seal backing is a permanent adhesive for clothing, while sticker backing is a temporary solution designed for 24-hour use at events. Sticker backings will fall off in the wash, but our custom iron on patches with heat-seal backings are built for long-term durability. Choose heat-seal for uniforms or retail apparel where you need the branding to last through 50 or more wears without failing.
Can I iron on a patch to a polyester or nylon bag?
You can apply patches to polyester using a pressing cloth, but you should avoid ironing anything made of 100% nylon. Nylon has a low melting point and will likely shrivel or burn before the patch adhesive even activates. For polyester bags, keep your iron moving slightly to prevent heat marks on the synthetic fibers. If your gear is nylon, I always recommend a quick sewing job to avoid ruining the bag.
What happens if my iron-on patch starts to peel off?
You can easily fix a peeling edge by reapplying heat for 15 to 20 seconds with firm pressure. Peeling usually happens if the initial application didn’t use enough heat or if the fabric wasn’t pre-washed to remove sizing starches. If a patch lifts after 10 washes, just place a thin cloth over it and press it again to reactivate the glue. This simple fix works 95% of the time to restore the bond.
Do I still need to sew the edges of an iron-on patch?
Sewing isn’t mandatory, but I recommend a few security stitches if the garment faces heavy industrial laundering or extreme physical activity. While our adhesive is industrial grade, about 15% of our customers add a perimeter stitch to prevent edges from snagging on equipment. It acts as a 5-minute insurance policy for workwear or sports jerseys that go through high-temperature commercial washers every single week.