Your custom patch design isn’t just a piece of art; it’s a technical contract between you and your manufacturer. If that contract is vague, you’ll likely end up with samples that look nothing like your original vision. I’ve seen too many brands lose time and money because they didn’t have a clear blueprint. That’s why creating a tech pack for a custom patch is the most important step you can take to ensure your 3D embroidery or chenille patches arrive exactly as you imagined them.
I understand the headache of staring at terms like merrowed edges versus heat-cut borders and wondering how they’ll impact your final cost. It’s frustrating when “simple” projects turn into multiple sampling rounds that eat your budget. I’ll show you how to build a professional technical blueprint that strips away this complexity. We’ll cover everything from 2026 color trends like Pantone’s “Cloud Dancer” to choosing the right durability for PVC or leather. By the end of this guide, you’ll have a clear template to reduce errors and take total control over your production.
ประเด็นสำคัญ
- Learn why a simple image file isn’t enough and how a technical contract prevents manufacturing delays.
- Master the process of creating a tech pack for a custom patch by using vector artwork and clear material call-outs.
- Discover how to adjust your specifications for different styles, whether you’re aiming for 3D embroidery height or woven detail.
- Identify the “Micro-Text” trap and other design errors that lead to distorted shapes or illegible branding.
- Streamline your production journey from initial vision to bulk delivery using my proven OEM process.
Why I believe every custom patch project needs a solid tech pack
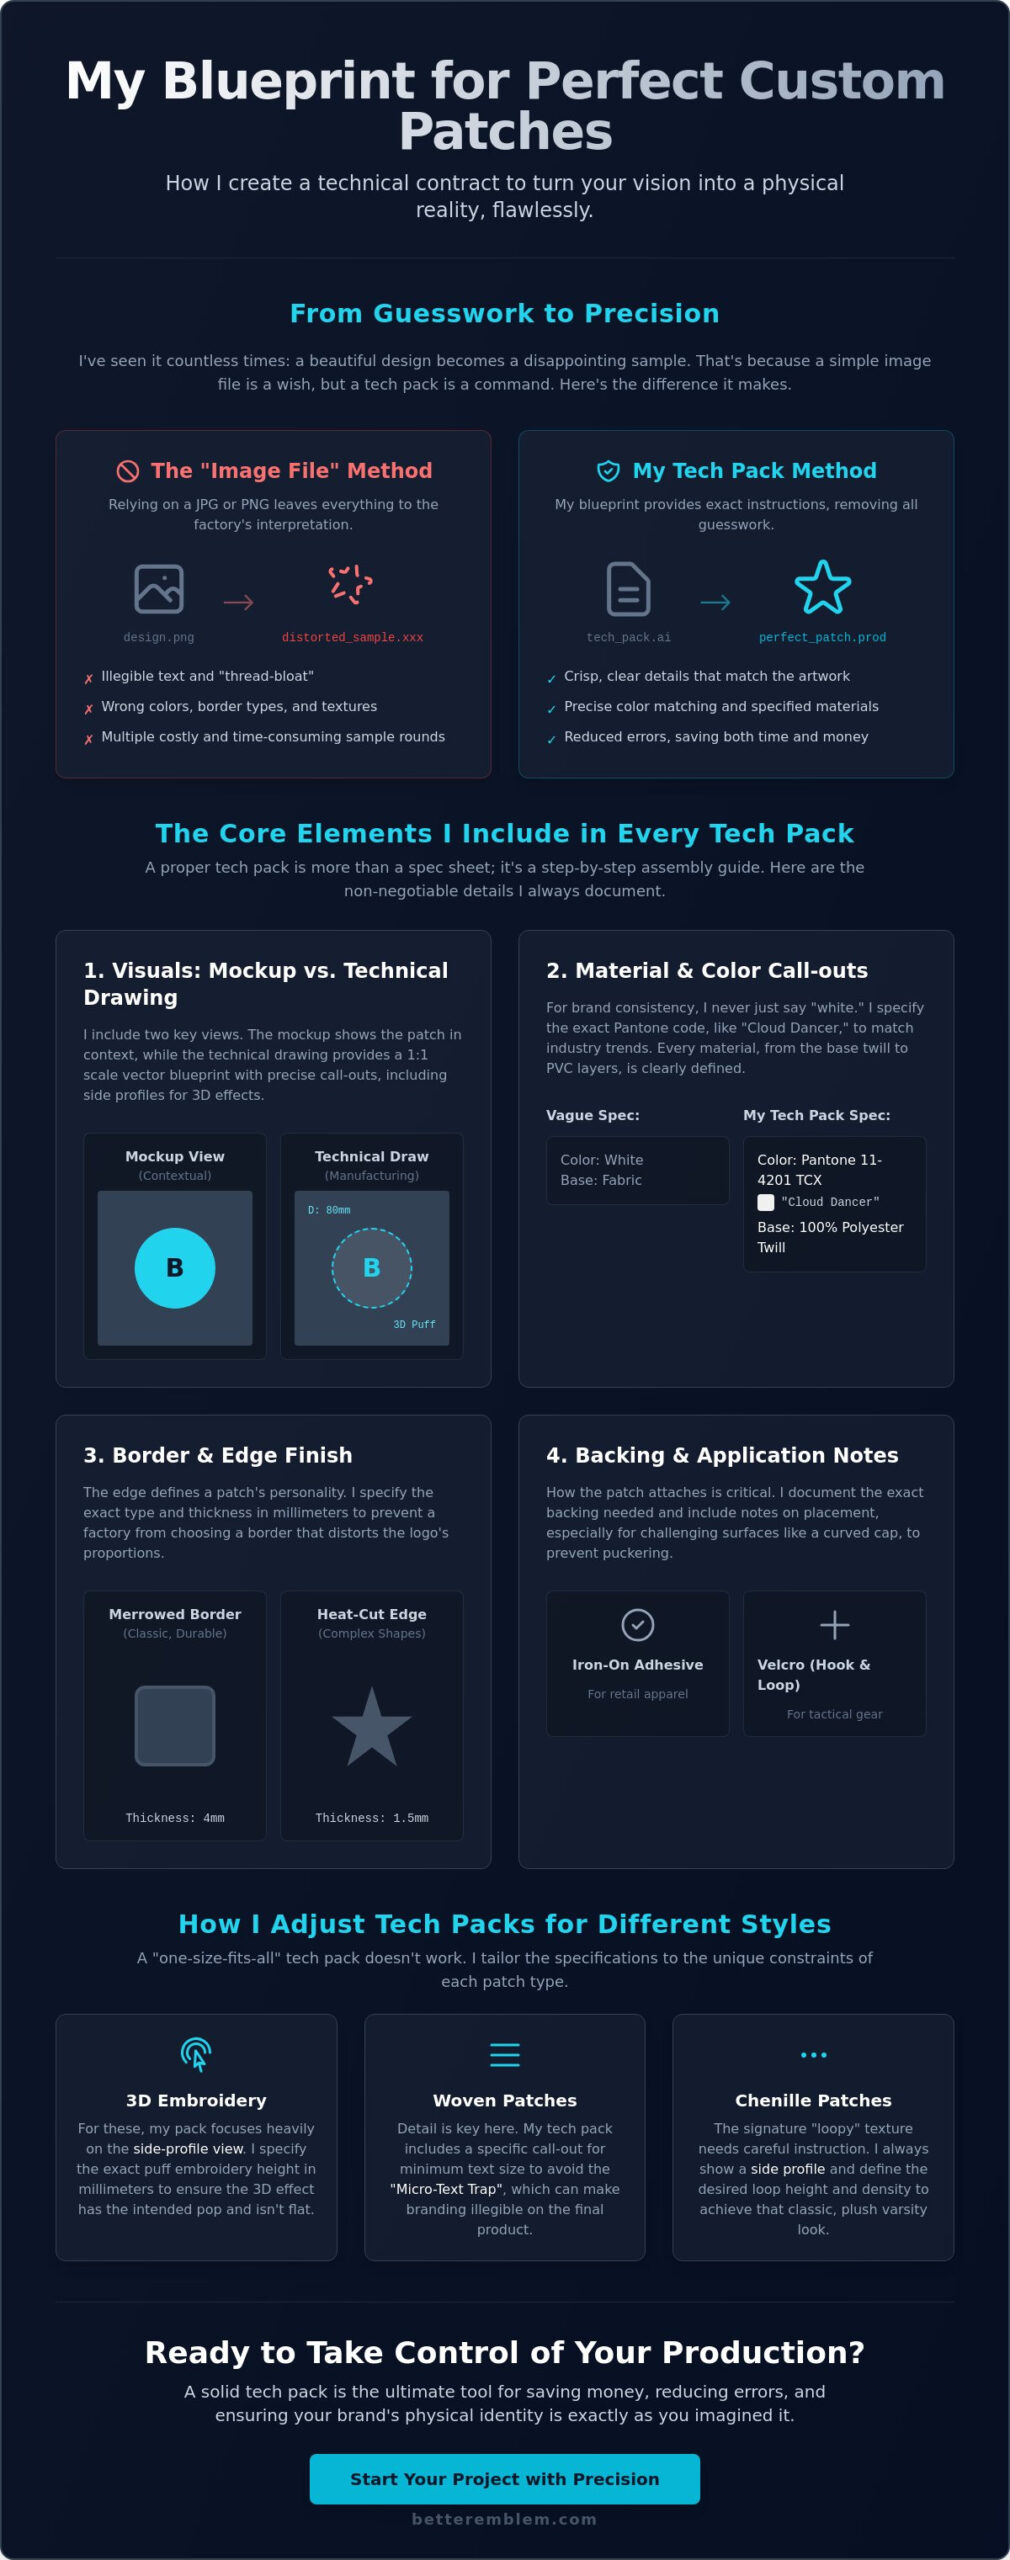
I’ve seen it happen dozens of times. A brand sends over a beautiful high-resolution PNG and expects a perfect 3D embroidery patch in return. Two weeks later, the sample arrives, and it’s a mess. The text is illegible; the colors are off; the border looks bulky. This happens because an image file is just a picture. A tech pack, however, is a blueprint. When you focus on creating a tech pack for a custom patch, you aren’t just making a drawing. You’re creating a technical contract that tells the factory exactly how to build your brand’s physical identity.
What is a patch tech pack?
Think of it as a master document. It holds every physical detail of your emblem. There’s a massive difference between an art file and a production file. An art file shows what you want it to look like. A production file explains how to make it. By applying basic patternmaking principles to your patch design, you ensure that the physical structure supports the aesthetic. It’s the difference between a sketch of a house and a set of architectural plans. For me, this document is the ultimate blueprint for your brand identity.
Relying on a simple image is the primary cause of manufacturing delays. Factories have to guess your thread counts, backing types, and border widths. This guesswork leads to “thread-bloat,” where too many stitches in a small area make the patch stiff and distorted. Without specific instructions, a factory might choose a merrowed edge when you actually needed a precision heat-cut border for a complex shape. Clear specs eliminate this confusion immediately.
The cost of skipping the technical stage
Skipping this stage is expensive. Vague specs lead to multiple sampling rounds. Each round costs you money and weeks of time. You also risk “design drift” during mass production. This is when the bulk batch looks slightly different from the approved sample because the technical constraints weren’t locked down. Professional brands don’t leave these details to chance. They start with a pack to maintain total control over the final aesthetic and durability.
My philosophy is simple. Transparency leads to better pricing. When I see a detailed tech pack, I can provide an accurate quote immediately. There are no hidden hurdle fees later because we both know exactly what’s being built. It removes the friction from the start and ensures you’re making a high-quality investment without the stress of unexpected costs. A solid tech pack saves you money by replacing guesswork with precision.
The 5 core elements I include in every patch tech pack
Most designers confuse a simple spec sheet with a comprehensive tech pack. While a spec sheet might just list dimensions and a general color, creating a tech pack for a custom patch involves documenting the entire physical anatomy of the emblem. Understanding the Tech Pack vs Spec Sheet distinction is vital for your brand. One is a basic summary; the other is a step-by-step assembly guide that ensures your 3D embroidery or woven patches look identical to your digital art.
Visuals: The Mockup vs. The Technical Draw
I always include two distinct views in my packs. The mockup shows how the patch looks in a real-world setting, like on a hat or jacket. The technical draw is a 1:1 scale vector file created in a program like Adobe Illustrator 2026. I use clear arrows to point out specific textures. If you’re designing chenille patches, you need to show the side profile. This tells the factory exactly how high the “loops” should sit. Without a side view, your 3D effects might end up looking flat and uninspired.
Material and Color Call-outs
Consistency is everything for professional branding. I don’t just list “white” as a color. I specify Pantone 11-4201 “Cloud Dancer” to stay aligned with the 2026 palette trends. Your tech pack should list every thread color and base material clearly. You need to decide if you want a rugged twill base, a soft felt, or perhaps a fully sublimated background for complex gradients. If you are looking for high-end พียูซีแพทช์, you must specify the exact layers for each color to avoid a muddy final product.
The Border and Edge Finish
The edge finish defines the personality of the patch. I usually recommend a merrowed border for that classic, chunky varsity look. It wraps around the edge and provides great durability. However, if your design has jagged edges or sharp, complex corners, a heat-cut or laser-cut edge is a much better choice. I always define the border thickness in millimeters. A standard 4mm merrowed edge looks very different from a thin 1.5mm satin-stitched border. Specifying this prevents the factory from making a choice that might distort your logo’s proportions.
Finally, I always include the backing and application notes. Whether you need tactical Velcro for uniforms or a simple iron-on adhesive for retail apparel, it must be documented. I also add notes on the intended placement. If a patch is meant for a curved surface like a cap, the factory might suggest a slightly different stitch density to prevent puckering. Clear communication at this stage removes every hidden hurdle from the manufacturing process.
How I adjust tech packs for embroidery, woven, and chenille styles
A common mistake I see is using a “one size fits all” approach to technical specifications. Different manufacturing methods require unique data points to succeed. When you are creating a tech pack for a custom patch, you must tailor your document to the specific medium you’ve chosen. A specification that works for a heavy leather patch will fail miserably for a high-detail woven design. I treat each material as its own distinct engineering project to ensure the highest quality results.
The 3D Embroidery Difference
If you want that premium, raised look, you need to be specific about your การปักสามมิติ. I always define the foam thickness, usually 2mm or 3mm, in the side profile view. You also need to map out exactly which parts of the design remain flat. If your logo is too complex, “puff” styles can look sloppy. I use a color-coding system to show the factory which sections get the 3D treatment and which stay standard. This level of detail ensures the final product has the structural integrity you expect.
High-Detail Woven and Heat Transfer Specs
When your design includes small text or intricate linework, I recommend transitioning to แพทช์ทอ. These use thinner threads and a tighter weave. In your tech pack, you should specify the density of the weave rather than stitch counts. For photographic elements or gradients that thread simply can’t capture, I call for การพิมพ์ถ่ายเทความร้อน in your tech pack. For these, you must include high-resolution files, ideally 300 DPI or higher, to maintain clarity during the transfer process.
Chenille and Specialty Materials
Drafting for แพทช์ผ้ากำมะหยี่ requires a focus on texture. I always call out the “moss stitch” effect and specify the loop height. You also need to define the felt base color, as this often acts as a visible border. For แพทช์สั่งทำพิเศษเฉพาะ like PVC or leather, I map out 2D versus 3D molded layers. This tells the factory which parts should be recessed and which should be raised. Creating a tech pack for a custom patch with these specialty materials also means ensuring your backing choice, like heavy-duty Velcro, matches the physical weight of the material. This prevents the patch from sagging or peeling over time.
Common mistakes I see designers make when drafting patch specs
I’ve spent years reviewing blueprints, and I’ve noticed a clear pattern. Most manufacturing errors don’t come from bad artwork; they come from ignoring the physical laws of thread and fabric. While software tutorials might tell you how to name your layers, they often skip the part where a needle has to actually move through a base material. When creating a tech pack for a custom patch, you have to think like a builder, not just a graphic designer.
The “Micro-Text” Trap is the most frequent offender I see. Designers often include tiny taglines in their 3D embroidery specs, hoping for a crisp finish. If your text is smaller than 4mm high, it will likely look like a tangled blob of thread. For standard embroidery, I always recommend keeping text at least 5mm tall for perfect legibility. If your branding requires microscopic detail, you should pivot to a woven or heat transfer style instead.
The limits of thread and needle
Thread has a physical width. You simply can’t stitch a line thinner than the needle itself. I always tell my clients to simplify their logos for the best physical results. This means converting “gradients” in your digital art into solid blocks of color. Thread doesn’t blend like ink; it layers. If you try to force a digital gradient into an embroidered patch, the result is often a muddy, messy texture that lacks the sharp impact of a professional emblem.
Color overload is another hidden hurdle. Every new thread color adds density and tension to the design. If you pack 12 colors into a small circular patch, that tension will cause the base fabric to pucker or warp. It’s much better to simplify your palette to 6 or 7 high-impact shades. This keeps the patch flat, durable, and clean.
Scaling and Proportions
I always double-check the length-to-width ratio before we move to production. A tech pack catches these scaling errors before we ever cut a mold for a PVC patch or start a bulk embroidery run. It’s also vital to specify the “Total Area” versus the “Design Area.” The total area includes your border, while the design area is just your internal artwork. Confusing these two can result in a finished product that’s significantly smaller than you intended.
Don’t forget the “Bleed” and backing compatibility. Your design needs at least 2mm of breathing room from the border to avoid being clipped during the cutting process. Finally, make sure your backing choice matches your garment. Putting heavy tactical Velcro on a delicate, thin fabric will cause the shirt to sag and pull. If you aren’t sure which backing works best for your specific application, let us review your tech pack to ensure a perfect match for your brand’s needs.
How we turn your technical vision into a premium finished product
Once you’ve finished creating a tech pack for a custom patch, the heavy lifting is done. You’ve moved past the guesswork and built a reliable blueprint. Now, you need a partner who respects that precision. At Better Emblem Company Ltd., we’ve spent over 45 years acting as an Expert Facilitator for global brands. We don’t just see a document; we see your brand’s creative journey. Our facilities in Asia and North America are specifically designed to handle high-volume wholesale production with surgical accuracy. Your technical detail allows our teams to work with speed and confidence. This document acts as the bridge between your design studio and our factory floor, ensuring nothing is lost in translation.
The Better Emblem Company Ltd. OEM process is built for reliability. When you submit your tech pack, our team reviews every detail you’ve documented, from the merrowed borders to the Pantone thread matches. We handle the complex digitizing process for you. This is where we translate your vector art into a technical embroidery file that our machines can read perfectly. Because your tech pack already defines the 3D height and thread density, our digitizers don’t have to guess. This reduces sampling rounds and gets your bulk delivery to your door much faster. It effectively eliminates the friction that usually comes with mass-producing specialized goods.
Partnering with a veteran manufacturer
We treat your project with the same care we’d give our own brand. Many of our clients are professional buyers who need total consistency across thousands of units. Our high-volume expertise means we understand how to maintain quality from the first patch to the ten-thousandth. By following the technical requirements you’ve laid out, we ensure that the durability and aesthetic you planned for are exactly what we deliver. We strip away the complexity of manufacturing so you can focus on your brand’s growth and creative direction.
Ready to start your production?
Before you send over your files, run through one final checklist. Ensure your text meets the minimum height requirements we discussed, your Pantone colors are clearly labeled, and your backing choice matches your final application. Precision at this stage is the key to a high-quality investment when creating a tech pack for a custom patch. Once you’re confident in your specs, you can order custom patches with total peace of mind. If you still have questions about specific materials like PVC or leather, I invite you to reach out for a custom manufacturing consultation. We’re ready to turn your technical vision into a premium finished product.
Take control of your brand’s physical identity
You’ve now got the tools to move from a simple sketch to a professional production file. By avoiding common traps like illegible micro-text and choosing the right border for your design’s complexity, you’re already ahead of most brands. Mastering the process of creating a tech pack for a custom patch is the single best way to ensure your first sample is your final approved piece. It saves you money, reduces stress, and keeps your creative vision intact from the very first stitch.
Since 1978, we’ve provided manufacturing excellence and global OEM services for top-tier brands. We specialize in high-end techniques like 3D embroidery, chenille, and woven patches; we know exactly how to interpret your technical requirements. Let us bring your tech pack to life; get a custom quote today! Our team is ready to act as your expert facilitator to ensure a frictionless manufacturing experience every time. Your brand deserves an emblem that stands out on any garment. I’m excited to help you start this creative journey and see your vision become a reality.
คำถามที่พบบ่อย
Do I need professional software like Illustrator to create a tech pack?
You should use vector-based software like Adobe Illustrator 2026 to ensure your designs stay sharp at any size. Vector files allow me to scale your artwork without losing any clarity or detail. If you don’t have access to professional tools, a graphic designer can help you convert your sketches. This is a vital part of creating a tech pack for a custom patch because it provides the clean paths our machines need to follow.
Can I use a photo of an old patch as my tech pack?
A photo is a great visual reference, but it isn’t a substitute for a technical blueprint. Photos don’t provide the vector paths, exact dimensions, or specific material call-outs required for manufacturing. I use photos to understand your aesthetic goals, but we’ll still need to build a proper technical file. This ensures your new batch matches your brand’s current quality standards without any “design drift” from the old version.
What is the difference between a merrowed border and a heat-cut border in a tech pack?
Merrowed borders offer a classic, chunky edge that wraps around the patch; it’s perfect for circles and shields. Heat-cut borders are flat and follow the exact shape of your design with laser precision. I recommend heat-cut edges for complex or jagged shapes that a merrowed stitch can’t handle. Specifying this in your pack prevents the factory from choosing an edge that might distort your logo’s unique silhouette.
How do I specify the backing if I want my patches to be removable?
Specify a “Velcro” or “Hook and Loop” backing in your technical document if you need the patches to be removable. You should also note if you need just the hook side attached to the patch or both sides provided. This is a common requirement for tactical gear and corporate uniforms. It’s an easy way to add versatility to your branding without increasing the complexity of the manufacturing process.
Why do I need to provide Pantone colors instead of just RGB?
Pantone (PMS) colors are essential because they provide a universal physical reference for thread and material matching. RGB colors are designed for digital screens and look different on every monitor. By using specific codes like Pantone 11-4201 “Cloud Dancer,” you ensure your patches look identical whether they’re made in Asia or North America. It’s the only way to guarantee color consistency across different lighting and fabric types.
How long does it take to go from tech pack to finished bulk order?
The transition from a finalized tech pack to a bulk delivery usually takes between three and four weeks. This timeline includes about one week for the physical sampling phase and another two to three weeks for bulk manufacturing and shipping. Having a professional document ready speeds up this process significantly. It reduces the need for multiple sampling rounds and helps us hit your deadlines with confidence and speed.
What is the minimum line thickness I should use for embroidered text?
Your text should be at least 5mm tall to ensure the embroidery needle can capture the detail clearly. I also recommend keeping your line thickness at 1mm or more to prevent the stitches from blending together. As we discussed in the “Micro-Text” trap section, smaller text often becomes a tangled blob. If your design requires finer detail, we should look at woven patches or heat transfer printing instead.
Can I include multiple patch sizes in one tech pack?
You can certainly include multiple sizes, but I recommend a dedicated technical page for each one. This is a crucial step when creating a tech pack for a custom patch because it ensures proportions stay correct as you scale. Simply shrinking a large design can make small details disappear or become messy. A separate drawing for each size allows you to simplify the artwork for smaller applications while keeping the detail on larger versions.