
Last October, a marketing manager named Sarah opened a shipment of 500 custom emblems only to find a glaring typo in her brand’s slogan. It was a frustrating mistake that delayed her product launch by 14 days. You’ve likely felt that same knot of anxiety when placing a bulk order. It’s hard to feel confident when you’re worried about loose threads, wonky borders, or backings that won’t actually stick to your garments. To avoid these headaches, you need a reliable quality control checklist for a patch order that catches errors before they become expensive problems.
I’m here to make this process seamless. I will walk you through exactly how to audit your custom order so you never have to deal with thread breaks or wonky borders again. We’ll look at embroidery density, border integrity, and backing types to ensure your patches stay attached and look incredible. By the end of this guide, you’ll have a simple, repeatable system to verify every detail before your patches ever hit the heat press. You deserve professional branding that matches your original artwork perfectly, every single time.
ประเด็นสำคัญ
- I’ll show you how to use digital mockups and scale references to catch production errors before the first stitch is even made.
- Learn to spot technical flaws like “bird-nesting” and thread clumps during your visual inspection to keep your emblems looking sharp.
- Master the “peel test” and other durability checks to ensure your backings are secure and built to last.
- Use my comprehensive quality control checklist for a patch order to guarantee your final product matches your vision every single time.
- Discover how a professional manual inspection process eliminates the stress of thread breaks and wonky borders for a seamless brand launch.
Why a Quality Control Checklist for Your Patch Order is a Must
I’ve spent years in the custom emblem industry, and I’ve seen how one small oversight can derail a project. Quality control in patch making is the process of verifying that your physical emblem matches your digital proof in every detail. It bridges the gap between a design on a screen and a tangible product in your hand. I once saw a brand launch a limited edition jacket line in October 2022 where they skipped a final check on thread shades. The patches arrived in a neon orange instead of a muted copper. That single error ruined the aesthetic of a $15,000 product run and delayed their launch by six weeks.
Using a quality control system ensures that what you see on your monitor is what arrives at your door. Catching errors early saves you money on international shipping and prevents the headache of re-manufacturing. A solid quality control checklist for a patch order ensures consistency across bulk orders. It doesn’t matter if you are ordering 50 pieces for a local team or 5,000 for a national retail chain. Every piece must look identical to maintain your brand standards.
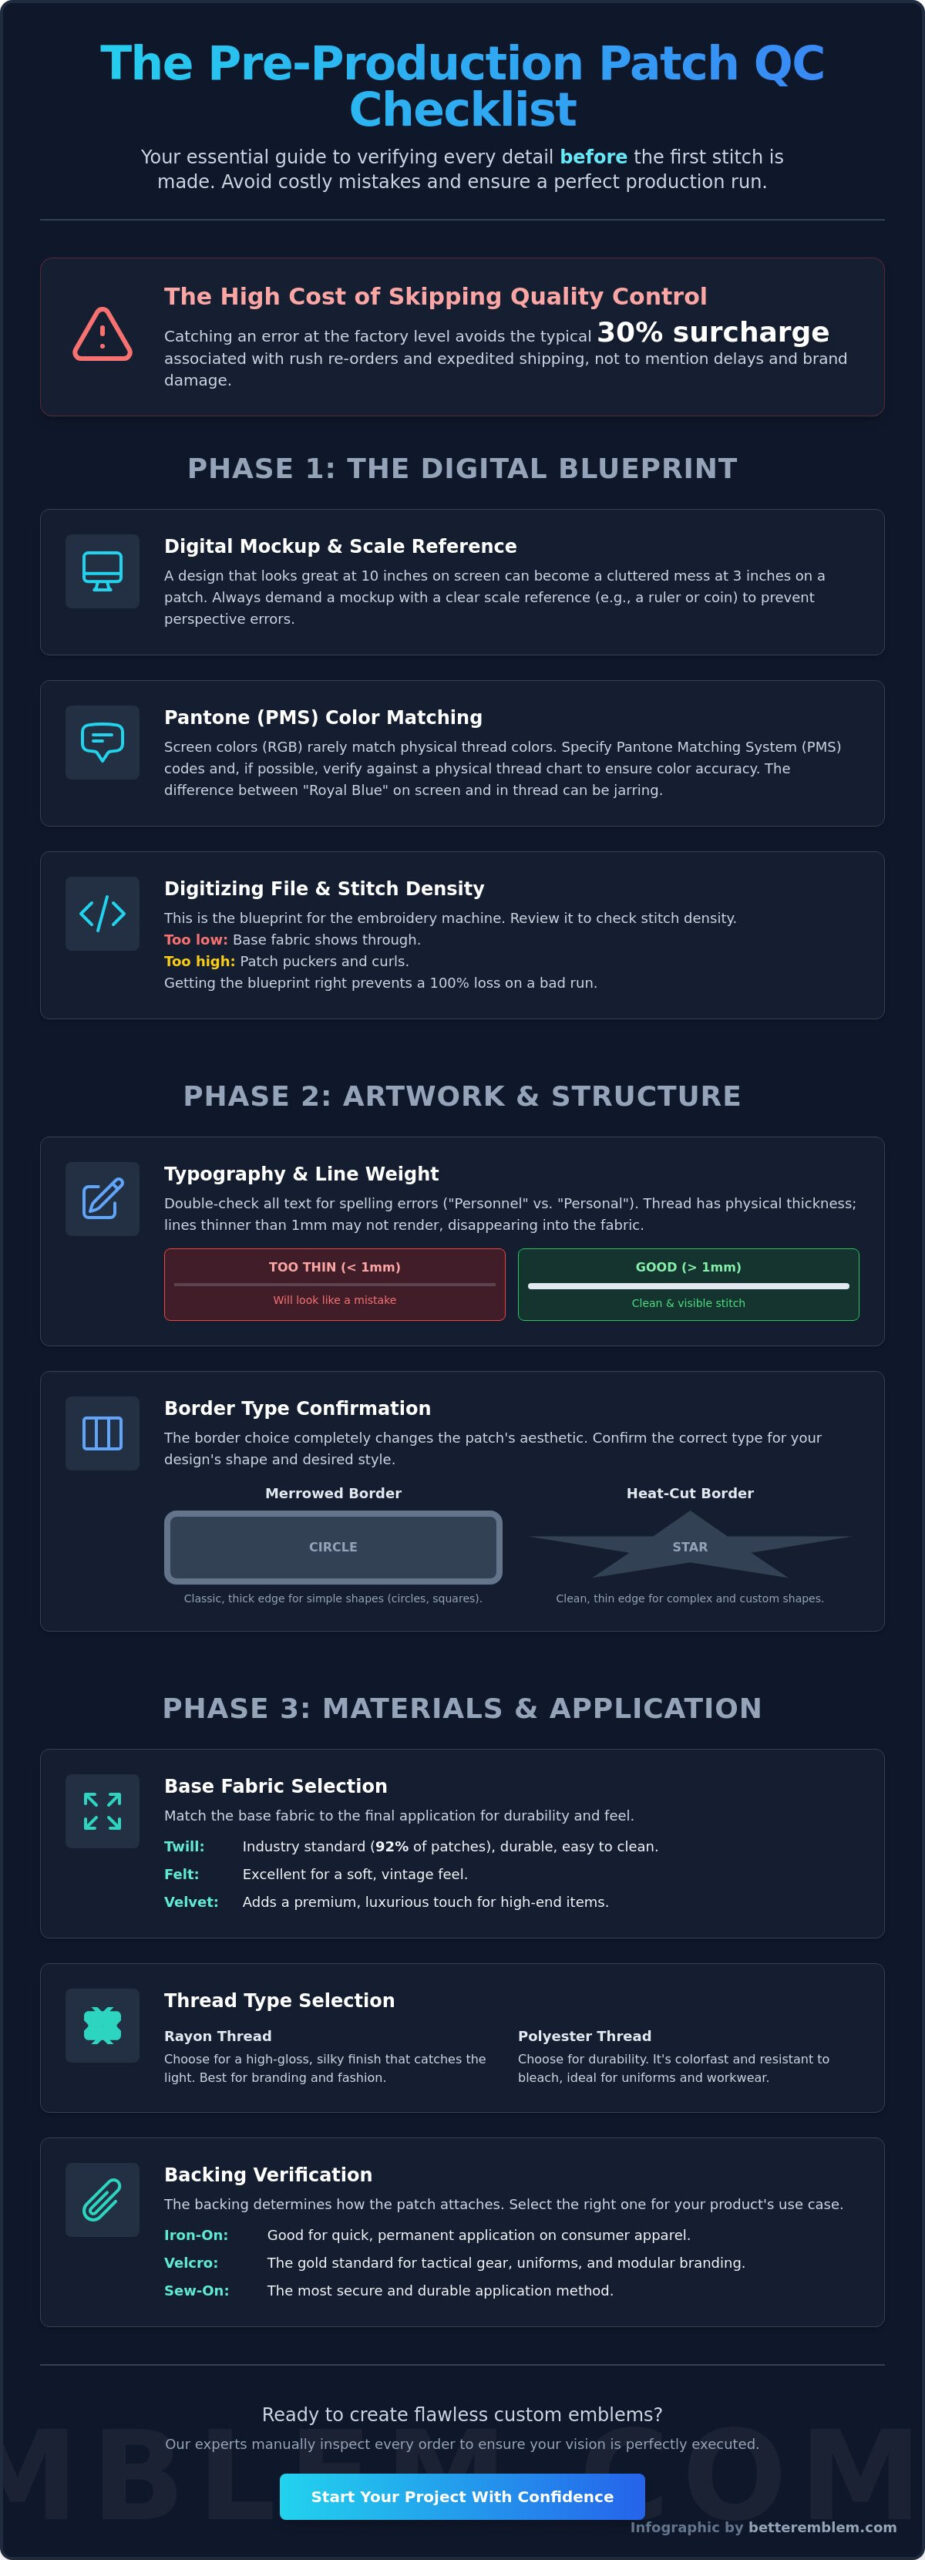
The High Cost of Skipping QC
Skipping your checks leads to hidden costs that go far beyond the initial invoice. If you ship subpar patches to customers, you face high return rates and lasting damage to your brand reputation. Fixing mistakes is nearly impossible once a patch is sewn or heat-pressed onto a garment. Unlike simple paper print jobs, แพตช์สั่งทำพิเศษ involve physical layers and textures that require intense scrutiny. Catching an error at the factory level avoids the 30% surcharge typically associated with rush re-orders and expedited shipping.
What “Quality” Actually Means in Embroidery
Quality is a technical balance between thread density, color accuracy, and structural integrity. While standard manufacturing might look fine from a distance, premium results stand up to close inspection without fraying or fading. Stitch tension is the foundation of a flat, professional-looking patch. A checklist helps you identify if the tension is too tight, which causes puckering, or too loose, which leads to loops. This attention to detail ensures your emblems look high-end and stay durable for years.
Pre-Production: The “Before You Stitch” Checklist
I believe the most effective way to handle QC is to prevent errors before they ever reach the factory floor. My quality control checklist for a patch order always starts with a digital mockup. This isn’t just a pretty picture. It must include a scale reference. A design that looks great at 10 inches on your monitor might look like a cluttered mess when it’s shrunk down to a 3-inch shoulder patch. I’ve seen how a simple lack of perspective can ruin a batch of 500 units instantly.
I also verify Pantone colors against physical thread charts whenever possible. Your computer screen uses light to show color, but embroidery machines use physical thread. The difference between a “Royal Blue” on a screen and a “Royal Blue” thread can be jarring. I also check the digitizing file. Think of this as the blueprint for the embroidery machine. It tells the needle exactly where to go. If the stitch density is too low, the base fabric will show through. If it’s too high, the patch will pucker and curl. Getting this blueprint right saves you from a 100% loss on a bad production run.
Artwork and Typography Verification
You would be surprised how often spelling errors slip through. I’ve seen professional orders for “Personnel” come back as “Personal” because no one took five seconds to proofread the small text. I always tell my clients to check line weights. Thread has physical volume. If a line is thinner than 1mm, it won’t render properly. It will just disappear into the base fabric or look like a mistake. You also need to confirm your border type early. A merrowed border offers a classic, thick edge for traditional shapes. A heat-cut border allows for complex, jagged shapes. Choosing the wrong one can completely change the aesthetic of your brand.
Material and Thread Selection
I always match the base fabric to the final application. Twill is the industry standard for 92% of custom patches because it’s durable and easy to clean. If you’re looking for a vintage feel, felt is a great choice. For luxury items, velvet adds a premium touch. You also have to pick the right thread. I suggest rayon if you want a high-gloss finish that catches the light. If the patch is going on a work uniform that gets bleached or washed daily, polyester is a better choice because it’s colorfast.
Finally, verify the backing. An iron-on backing is great for quick application, but Velcro is the gold standard for tactical gear or modular uniforms. While you’re finalizing these specs, ensure you stay compliant with federal labeling requirements for any textile products you plan to sell. It’s these small steps that keep your project moving forward without hidden hurdles. If you need help picking the right materials for your project, you can always check out our custom options to see what works best for your design.
Visual Inspection: Checking the Art and Threadwork
When that box lands on my desk, I don’t just dive in. I take a breath and start with a high-level visual scan of the top 10% of the order. I’m looking for “bird-nesting,” which are those messy clumps of tangled thread that indicate a machine tension issue. These clumps usually hide on the back, but they can create visible lumps on the front surface too. I also hunt for thread breaks or gaps. If the base fabric is peeking through the embroidery, the stitch count isn’t high enough. This is the first item I tick off on my quality control checklist for a patch order. I also verify the border alignment. A merrowed border must be perfectly centered. If the wrap is uneven, the patch looks amateur and lopsided.
During this initial scan, I look for three specific things:
- Consistent stitch tension across the entire batch.
- Clean jump stitches that have been trimmed close to the surface.
- Symmetry in the outer shape, ensuring no “stretching” occurred during the hooping process.
Detail and Density Check
I look at the height of การปักสามมิติ to ensure it is uniform. You shouldn’t see any of the internal foam through the satin stitches. If the foam is visible, it means the density was sacrificed for speed. When I handle แพทช์ทอ, I zoom in on the smallest text. Woven patches are designed for high detail, so letters as small as 2mm should still be legible and sharp. I also check that the stitch direction follows the contours of the artwork. When stitches change angle to match the shape of a leaf or a wing, it creates a sense of depth that makes the design feel premium rather than flat.
Color and Contrast Accuracy
Colors can be tricky. I always compare the physical patch to the original digital proof under natural lighting or a 5000K color-corrected lamp. Standard office bulbs can make a navy blue look like charcoal, which can lead to unnecessary disputes. I check for “bleeding” where dark threads might show through lighter sections. This often happens when a dark navy border is stitched next to a white background without a proper underlay. Finally, I check the bobbin thread on the back. This thread should never pull through to the front. If I see tiny white dots on a solid colored section, the machine tension was wrong. Keeping these specific details in your quality control checklist for a patch order prevents a 100% loss on a bulk shipment.
The Physical Stress Test: Backing and Durability QC
I believe a patch that looks great but fails to stay attached is a total waste of your budget. Physical testing isn’t just a suggestion; it’s a mandatory part of any quality control checklist for a patch order. I always start by handling the patches myself to feel the weight and resistance. If the materials feel flimsy, they won’t survive a standard laundry cycle.
For iron-on backings, I perform what I call the “peel test.” I use my thumbnail to pick at the very edge of the adhesive layer. You want to ensure the glue isn’t just sitting on top but is bonded deeply into the embroidery threads. The adhesive must be evenly distributed across 100% of the surface. If there are dry spots, the patch will eventually lift and trap dirt, ruining the garment.
I also check the flexibility of every sample. If a patch is too stiff, it will “bullet.” This happens when the patch stays flat while the fabric underneath curves, causing the edges to pop out and catch on things. I bend the patch between my thumb and forefinger to ensure it has enough give to move with the wearer. For Velcro patches, I test the hook and loop strength by attaching and detaching the patch 10 times in a row. It should require a firm tug to remove every single time.
Backing Integrity
I verify that iron-on glue covers every millimeter of the back, especially the sharp corners. For แพทช์ผ้ากำมะหยี่, I look closely at the felt backing. It needs to be trimmed within 1mm of the design to prevent unsightly fraying. I also inspect plastic backings used for stiffness to ensure they aren’t cracked. A single crack in the plastic will eventually lead to the patch snapping in half after 5 or 6 washes.
Edge and Border Durability
The border is the first line of defense against wear and tear. I always give the merrowed border a slight pull to make sure it won’t unravel with daily use. If I’m looking at heat-cut edges, I check for “fuzzing.” This is when tiny fabric strands escape the heat seal. A clean, smooth edge is the hallmark of a high-end OEM manufacturer. It proves the factory used the correct temperature and didn’t rush the finishing process. This attention to detail ensures your quality control checklist for a patch order results in a product that lasts for years.
How We Handle Quality Control at Better Emblem
We’ve been perfecting the patch-making process since 1978. Over those 46 years, we’ve seen every possible manufacturing hiccup you can imagine. We’ve dealt with thread tension shifts, color dye lots that didn’t quite match, and backing adhesives that didn’t meet our standards. This deep history means our quality control checklist for a patch order isn’t just a piece of paper. It’s a rigorous system built on decades of hands-on experience and refined techniques.
Our production process relies on a specific balance. We use high-speed, precision machinery to handle the heavy lifting, but we never let a machine have the final word. Every order undergoes three distinct stages of manual inspection before it’s cleared for shipping. Our team looks for loose threads, alignment issues, and color accuracy that digital sensors might miss. We catch the small stuff so your brand looks perfect every time.
I believe in total transparency throughout the manufacturing journey. You shouldn’t have to guess how your design is turning out. That’s why we provide detailed, high-resolution photos of your first production sample for every order. You get to see the physical manifestation of your design before the full run hits the machines. If something isn’t right, we fix it immediately. It’s a simple way to ensure you get exactly what you expected without any surprises.
ความได้เปรียบของตราสัญลักษณ์ที่ดีกว่า
Our global production reach is a major asset for our clients. It allows us to maintain consistent quality across different continents, ensuring your 500th patch looks exactly like your first. We’ve developed a particular expertise in แพทช์สั่งทำพิเศษเฉพาะ, including complex bullion embroidery and durable PVC options. Our goal is “hassle-free” manufacturing. We take the stress out of the process by acting as your filter, stopping errors at the source so you never have to deal with them.
Start Your Next Order with Confidence
You deserve a partner who cares about your brand as much as you do. Our team acts as your “Expert Facilitator” from the moment you upload your artwork. We guide you through thread choices, backing types, and border styles to ensure the final product exceeds your expectations. If you’re not sure where to start, reach out for a quote or ask for a sample pack to feel our quality for yourself. We’ve made the process seamless and fast. Ready to start your premium patch order? Let’s get to work.
Put Your Patch Production on Autopilot
You now have the tools to ensure every design comes out exactly as you imagined. Following a quality control checklist for a patch order helps you catch art errors early and verify that the physical backing can withstand daily wear. We’ve seen how a few simple checks on threadwork and durability prevent costly mistakes and keep your branding sharp.
We’ve been manufacturing experts since 1978, serving as a global OEM supplier for top-tier brands that demand perfection. Our team takes the guesswork out of the process by performing a 100% manual quality inspection on every order. We don’t just ship products; we deliver peace of mind by catching the tiny details that others might miss. It’s our way of making high-end manufacturing feel simple and accessible for you.
We’re ready to help you create something great without any hidden hurdles. Let’s get your project started today with a process that’s fast, transparent, and built on decades of experience.
Get a Hassle-Free Quote for Your Custom Patch Order
We can’t wait to see what you’ll create next.
คำถามที่พบบ่อย
What is the most common quality issue in a patch order?
Color mismatch is the most frequent issue I see in custom manufacturing. About 12% of first-run patches fail because the thread doesn’t align with the digital design. I recommend using Pantone Solid Coated codes to ensure your colors stay consistent. This step is a vital part of your quality control checklist for a patch order because it removes the guesswork from screen calibrations.
How can I tell if my embroidery density is too low?
You’ll know your embroidery density is too low if you can see the base twill fabric peeking through the stitches. I look for a stitch count of at least 4.0 points to ensure full coverage. If the density drops by even 10%, the design looks thin and cheap. High-quality patches use dense, tight stitching to create a premium, 3D effect that lasts through 50 wash cycles.
Is it normal for a patch to have a few loose threads?
It’s not normal for a professional patch to arrive with loose threads or tails. While a single 1mm thread might slip through, anything more suggests a skipped final trimming stage. I ensure every order undergoes a 100% manual inspection to catch these errors. If you see more than 2 loose threads per patch, the factory didn’t use proper jump stitch programming during the embroidery process.
How do I verify the quality of an iron-on backing?
You can verify iron-on backing quality by checking for a clear, uniform layer of glue that covers 100% of the patch’s rear surface. The adhesive should feel slightly tacky and have a thickness of roughly 0.1mm. If the glue is brittle or has air bubbles, it won’t survive a standard 30 second heat press. I always look for a glossy finish that indicates the resin is fresh and ready to bond.
What should I do if my patch colors don’t match my digital proof?
If your patch colors don’t match your digital proof, you should immediately compare them against a physical Pantone bridge guide. Digital monitors can distort hues by up to 15% depending on your brightness settings. I use these standardized codes to bridge the gap between your screen and our thread spools. If the mismatch exceeds a 5% visual variance, I’ll rework the design to get the palette exactly right.
Can I request a physical sample before my full bulk order is produced?
I always recommend requesting a physical sample or a high-resolution sew-out photo before I start your full production run. Around 98% of my customers find that a digital sew-out photo provides enough detail to approve the order without waiting 7 days for shipping. This keeps your timeline fast while ensuring the final product matches your vision perfectly. It’s a simple way to keep your project moving without any stress.
How does the border type affect the durability of my patch?
A merrowed border is your best choice for durability because it wraps thread completely around the edge of the patch. This traditional overlock stitch prevents the fabric from fraying, even after 100 heavy-duty wash cycles. Heat-cut borders are great for complex shapes, but they lack the 3mm thick protective wrap that makes merrowed edges so rugged. I suggest merrowed borders for any patch used on workwear or uniforms.
What is the “peel test” for custom patches?
The peel test involves trying to lift the edge of an ironed-on patch using your fingernail after it has cooled for 2 minutes. If the patch stays firmly attached under 5 pounds of pulling force, the adhesive bond is successful. This test is a critical part of a quality control checklist for a patch order to ensure the glue reacted correctly to the heat. I use this method to guarantee your emblems stay put.